EMAIL SUPPORT
dclessons@dclessons.comLOCATION
USViptela Onboarding & Provisioning
As we know that, as network becomes larger and larger, Enterprise needs to reduce the provisioning and Onboarding.
Cisco SD-WAN Solution, Simplifies onboarding & Provisioning of a device. WAN Edge device support below mechanism to Automatically bring the device online in to SDWAN fabric.
- PNP
- Zero Touch Provisioning
In these method, Network Admin, preconfigures the device within vManage Controller, and once vManage controller sees the device, it automatically applies the configuration on Edges. WAN Edges can directly ship to location, and it does not require initial configuration. Once physically installed on remote site, Edge device will automatically locate the vManage controller and begin the Provisioning process.
Summary of Events:
Below are the summery of events that occurs to bring up Cisco Viptela device. To bring up the Cisco Viptela hardware and software components in a Viptela Overlay network, all Viptela components must be connected and reachable to each other via any transport Network which includes Internet, MPLS, etc.
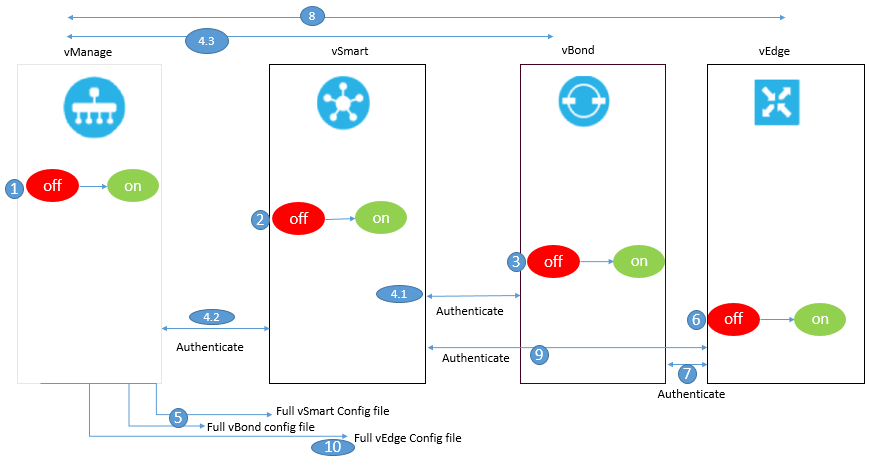
- The vManage NMS software get started on an ESXi or KVM server in the data center.
- The vBond orchestrator get started on an ESXi or KVM server in the DMZ.
- The vSmart controller get started on an ESXi or KVM server in the data center.
- At first the vManage NMS and the vBond orchestrator authenticate each other, their after vManage NMS and the vSmart controller authenticate each other, and then the vSmart controller and the vBond orchestrator authenticate each other.
- The vManage NMS sends configurations to the vSmart Controller and vBond devices.
- The vEdge routers deployed and get started in the network.
- The vEdge routers authenticate with the vBond orchestrator.
- The vEdge routers authenticate with the vManage NMS.
- The vEdge routers authenticate with the vSmart controller.
Once vEdge is authenticated to all SD-WAN component, the vManage NMS sends configurations to the vEdge routers
Configuration Template
There are two ways by which Configuration template can be applied in Cisco SDWAN Solution. Network Admin can apply configuration via CLI or by using vmanage GUI (Preferred method). Configuration provisioned on vmanage can be applied to both WAN and vSmart controllers.
When we apply configuration via vmanage GUI, Network admin will use device template to apply configuration on either single device or Multiple Devices. These device template can be either CLI based, or Feature template based.
Feature Template defines what specific feature, network admin want to enable or configure such as Routing protocols, Interface Parameters, OMP etc. These feature template can be reused between multiple device templates.
A large number of Feature template options are available:
- System: used to configure basic system information such as System IP, Site-ID, Hostname.
- BFD: used to adjust BFD timers, app-route multipliers for each transport or color.
- OMP: Change graceful restart timers or control redistribution from other routing protocols in to OMP.
- Security: Change IPSec Security setting such as anti-reply, authentication, and encryption.
- VPN: Used to define Service VPN, Routing protocol redistribution or static Routing.
- BGP: used to configure BGP in a VPN or VRF.
- OSPF: used to configure OSPF in a VPN or VRF.
- VPN Interface: Used to define an interface that is part of Service VPN or VRF.
When a feature template is defined, It will then referenced by Device Template. Feature template can be device type agnostic as well. Network Admin defines the intent of configuration and vManage applies this intent to a specific device, be it Cisco IOS based or Viptela OS based, vManage will apply the correct device syntax.
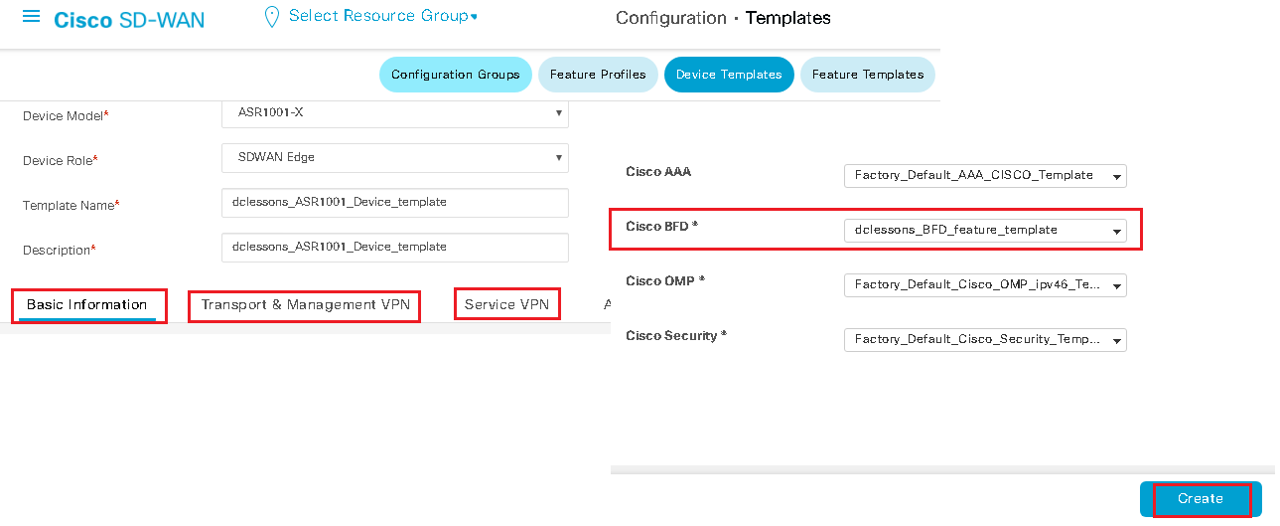
Device Template are collection of feature template and can only be applied to specific device types. Due to which you may have different Device Template for same model of hardware , depending upon device location , connectivity options. A device template cannot be shared across different device types. Below four main parts or groups of a device template.
- Basic Information: It includes items like System, Logging, AAA, BFD, OMP feature template.
- Transport and Management VPN: It contains information and configuration of VPN 0 and VPN 512.
- Service VPN: In this section, Configuration related to Service VPN or LAN facing template will exits. Here only OSPF, BGP parameters are configured.
- Additional Template: Used for Local Policies, Security Policies, SNMP configuration templates etc .
Below figure explains the Device template Structure.

There are three types of values defined in template.
- Default: factory default value, and it cannot be changed.
- Global: Value defined here, will be same everywhere, wherever this configuration is used.
- Device Specific: this value is set via a user-defined variable.
Configuring & Deploying Templates
Template configuration is done on vManage GUI. Once installation of vManage is done, some default template are created. These templates can also be used as starting point, or new templates can also be created.
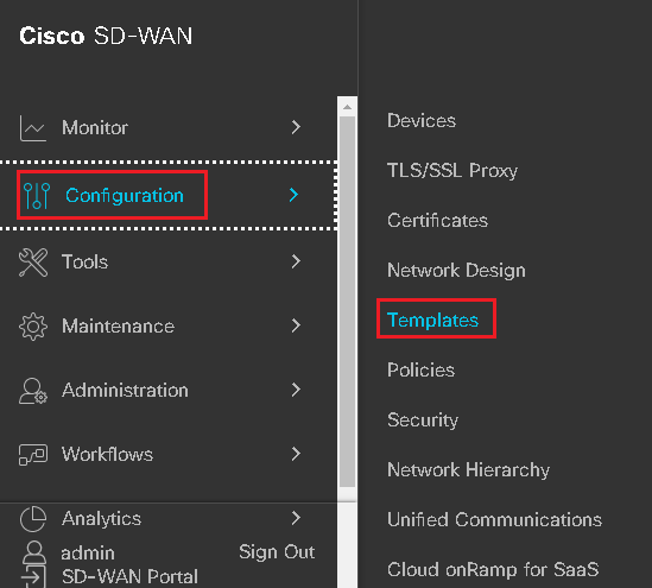
In order to create a template, navigate to Configuration | Template
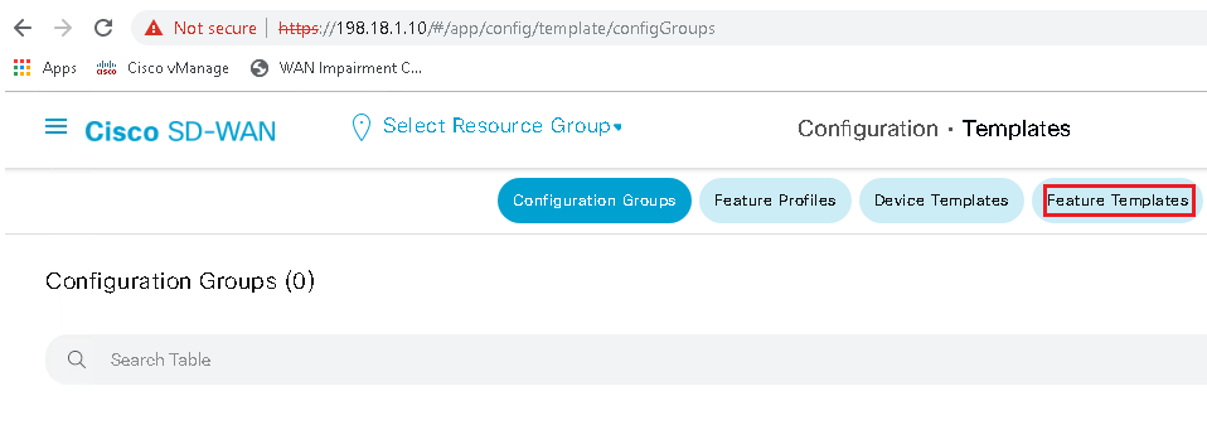
At template Configuration window | You will get both option Device template and feature Template
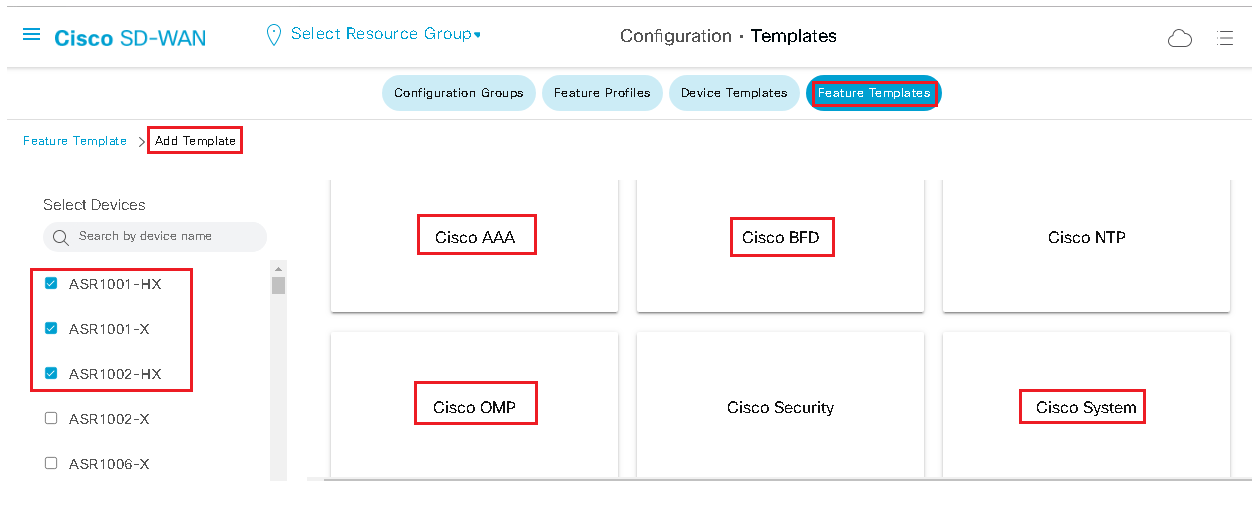
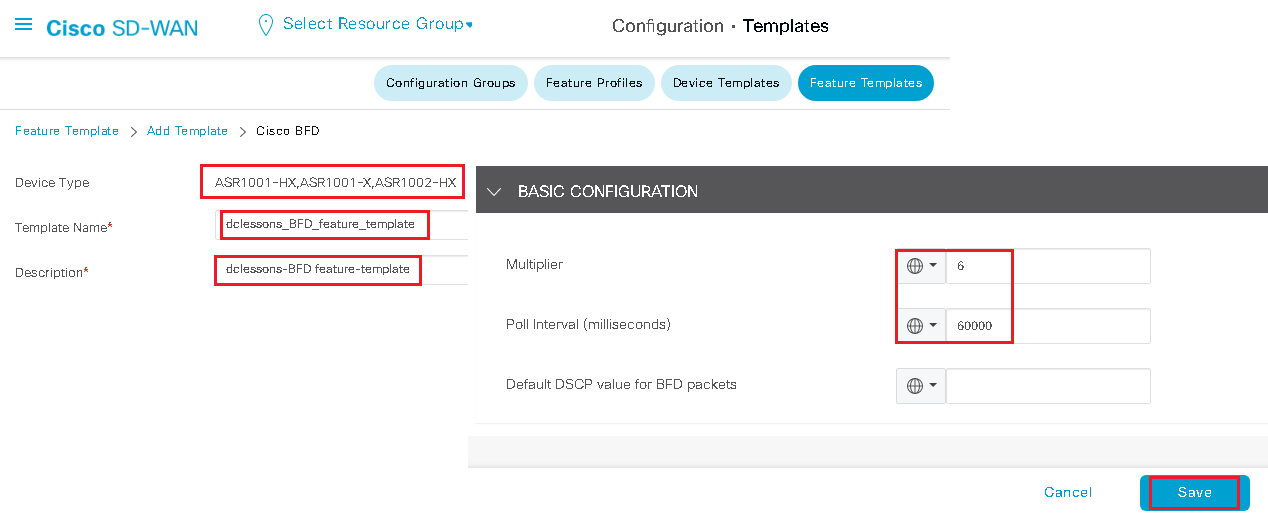
Start with creating feature template | Select Feature Template | Add Template | Select the devices that this template will apply to | Select type of template.
Now put the values for which you have selected the Type of template as shown in below figure. These values can be either variables, global parameters, or default parameter | Click Save
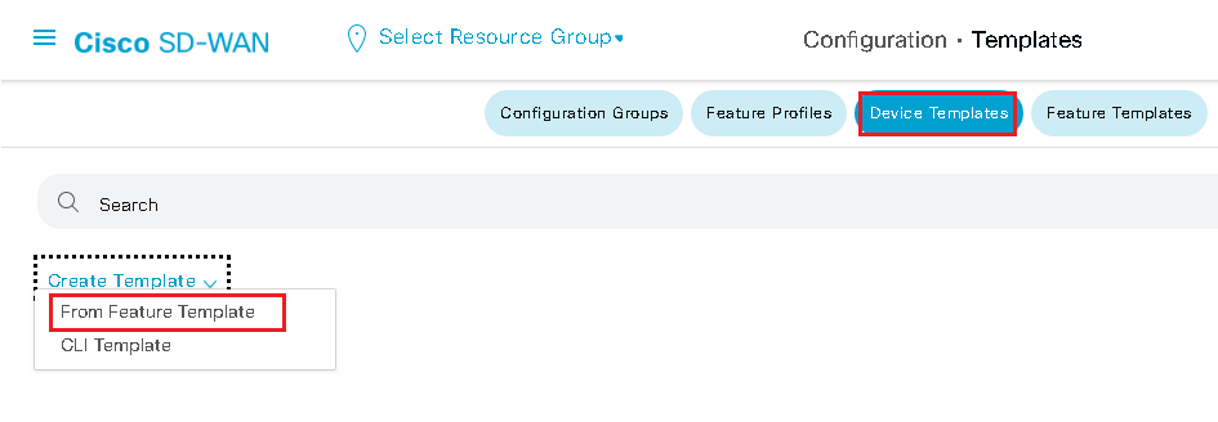
Now feature template has been created, we need to attach it to device template. Click Device | Click template | Select from feature template
Once Feature template is selected | Select the Device Model, to which this template is applied to | Provide the name of the template. | Click Save
Now Once Device template is ready and created, it can be attached to device | From the Device template page | Click on ellipses option next to template | Select the Option to Attach Devices
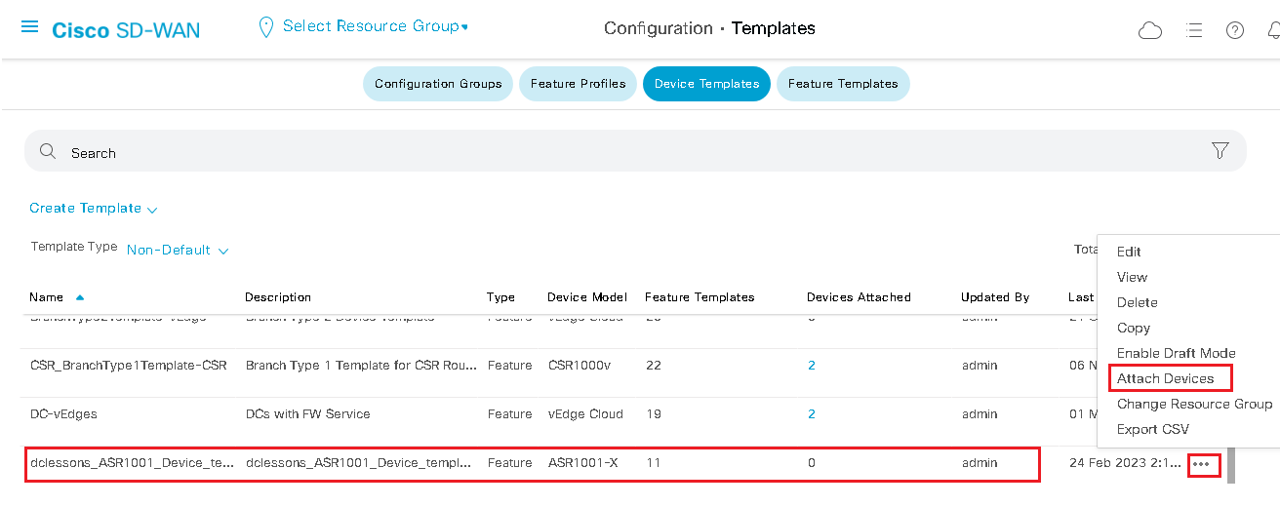
Once Device is selected | Click Attach
Onboarding Devices
In Order to Join WAN fabric, WAN Edge will first establish the connectivity to vBond Controller. vBond Controller facilitates discovery of vManage and vSmart Controller. As WAN Edge establishes connectivity to each of these controller, mutual authentication will occur. Once WAN Edge authentication is done from Controller, Edge device will receive its full configuration from vManage. There are two methods to bootstrap a device with initial configuration so that it can reach to vBond.
- First method: Manually Apply the Minimal Configuration to device (Minimal Preferred)
- Second method: Automatically discovering the network using the ZTP or Plug & Play (PNP).
If device uses Viptela OS it will use ZTP and if the device is IOS XE, it uses PNP method.
Manual Boot Strapping of WAN Edge
Network Admin will configure minimum configuration to the device, includes IP address, vBond Address (Either DNS name or IP), System Identification information. This information is used to establish initial connectivity and authentication. Let’s see the Process
Step 1. Configure an IP address and default gateway. If DHCP is available, this can be used to assign the IP and gateway automatically.
Step 2. Configure the vBond IP or hostname. If you are using a hostname, then a DNS server address must be provided, and the device must have reachability from VPN 0.
Step 3. Configure device identification information, including the system IP, site ID, and organization name.
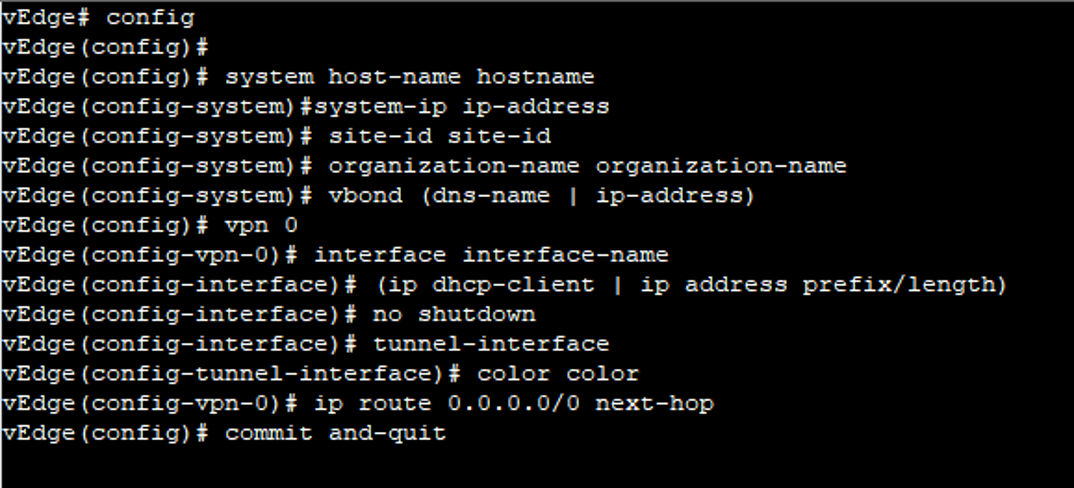
Minimal Configuration for Viptela OS based device
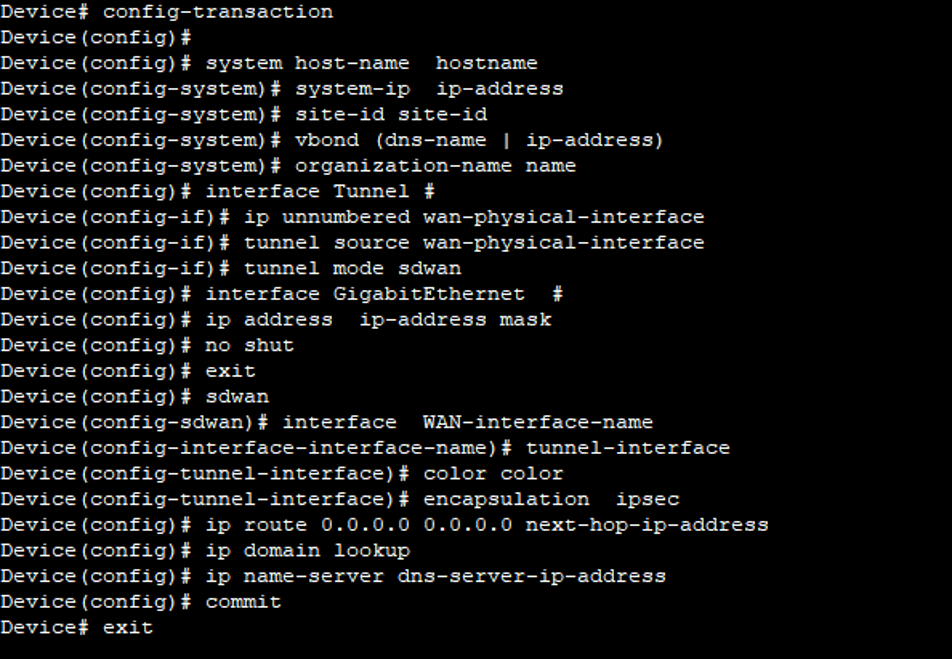
Minimum Configuration for IOS-XE based device
User Input for ZTP Automatic Authentication Process:
When the vSmart controller and vBond knows the serial number and chassis number of devices then only the automatic validation and authentication of Viptela devices happens during bring up process
Serial Number: It is 40 Byte number included in device certificate, for vBond and vSmart the certificate can be provided either by semantic or enterprise root CA. For vEdge routers the certificate is provided in hardware trusted board Id Chip.
Chassis Number: Each vEdge router has also Chassis number, and due to its unique Manufacture, it has one to one mapping between vEdge router Serial number and Chassis number.
The Serial number and Chassis number of is learnt by vSmart and vBond during initial configuration of these devices.
Along with Serial and Chassis number which is required for validation and authentication, same and unique organization name (case-sensitive) must also be required. This name can be configured in vManage NMS and is included in configuration file on all devices.
This organization name is also included in the certificate for each device which is created either by Viptela or by an enterprise root CA.

Comment
-
JD
I have subscribed for the onboarding and provisioning configuring course by DClesson. I am thrilled that I have done this course. This is easy to understand & offers quality content focused on networking. Their pricing is very transparent and matches the quality of courses. Also, courses are beginner-friendly.
-
RO
DClesson onboarding and provisioning configuring is a very detailed course available in the market. It is very well written, easy to navigate, and works smoothly with no technical issues. Professional service with higher education study materials. Flexible learning timetables. Very well-planned course.
TABLE OF CONTENTS
- Onboarding & Provisioning Configuring Templates
- Authentication between vSmart & vBond
- Authentication between vSmart Controller
- Authentication between vBond & vEdge Router
- Authentication between vEdge Router & vManage NMS
- Authentication between vSmart Controller & vEdge Router
- Viptela Specific Port Terminology
- Deploy & Configure vManage & Generate Certificate
- Deploy & Configure vBond & Generate Certificate
- Deploy & Configure vSmart & Generate Certificate
- Configure vEdge & Generate Certificate
- SDWAN & NAT
- Secure DataPlane Bringup
- Enterprise CA for SDWAN Instances
- ZTP Process & PnP Overview
- Control Plane & Data Plane Operation - Unicast Routing Overview
- Configuring OMP & Its attributes
- Configure Unicast Overlay Routing
- Routing Configuration Example
- Segmentation Overview
- Configuring Segmentation
- Segmentation Configuration Example
- Data Traffic across Private WANs
- NAT in SDWAN & Data Encryption
- SD-WAN Viptela Policy Overview
- SD-WAN Centralized & Localized Control Policy Overview
- SD-WAN Centralized & Localized Data Policy
- Service Chaining
- Traffic Flow Monitoring
- vEdge Router as NAT Device
- Zone Based Firewalls
- Configure Centralized Control Policy
- Configuring Centralized Data Policy
- Configuring Cflowd Traffic Monitoring
- Configuring Zone based Firewall
- Service Chaining Configuration Example
- Configuring Service Side NAT
- Configuring Transport side NAT
- Control Policy Example 1: Hierarchical Topology
- Multi-Region Fabric
- Control Policy Example 2: Implementing Traffic Engineering
- Control Policy Example 2: Dynamic On-Demand Tunnels
- LAB Deploy Cisco SD-WAN Edge Routers
- LAB Deploy SDWAN Controllers
- LAB Deploy Cisco SD-WAN Devices Using Configuration Group
- LAB Implement Service-Side Routing Protocols
- LAB Implement TLOC Extensions
- LAB Implement Control Policies
- LAB Implement Data Policies
- LAB Implement Application-Aware Routing
- LAB Implement Branch and Regional Internet Breakouts
- LAB Migrate Branch Sites
RECENT POSTS
- Installing Context-Aware Network Access Control using Cisco ISE Policies
- Designing Network Access Control that is Scalable using Cisco ISE Architecture
- Enterprise Network Access Control and Policy Enforcement using Cisco ISE
- Secure Device Administration and Network Access Using AAA Architecture
- Designing Enterprise-Class Hybrid Cloud Connectivity Using AWS Networking Services
- Exploring Core AWS Networking and Messaging Concepts for Modern Cloud Architectures
- Understanding Key AWS Services for Modern Cloud Architectures
- Building a Strong AWS Foundation with Amazon S3, EC2, and Virtual Private Cloud
- Understanding the ENSDWI Course: Advanced Cisco SD-WAN (Viptela) Concepts
- A Complete Guide to the DCACI-A Course: Mastering Advanced Cisco ACI Concepts


LEAVE A COMMENT
Please login here to comment.