EMAIL SUPPORT
dclessons@dclessons.comLOCATION
USLAB UCS End to End LAB With Service Profile & Template
Task :
Provision the ESXi host on UCS System via Service Profile to build VMware Infrastructure for VMs.
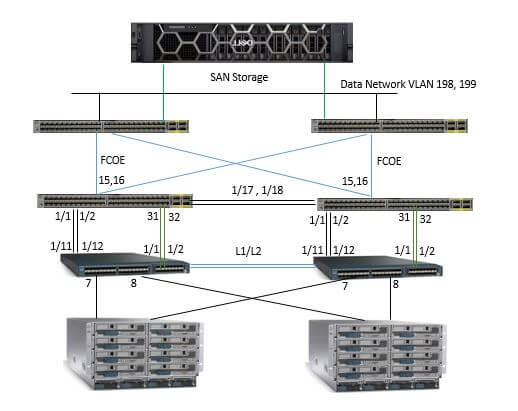
Topology
Refer below topology to configure UCS System
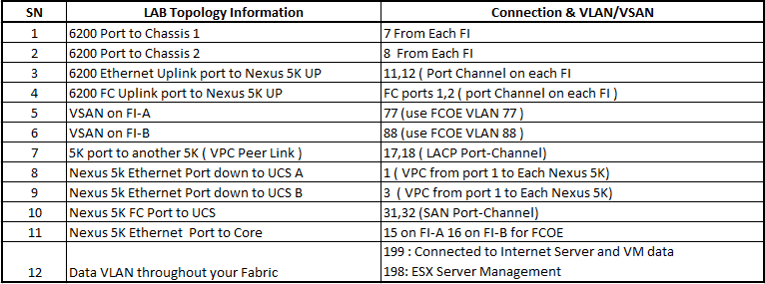
Refer Below chart to Understand the Topology requirement
Refer below chart for FI IP Information

EMC Port WWPN'S (For SAN Boot Info)

UCS Server UUID, MAC, WWNN, WWPN,

Solution:
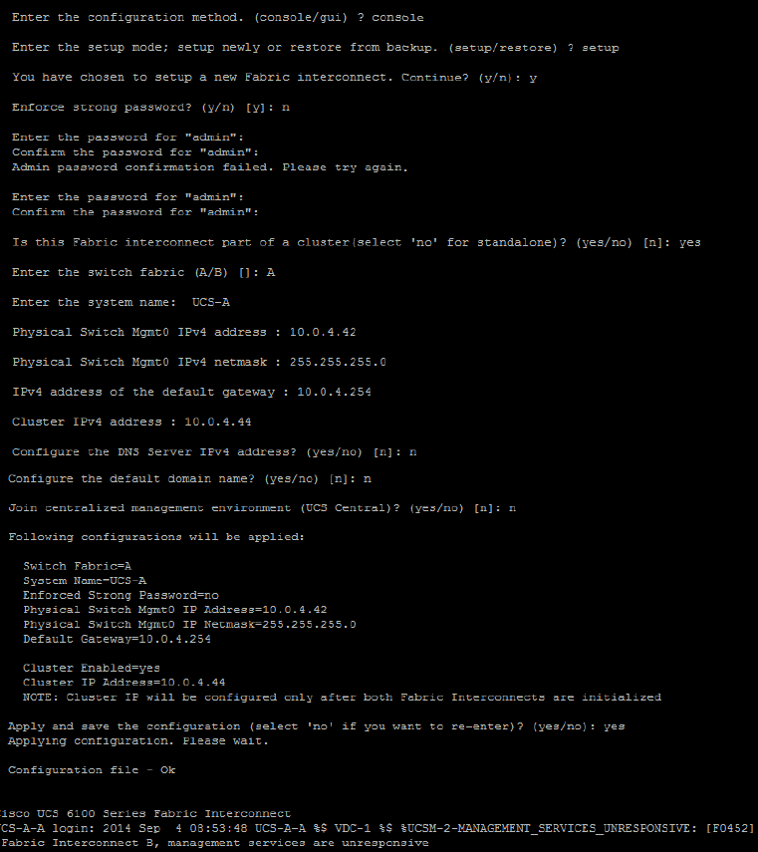
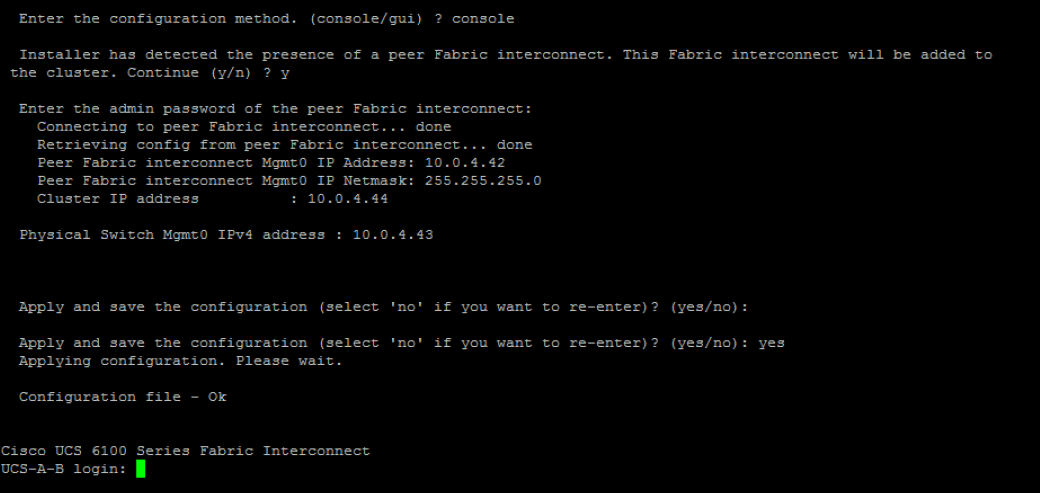
Task 1: Do initial setup of UCS Fabric Interconnects
Fabric A:
//you may have to hit return to see the first prompt
Fabric B:
Task 2: Set Up UCS Connections to Chassis and Verify Chassis and Blade Server Discovery
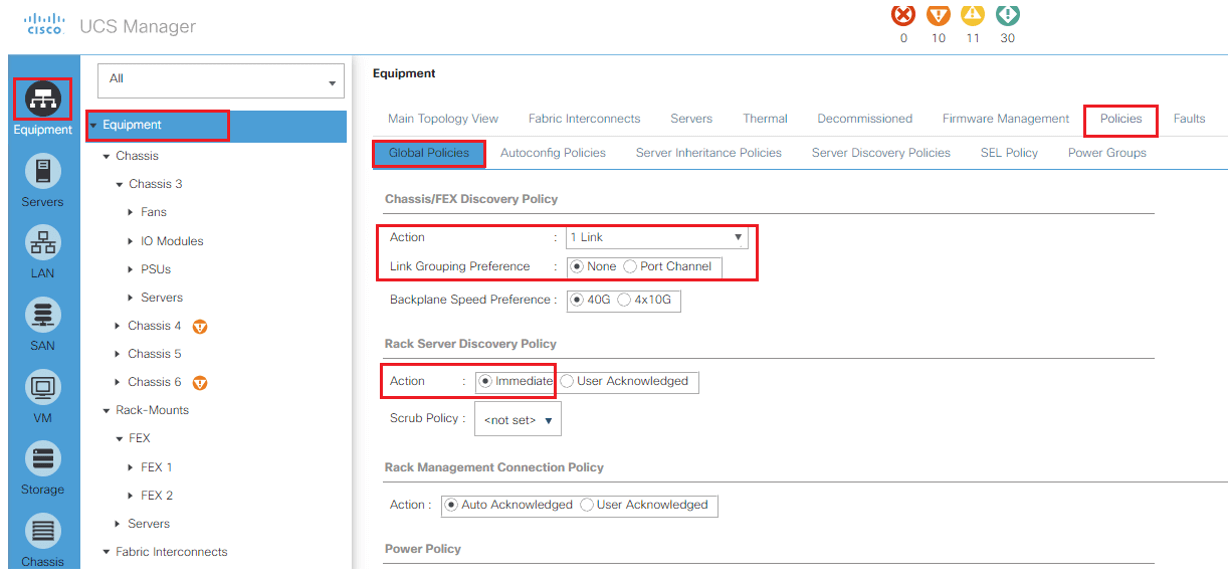
- Access the UCS GUI from the remote desktop.
- Verify that the discovery policy is “1-link” (this means that servers in a chassis will be discovered after the first link down to that chassis is configured.
Task 3:- Configure the server ports and uplink ports , Set up FC (SAN) Port Channel Configuration on UCS (up to NEXUS)
- Identify fabric A built-in ports 7 and 8 as server ports. This will cause discovery of the two chassis and blades within.
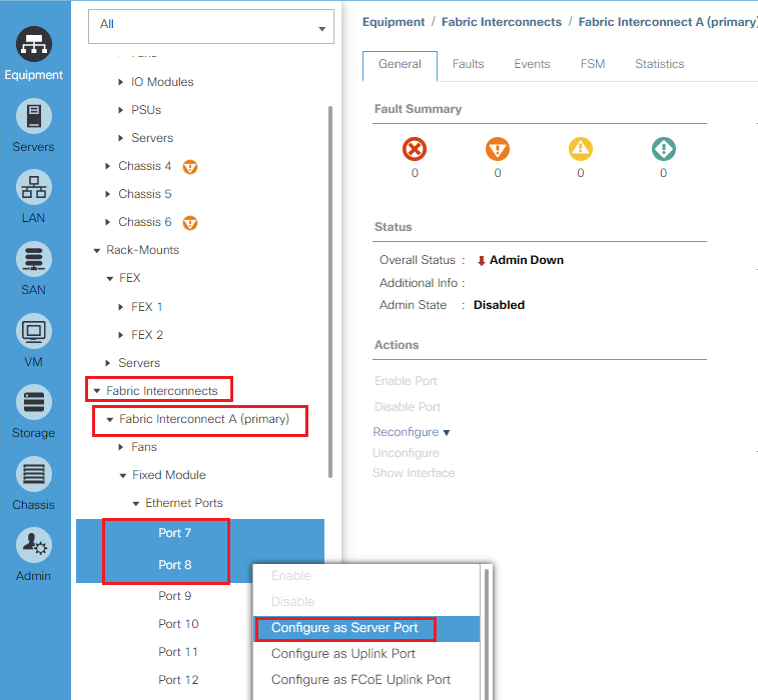
- Identify fabric B built-in ports 7 and 8 as server ports to the other fex of the same two chassis.
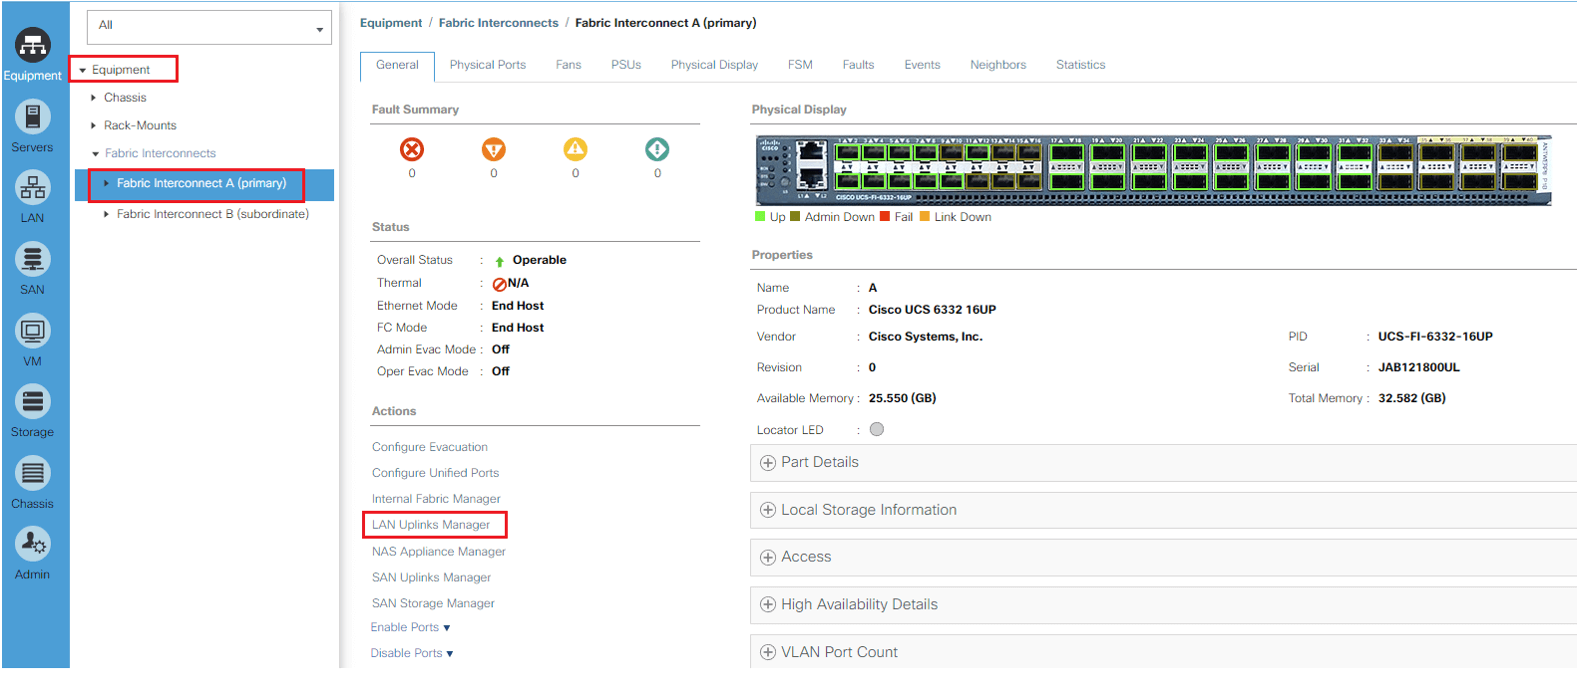
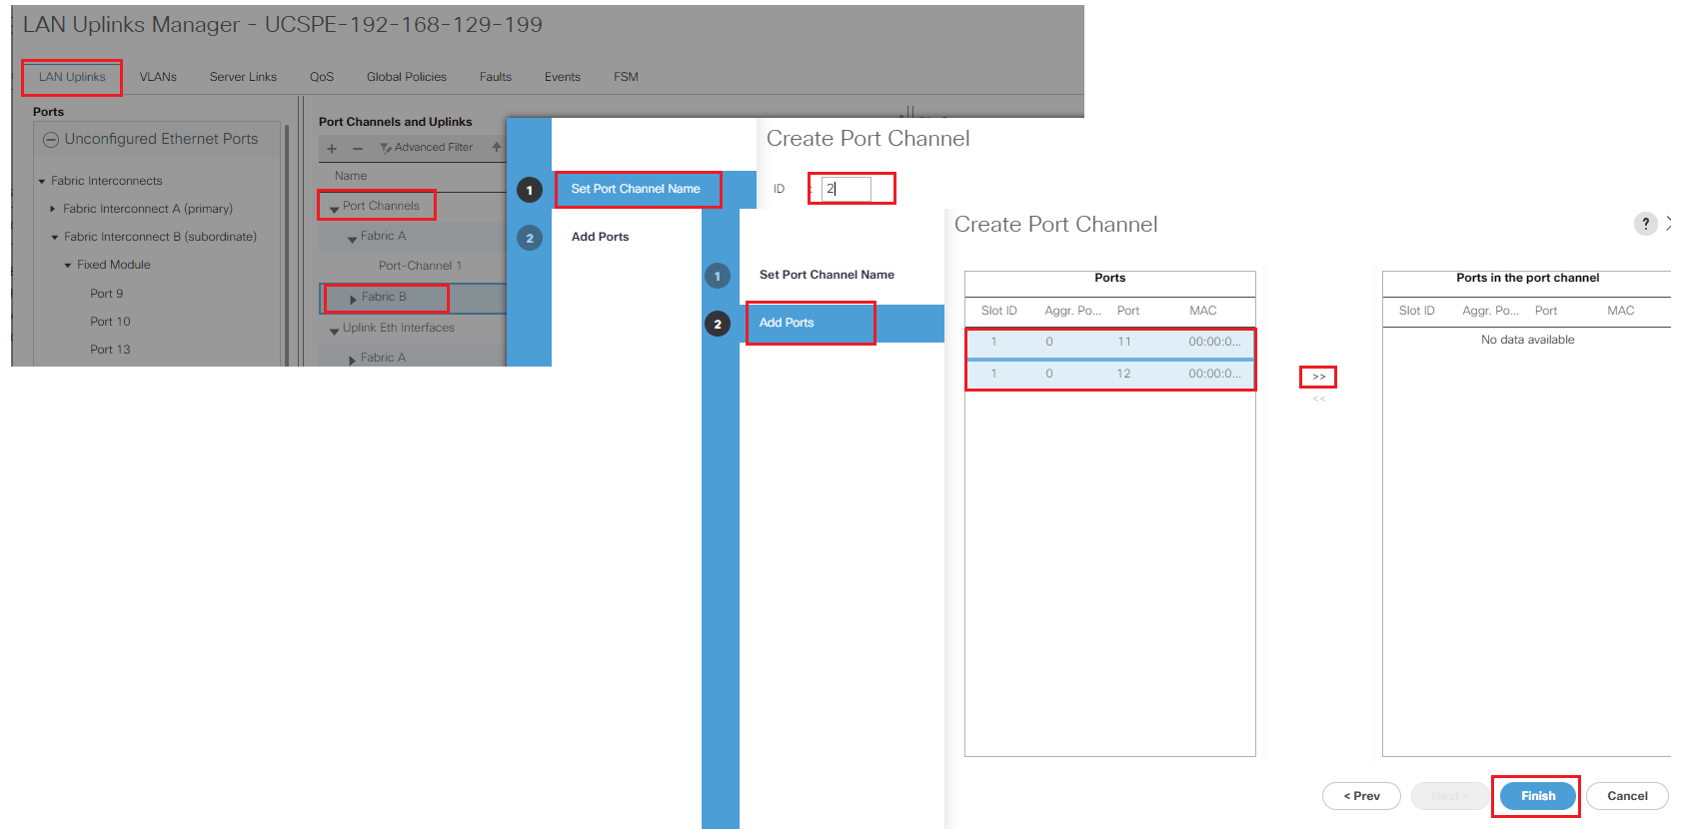
- Verify and enable a single port-channel on Fabric A using UCS ports 11 and 12.
- Got to FI –A, Select the LAN Uplink Manager | Select Port 11,12 and Configure them as Uplink port.
- Select the Port –channel | Select ID 1 | Put the interface in part of port-channel
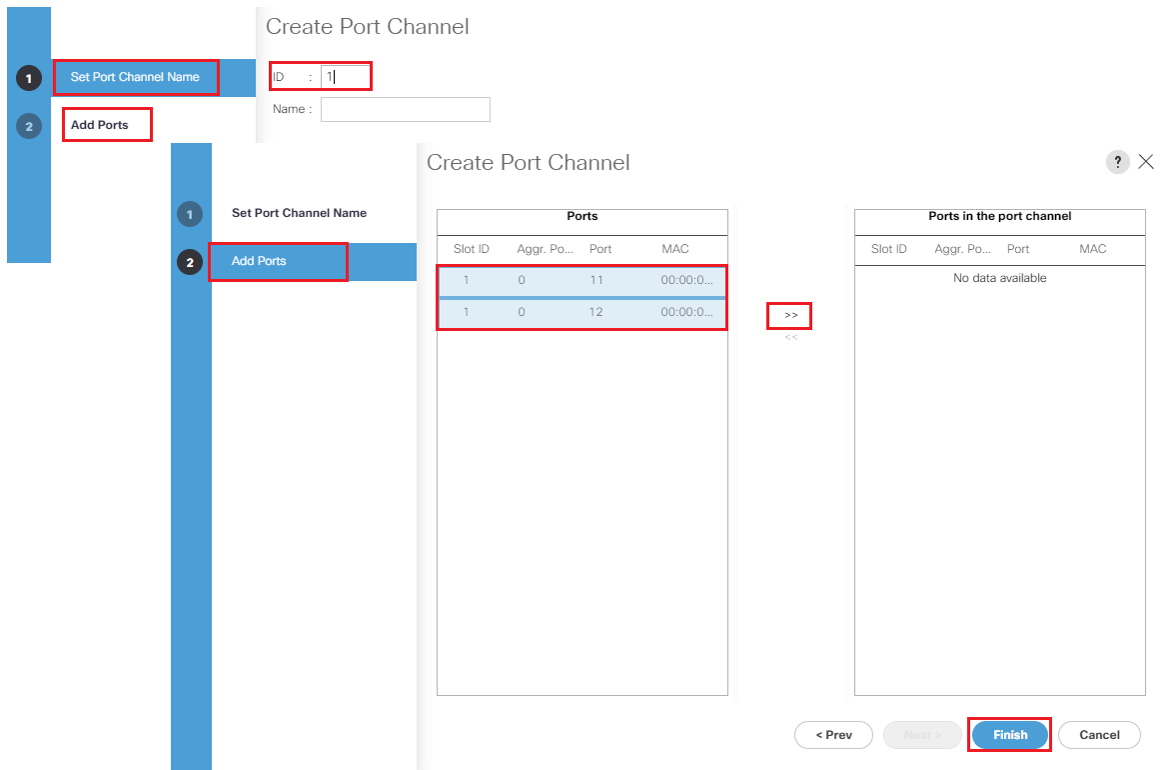
- Select Fabric B | Right Click to select: Create Port-Channel: Select the Port –channel | Select ID 2 | Put the interface 11, 12 in part of port-channel
- Verify that the port-channel and all member ports are up on UCS
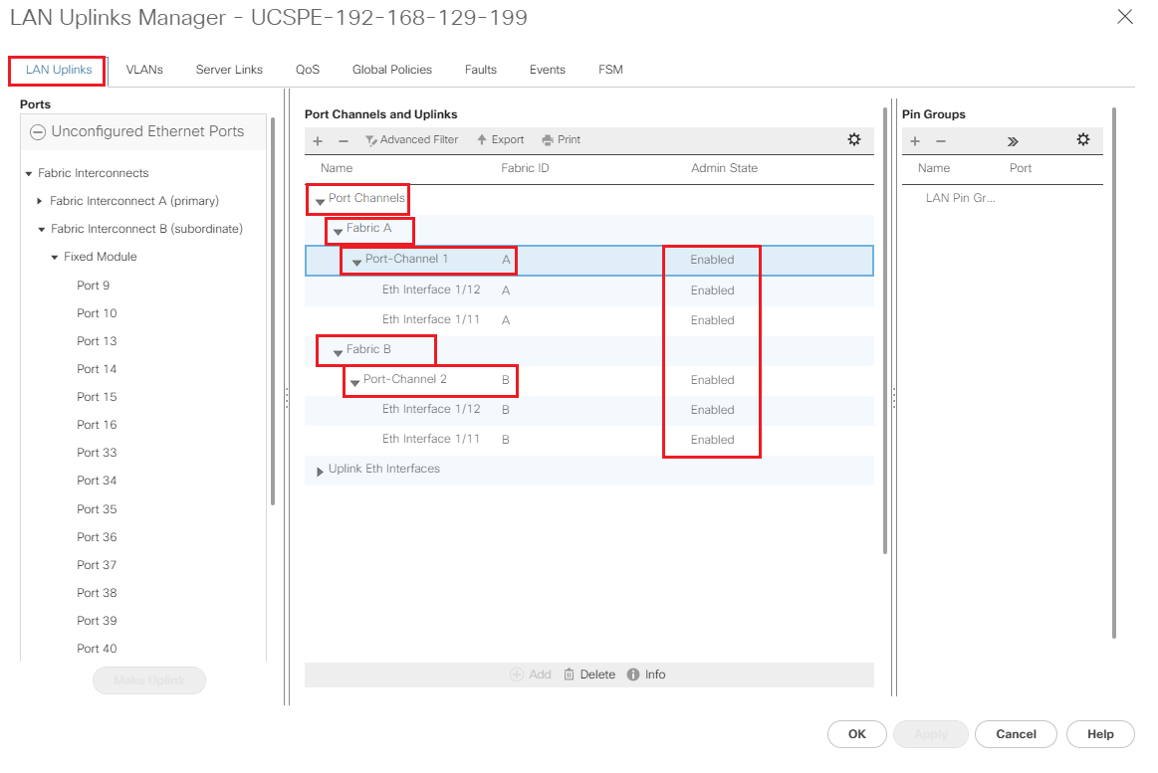
- Return to the 5548’s and verify that the corresponding port channels show that they are Connected.
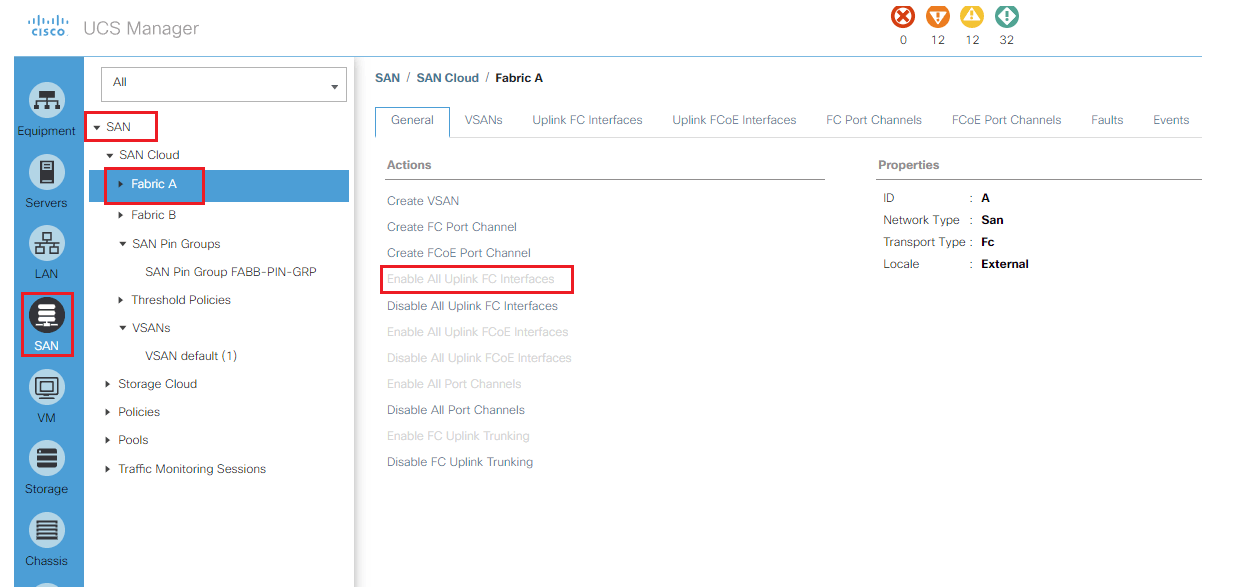
- Enable Uplink trunking on Fabric A and FI-B. Highlight Fabric A and enable FC Uplink Trunking as shown (ignore [ click Yes on] the warning you will get about this feature causing loss of access to higher number VSANs):
Repeat same step for FI-B also.
- Create a SAN port channel from FC ports 1 and 2 on fabric A. Under SAN | SAN Cloud: Fabric A: Select Create FC Port-Channel | Select ID 3 for FI-A, 4 for FI-B. Put the interface in part of port-channel
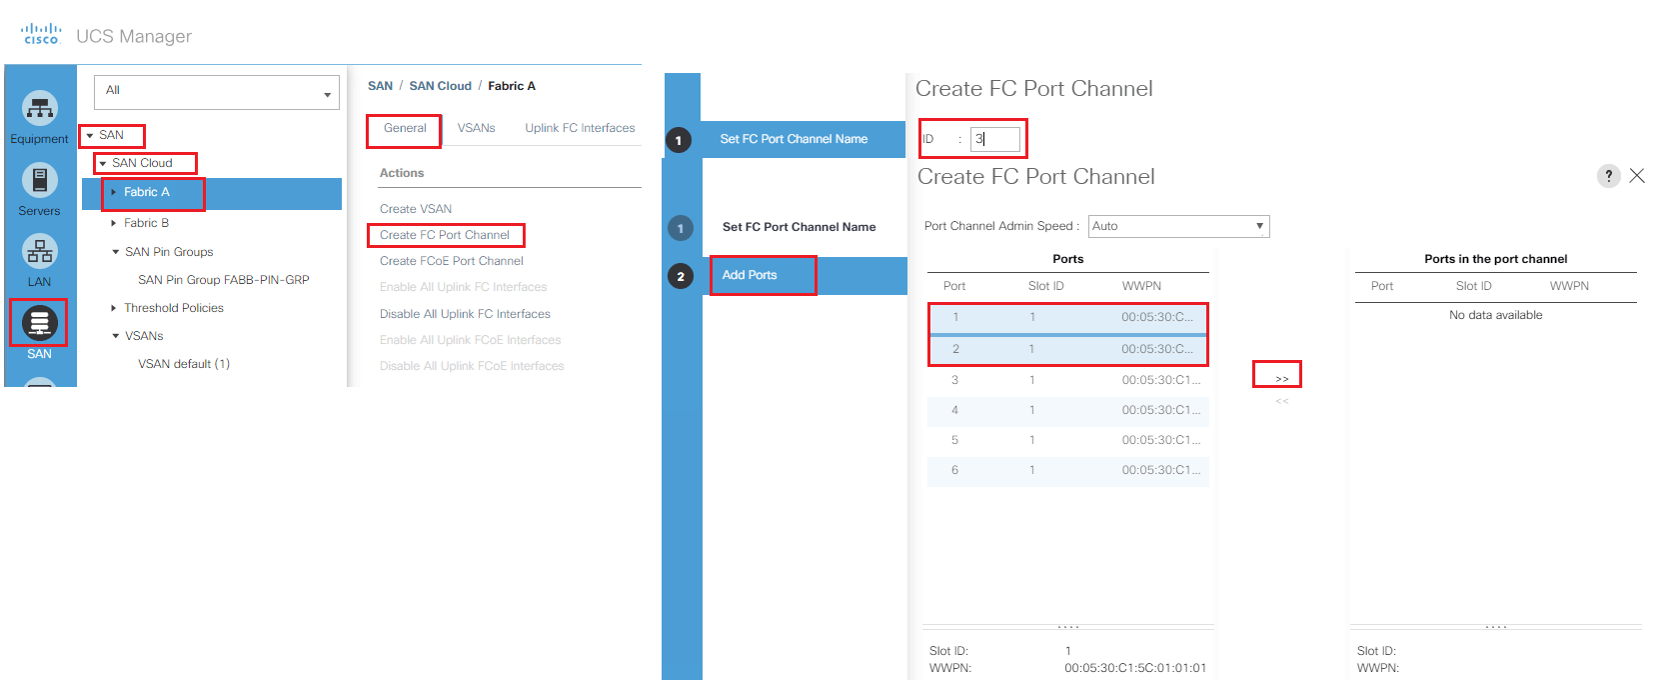
Repeat Same Step for FI-B
Verification:

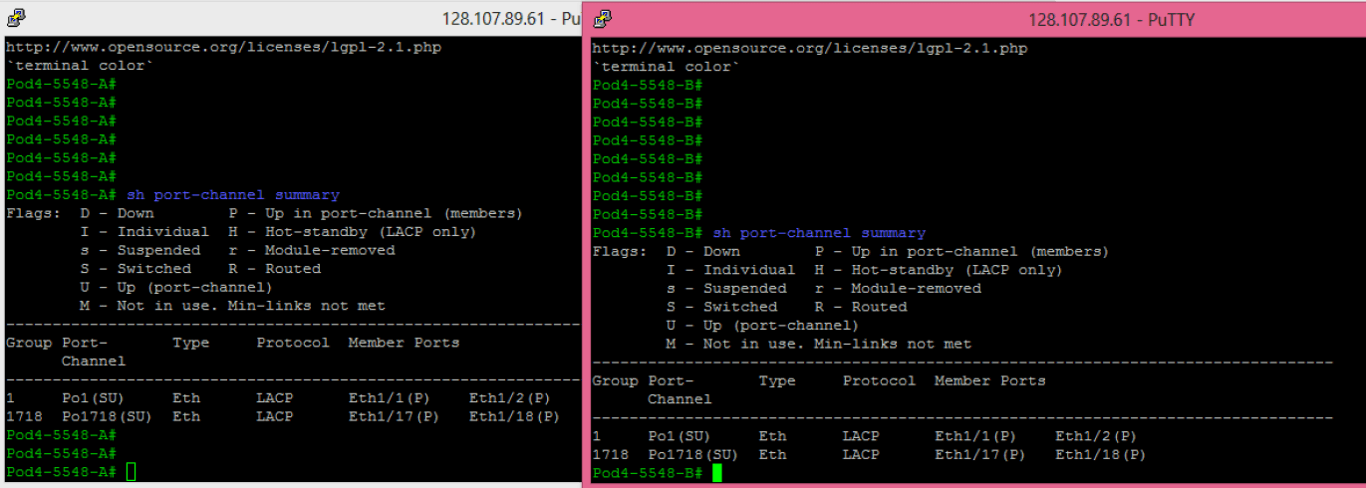
Bounce the port channel on the corresponding 5548 to make it all work.

The port channel should come up after a few seconds (try the “sh” below a couple of times): On the 5548 side:
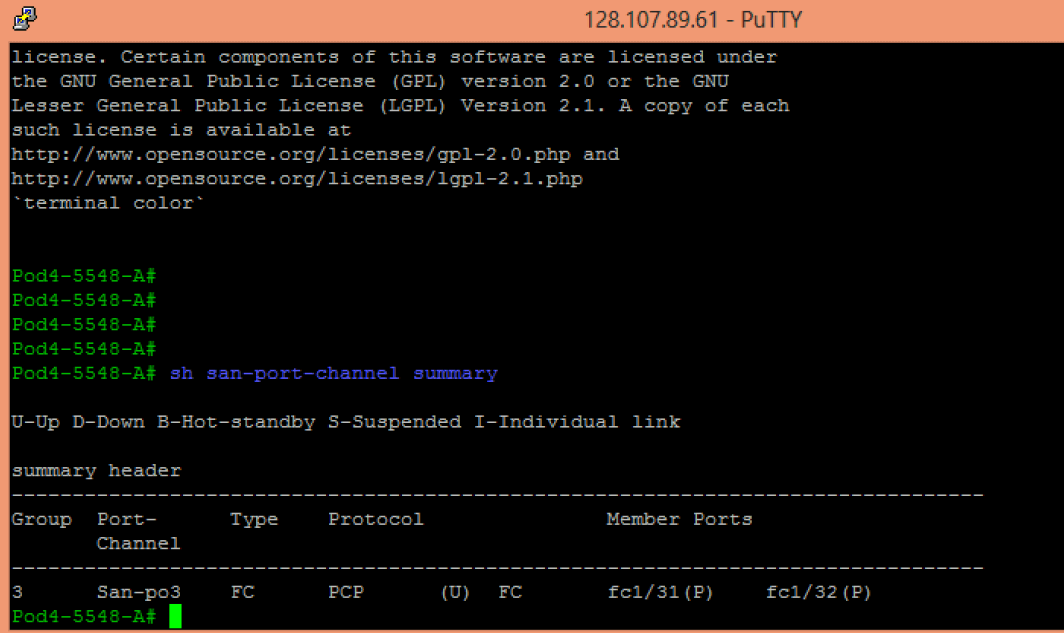
Check same for 5548-B.
Task 4:- Set up VLANs and VSANs on both FI’S
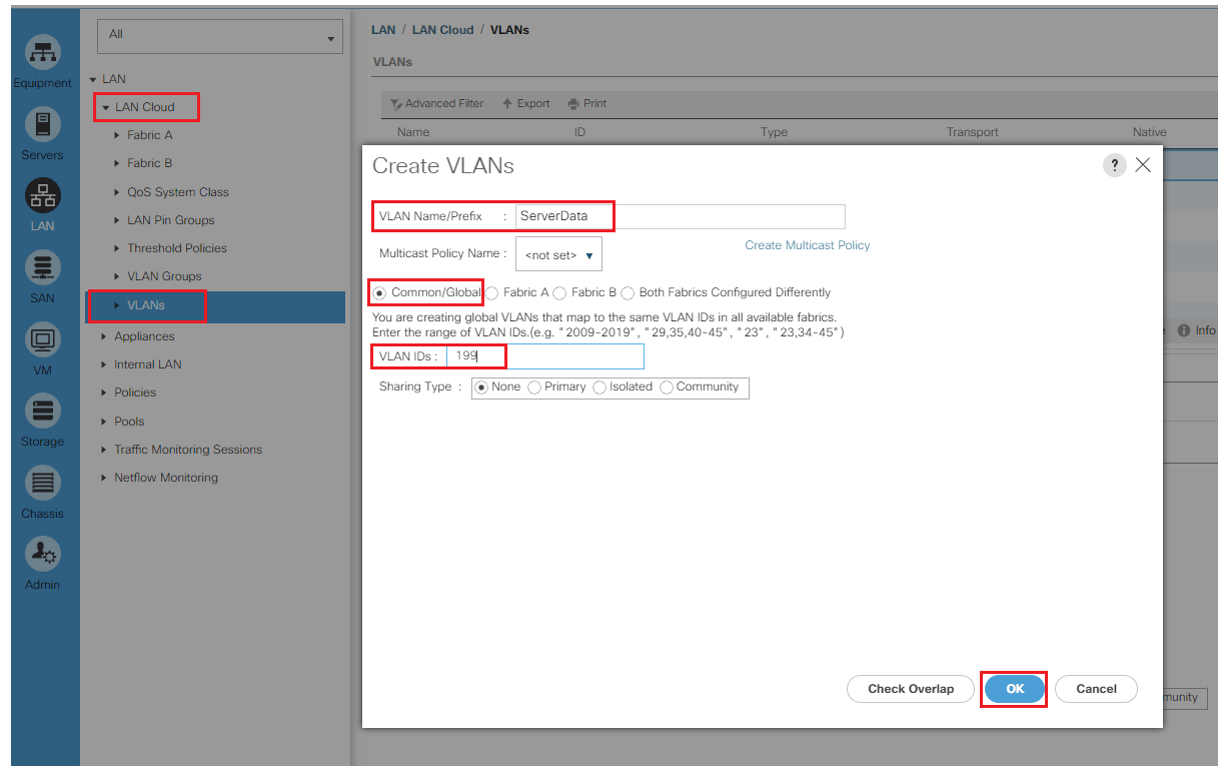
- Create a ServerData VLAN 199, ESXmgmt VLAN 198, and VMotion VLAN 932.
Go the the LAN tab | Highlight LAN CLOUD | Right-click and choose Create VLANs | Fill in the form like this: (make sure radio button set to Common/Global) | Click OK and confirm
Repeat steps 2-5 two more times for name/vlan combinations ESXmgmt (198) and VMotion (932). Make sure the radio button set to Common/Global.
Verification for VLAN Creation:

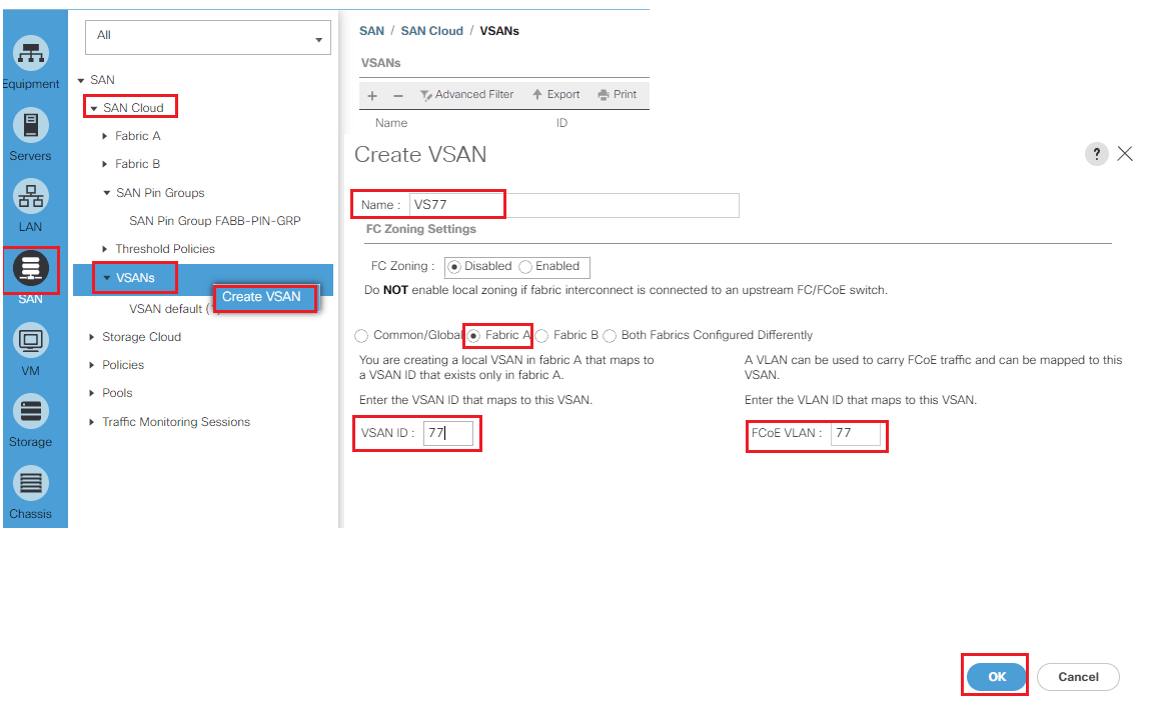
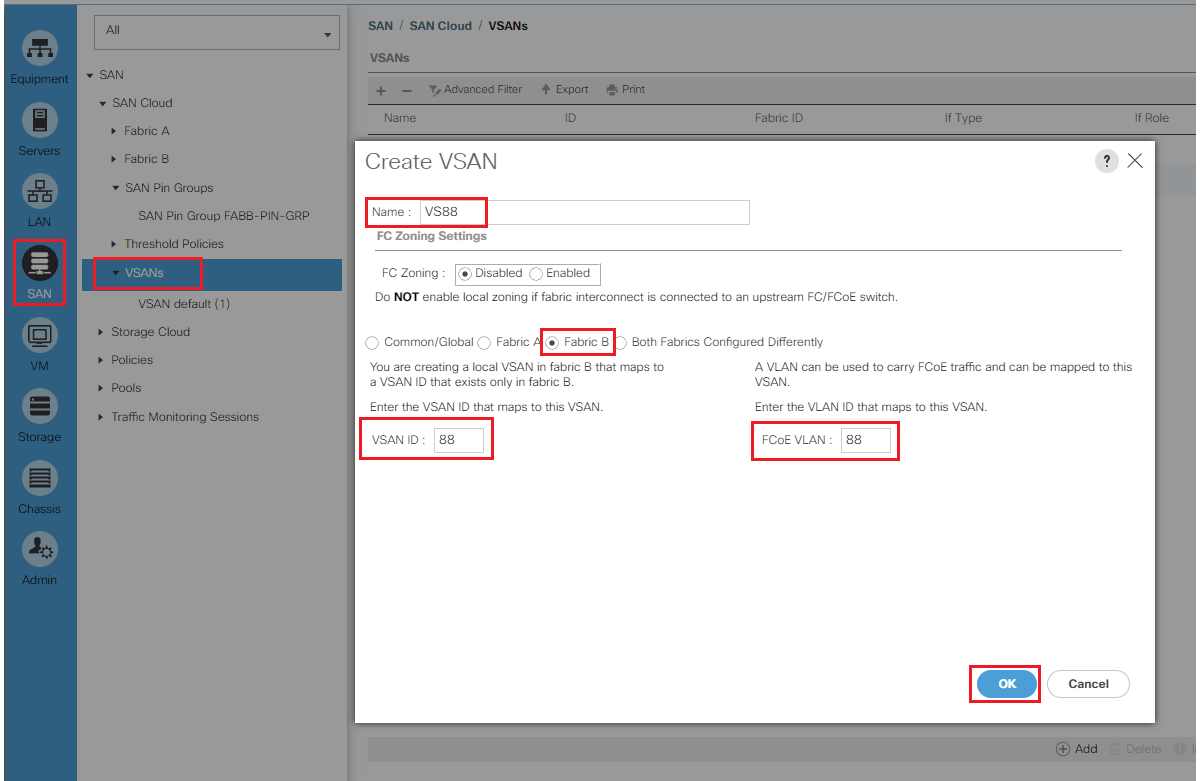
Create a VSAN 77 (use FCOE VLAN 77) on UCS Fabric A / Create a VSAN 88 (use FCOE VLAN 88) on UCS Fabric B. Create VSAN 77 (on FCOE VLAN 77) from the SAN tab as shown. Make sure you choose the radio button for Fabric A as shown (not Common/Global)
When your repeat the entire task on Fabric B use VSAN 88 on FCOE VLAN 88)
Task 5: - Cerate the UUID , WWNN, PWWN , MAC , IP address Pools
- Create WWNN Pools
- Create PWWN Pools
- Create Server pools
- Create MAC Pools
- Create IP Pools
Create UUID Pools
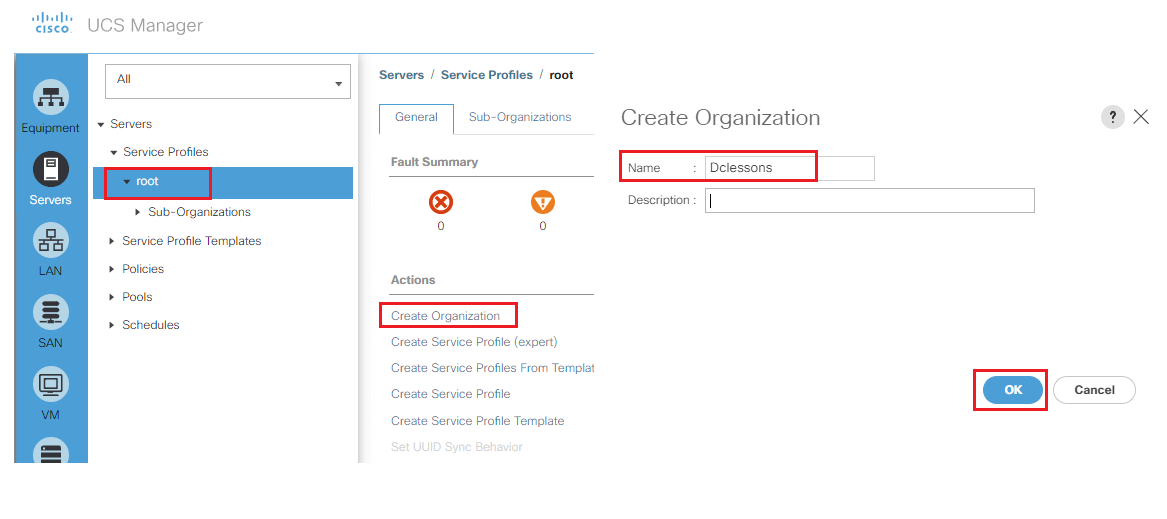
In UCS Manager, on the Servers tab, navigate to Service Profiles | root as shown and create an organization named Dclessons.
Navigate to: Pools | root | Sub-Organizations | Dclessons| UUID Suffix Pools | Highlight UUID Suffix Pools and right-click to create a pool.
On the popup, create a name dclessons-uuid Select the radio button Prefix: derived and click Next.

Comment
TABLE OF CONTENTS
- UCS LAN Connectivity
- LAB Ethernet Switching Mode, End Host Mode, and Uplink Configuration
- LAB Configuration VLAN
- LAB Configure Uplink Port-Channel
- LAB Configure LAN Pin Group
- LAB Configure Disjoint L2 Network
- LAB Configure LAN QOS Policies
- LAB Configure LAN QOS Policies for FCOE
- LAB Configure MAC Pools
- LAB Network Control LAN Policies
- LAB Configure vNIC Template
RECENT POSTS
- Installing Context-Aware Network Access Control using Cisco ISE Policies
- Designing Network Access Control that is Scalable using Cisco ISE Architecture
- Enterprise Network Access Control and Policy Enforcement using Cisco ISE
- Secure Device Administration and Network Access Using AAA Architecture
- Designing Enterprise-Class Hybrid Cloud Connectivity Using AWS Networking Services
- Exploring Core AWS Networking and Messaging Concepts for Modern Cloud Architectures
- Understanding Key AWS Services for Modern Cloud Architectures
- Building a Strong AWS Foundation with Amazon S3, EC2, and Virtual Private Cloud
- Understanding the ENSDWI Course: Advanced Cisco SD-WAN (Viptela) Concepts
- A Complete Guide to the DCACI-A Course: Mastering Advanced Cisco ACI Concepts


LEAVE A COMMENT
Please login here to comment.