EMAIL SUPPORT
dclessons@dclessons.comLOCATION
USLAB Configuring VPC
Once completing this exercise you can access the Amazon EC2 instance from Internet.
Task:
- Create the VPC
- Create a Security Group
- Launch an Instance into Your VPC
- Assign an Elastic IP Address to Your Instance
- Clean Up
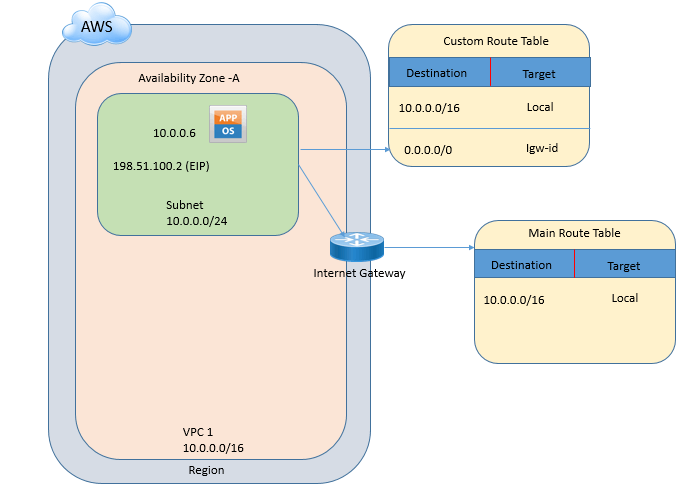
Step 1: Create the VPC
- Creates a VPC with a /16 IPv4 CIDR block (a network with 65,536 private IP addresses).
- Attaches an Internet gateway to the VPC
- Creates a size /24 IPv4 subnet (a range of 256 private IP addresses) in the VPC.
- Creates a custom route table, and associates it with your subnet, so that traffic can flow between the subnet and the Internet gateway.
Steps to be followed:
- Open the Amazon VPC console at https://console.aws.amazon.com/vpc/.
- In the navigation bar, on the top-right, take note of the region in which you'll be creating the VPC. Ensure that you continue working in the same region for the rest of this exercise, as you cannot launch an instance into your VPC from a different region.
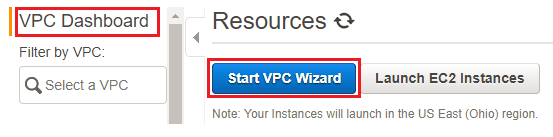
- In the navigation pane, choose VPC dashboard, and then choose Start VPC Wizard.
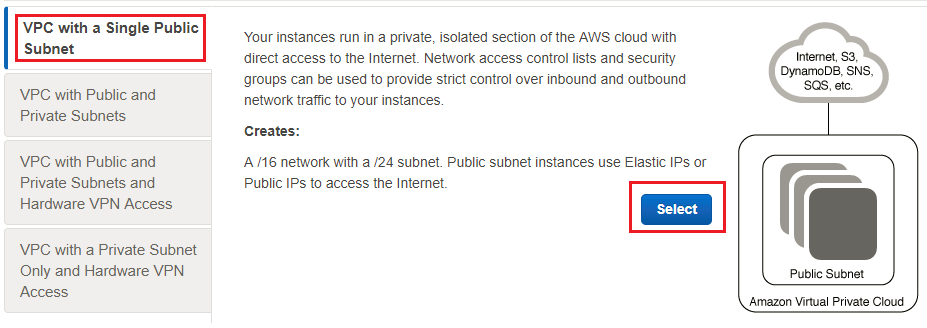
- Choose the first option, VPC with a Single Public Subnet, and then choose Select.
- On the configuration page, enter a name for your VPC in the VPC name field; for example, dclessons-vpc , and enter a name for your subnet in the Subnet name This helps you to identify the VPC and subnet in the Amazon VPC console after you've created them. For this exercise, you can leave the rest of the configuration settings on the page, and choose Create VPC.

Comment
You are will be the first.
TABLE OF CONTENTS
- Amazon S3- Basic Features
- Amazon S3 Advance Feature
- Amazon Glacier
- LAB Amazon Simple Storage Service
- LAB Setting up a Static Website
- LAB Enabling Versioning
- LAB Lifecycle Policy for S3 Bucket
- LAB: Create S3 Bucket & Upload Image & View Over browser
- LAB: Install AWS CLI
- LAB: Configure Lembda to upload an object in S3 Bucket
- Creating Custom VPC
- How to Attach Multiple IP to ENI-Instance
- How to Configure Launch Configuration & Auto Scaling
- How to Configure VPC Peering
- How to Configure VPN for VPC
- How to Configure VPC Tunneling
- How to Configure VPC with Private Subnet & Connect to DC
- How to Create Template for CloudFormation
- How to Configure Cloud Formation
- LAB: Configure Auto-Scaling & validation
RECENT POSTS
- Why Cisco SD-WAN Viptela Training is Necessary in the Current Cloud-First Networking Age
- 5 Best Reasons to Learn Cisco SD-Access: From Networking Issues to Automation Solutions
- What is Cisco SD-LAN? A Beginner’s Guide to Software-Defined Access
- Why Enroll in Cisco UCS Online Training? Key Benefits for Network Engineers
- Why Python Network Automation Training is a Must-Have for Modern IT Engineers
- What to Expect from the Best Docker Training Courses: Features That Matter
- Why are Advanced Cisco ACI skills essential for Modern Data Center Engineers
- Transform Your Career: The Skills You Gain from AWS Solution Architect Associate Training
- Why Network Engineers Should Learn Python for Automation
- How to Set Up and Configure a Fortigate Firewall: Step-by-Step Guide


LEAVE A COMMENT
Please login here to comment.