EMAIL SUPPORT
dclessons@dclessons.comLOCATION
USLAB: Introduction to Network Load Balancer
Task:
- Create a Custom VPC
- Configure a Firewall Rule
- Configure Backend Service and create an Unmanaged Instance Group
- Create a Health Check
- Configure Front End Configuration and test the Load Balancer
Solution:
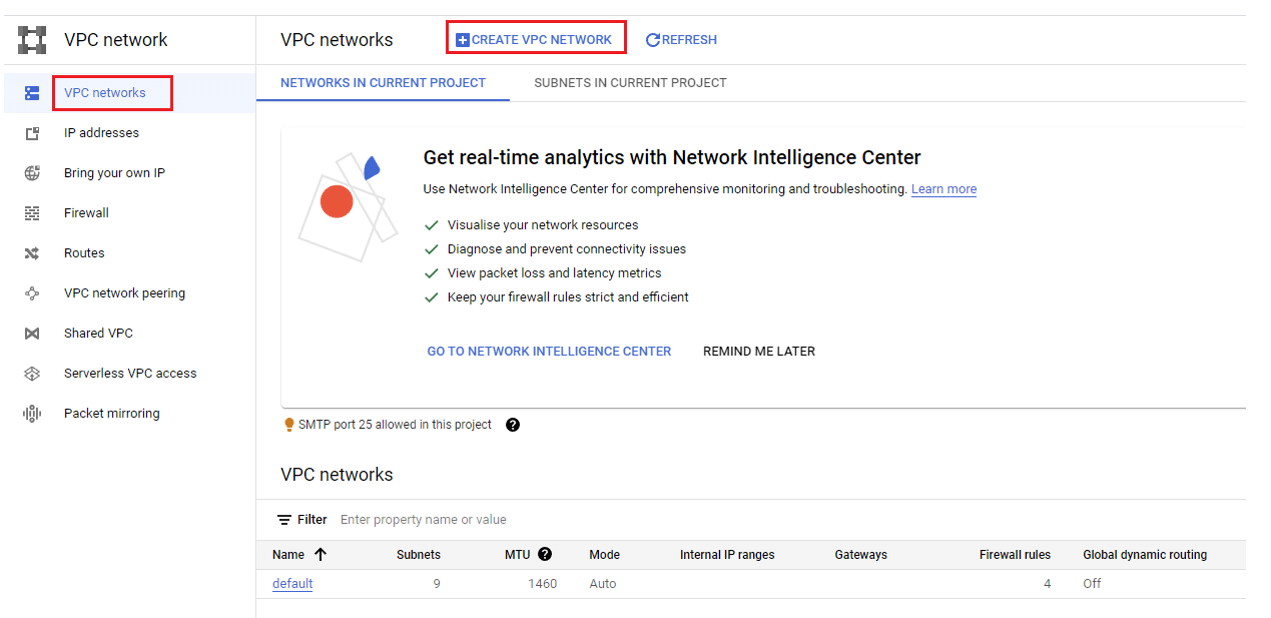
Task 1: Create a Custom Mode VPC
Under VPC Network | Click on Create VPC Network
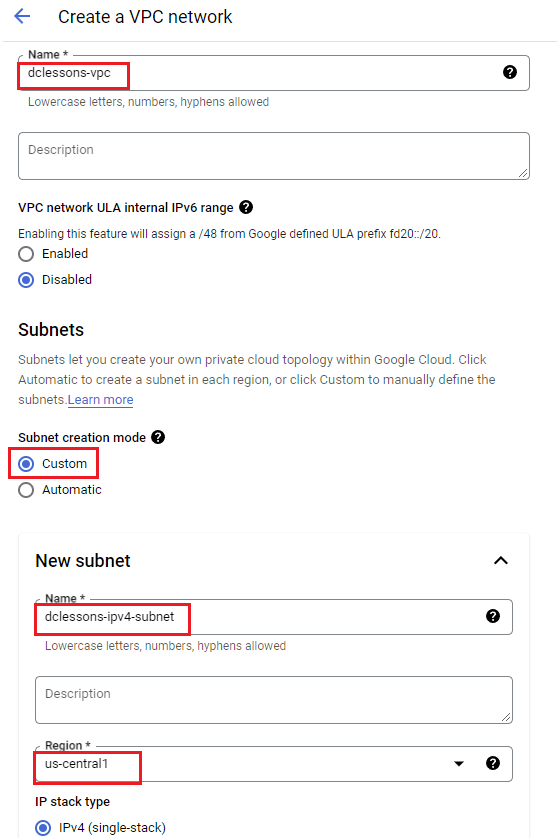
Under Create a VPC Network | Name: dclessons-vpc | Subnets: custom | New Subnet: Name: dclessons-ipv4-subnet | Region: us-central1
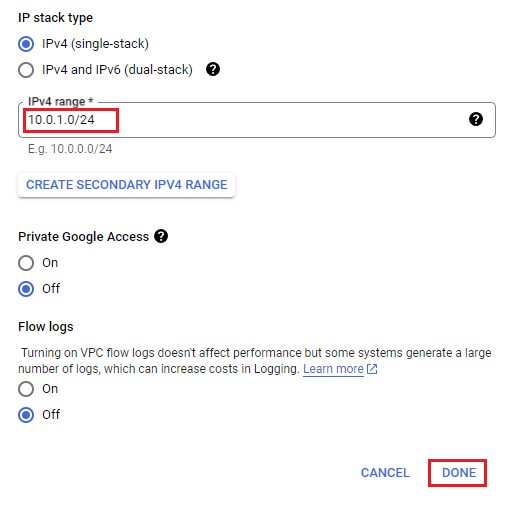
IP Stack Type: IPV4, | IPv4 range: 10.0.1.0/24 | Private Google Access: Off | Click Done
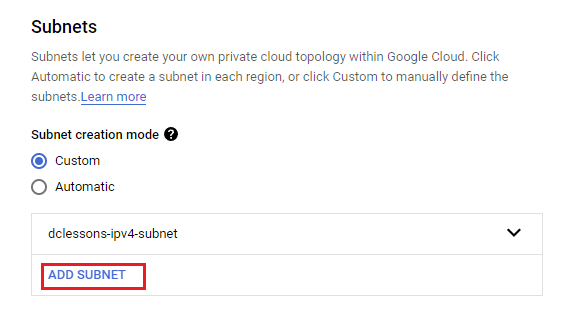
Under Subnet | Subnet Creation Mode : Custom | Select dclessons-ipv4-subnet and Click Add Subnet
Under New Subnet | Name dclessons-ipv6-subnet | Region: us-central-1 | IP Stack Type: IPv4 and IPv6 (dual stack ) IPv4 range : 10.0.2.0/24 | Click Done and leave a other setting as it is.
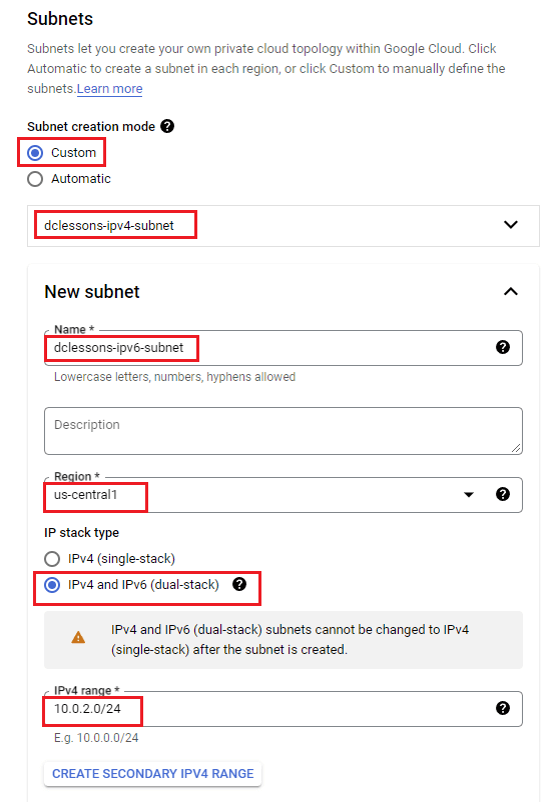
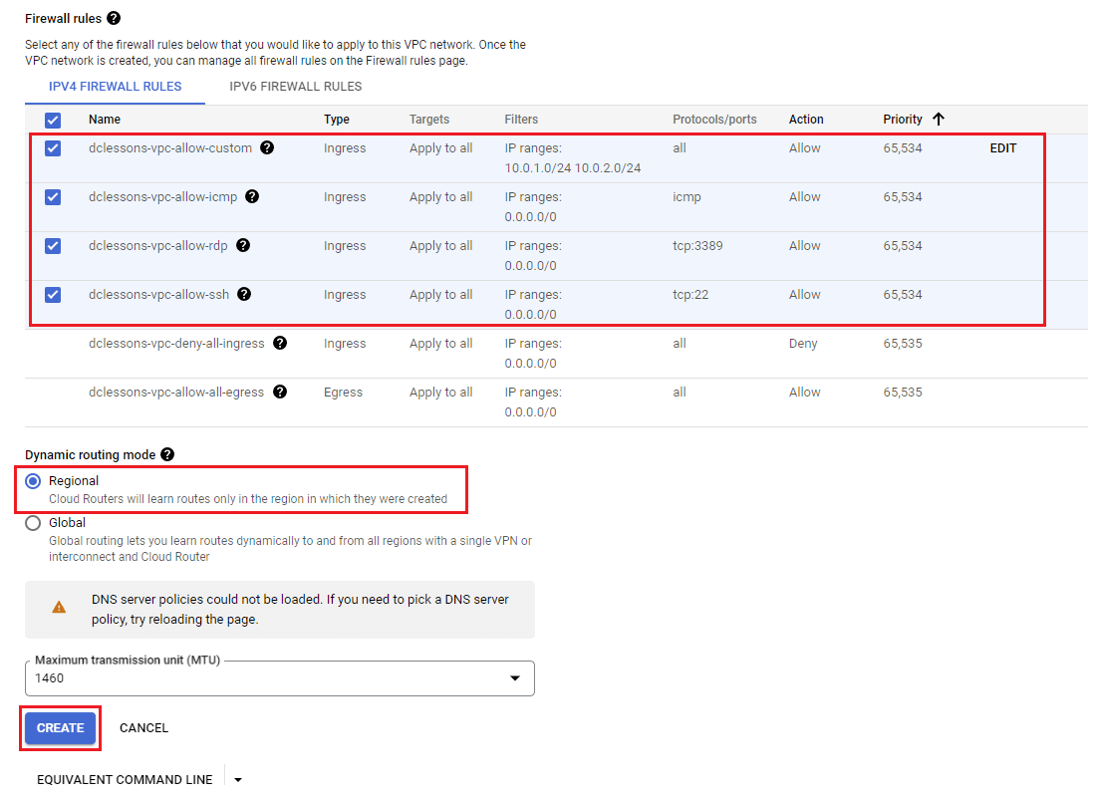
Under Firewall Rules | Choose all rules mentioned and Under Dymanic Routing Mode: Select Regional | Click Create
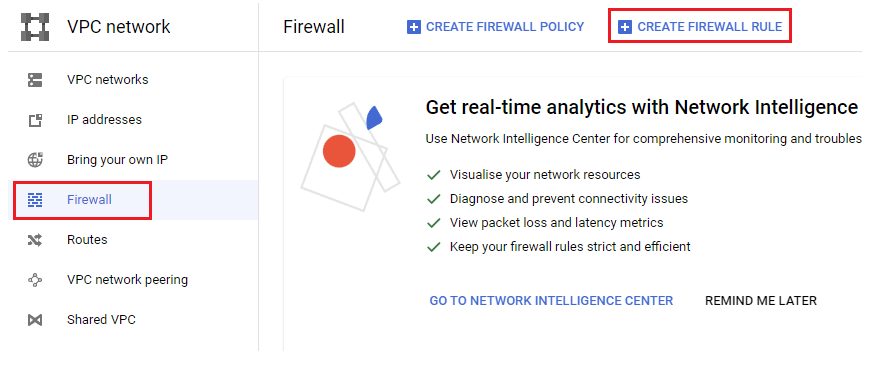
Task 2: Create a Firewall Rule:
Login to GCP Console | Click on VPC Network | Click on Firewall
Provide Name: dclessons-ipv4-traffic | Logs: off| Network: dclessons-vpc, priority 100 | Direction of traffic: ingress| Action: Allow | targets: specified targets tags | target tags : allow-ipv4 |Source IPv4 ranges: 0.0.0.0/0
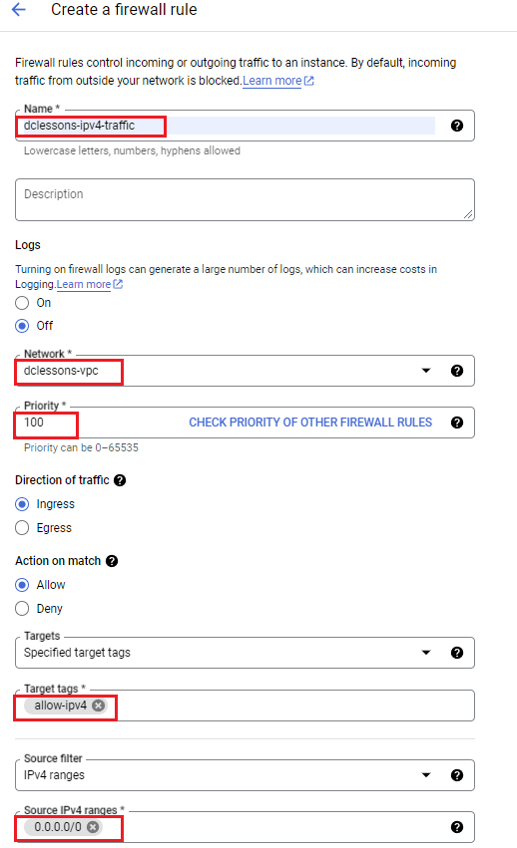
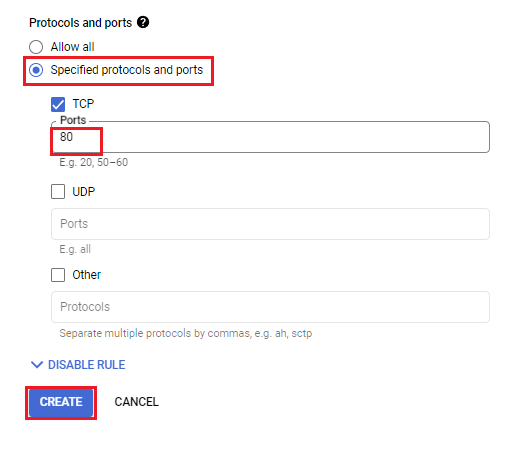
Protocols & Ports: Select Specified protocols and Ports | TCP: port 80 | Click Create
Create another Firewall rule :
Login to GCP Console | Click on VPC Network | Click on Firewall
Provide Name: dclessons-allow-ipv6-traffic | Logs: off| Network: dclessons-vpc, priority 101 | Direction of traffic: ingress| Action: Allow | targets: specified targets tags | target tags : allow-ipv6 |Source IPv4 ranges: ::/0
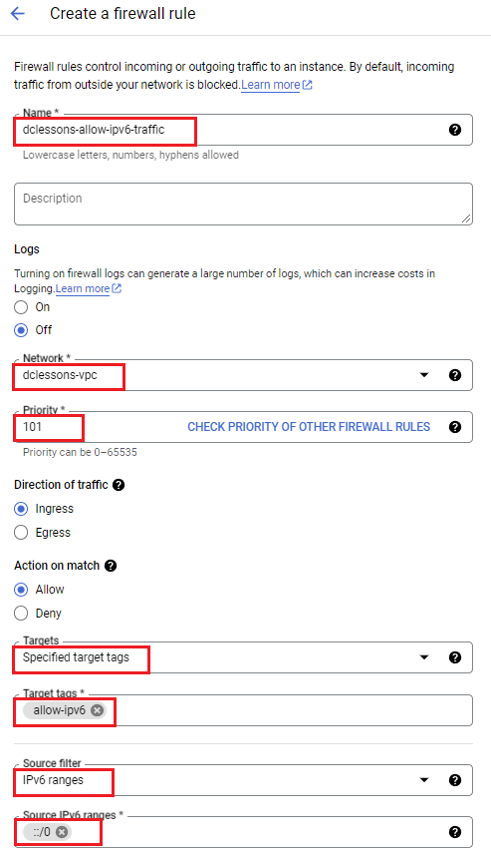
Protocols & Ports: Select Specified protocols and Ports | TCP: port 80 | Click Create

Task 3: Configure & Create VM Instance
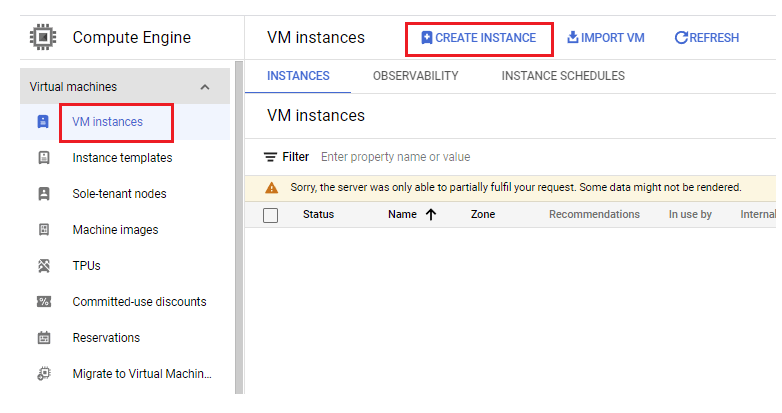
Under Compute Engine | VM Instance: Create Instance
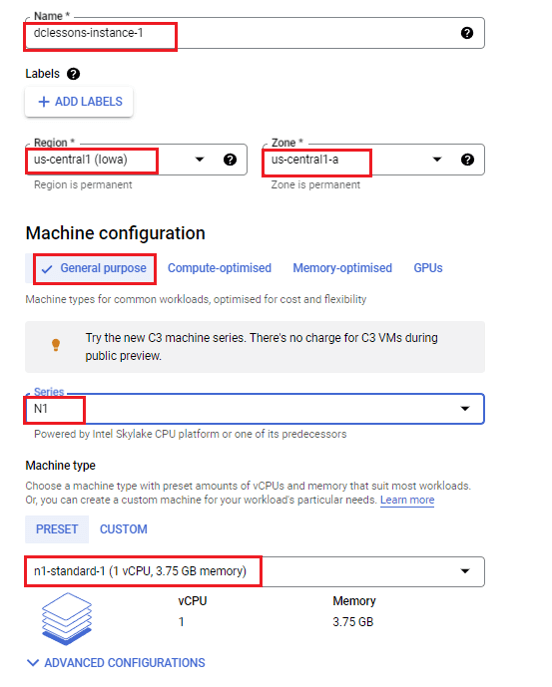
Under Create Instance | Name: dclessons-instance-1 | Region: us-central1(lowa) , Zone: us-central1-a | Machine Configuration: Series : N1 , Machine Type: n1-standard-1
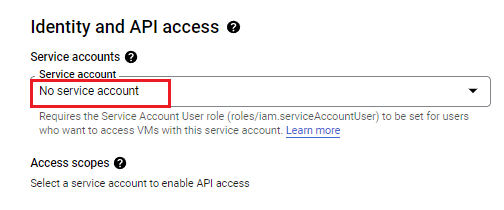
Under Identity & API Access | Service Account: Select No Service Account
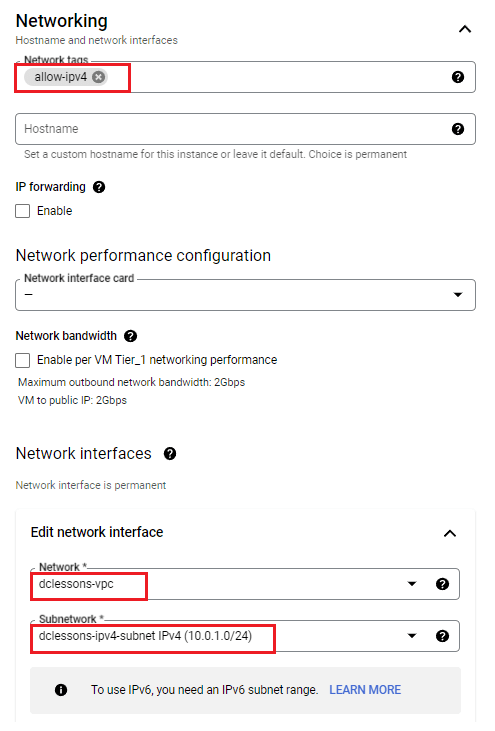
Under Advance Option | Networking: Network tags: allow-ipv4
Network Interfaces: Edit Network Interfaces: Network: dclessons-vpc | Subnetwork: select dclessons-ipv4-subnet IPv4(10.0.1.0/24) | Click Done
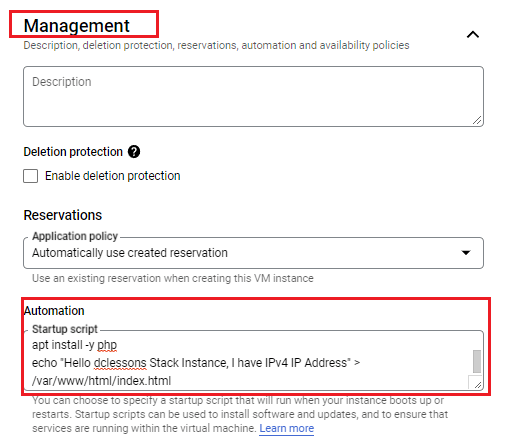
Under Management | Automation put below code:
#!/bin/bash
apt update -y
apt install -y apache2
apt install -y php
echo "Hello dclessons Single Stack Instance, I have IPv4 IP Address" > /var/www/html/index.html
Leave the rest of the settings as default and click on Create.
Lets Create One more Instance
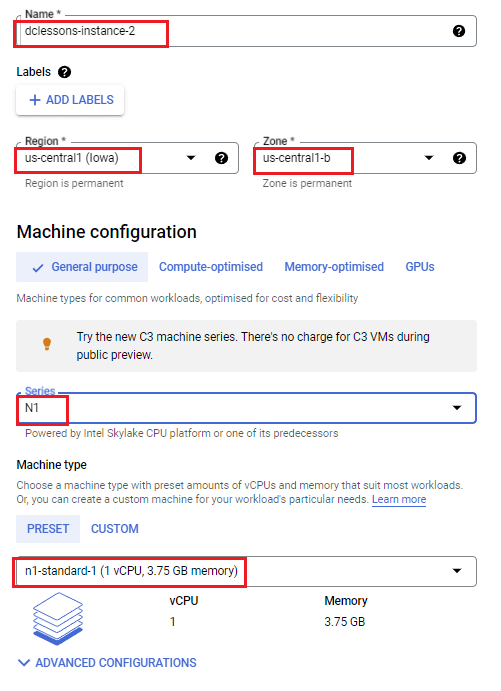
Under Create Instance | Name: dclessons-instance-2 | Region: us-central1(lowa) , Zone: us-central1-b | Machine Configuration: Series : N1 , Machine Type: n1-standard-1
Under Identity & API Access | Service Account: Select No Service Account

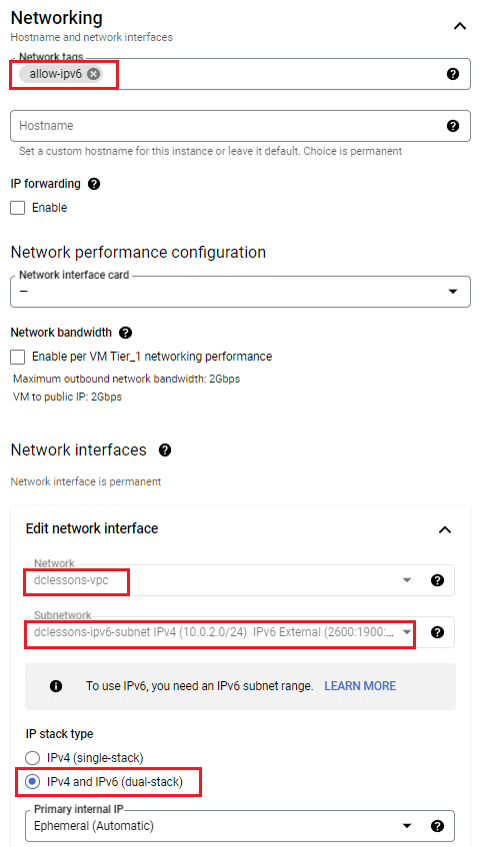
Under Advance Option | Networking: Network tags: allow-ipv6
Network Interfaces: Edit Network Interfaces: Network: dclessons-vpc | Subnetwork: select dclessons-ipv6-subnet IPv4(10.0.2.0/24) | IP Stack Type: IPv4 and IPv6 (dual Stack) Click Done
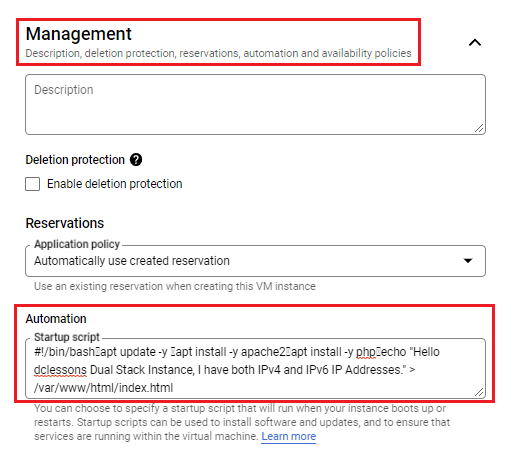
Under Management | Automation put below code:
#!/bin/bash
apt update -y
apt install -y apache2
apt install -y php
echo "Hello dclessons Dual Stack Instance, I have both IPv4 and IPv6 IP Addresses." > /var/www/html/index.html
Leave the rest of the settings as default and click on Create.
Now you can see that your both Instance is created.

Task 4: Configure Instance Group
Click on Compute Engine | In Left Side bar: Click on Instance Group
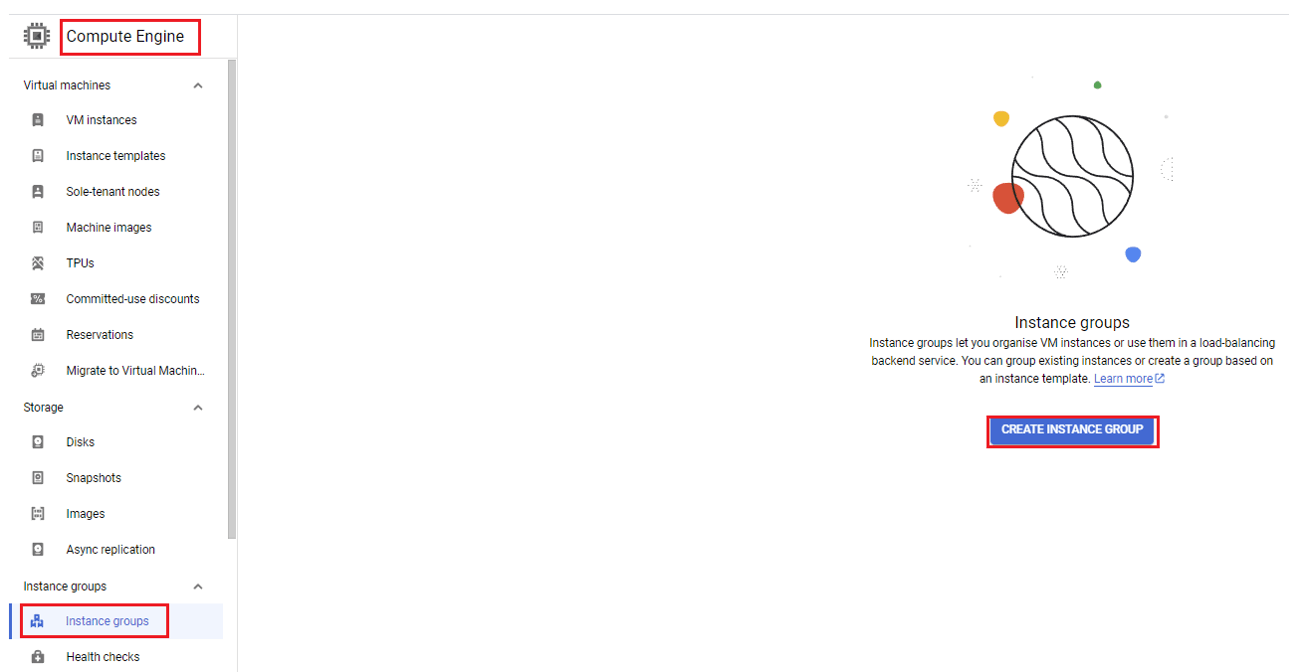
Under New Unmanaged Instance Group | Name: dclessons-instance-group-1 | | Region: us-central1(lowa), Zone: us-central1-a

Comment
TABLE OF CONTENTS
- Cloud Storage Overview
- Understanding Cloud Firestore & Cloud SQL
- Understanding Cloud Spanner & Bigtable
- LAB Configure GCP Bucket
- LAB GCP Cloud Storage Bucket , Upload Object and enable versioning
- LAB Implement Google Cloud SQL & Test
- LAB Configure Cloud Spanner & test
- LAB Create Lifecycle policies of Bucket
- Networking in GCP
- GCP Load Balancing & NAT
- GCP Hybrid Connectivity
- LAB: Configure Auto Scaling in GCP
- LAB: Configure & Test HTTP(S) Load Balancing
- LAB: Configure a custom VPC in GCP
- LAB: Deploying networks using Terraform
- LAB: Communicate with Internet using Cloud NAT
- LAB: Creating VPC Peering Architecture
- LAB: Introduction to Network Load Balancer
- LAB: Configure Firewalls Priority
- LAB: Encrypting and Decrypting data using Cloud KMS
- LAB: Traffic blacklisting using Cloud Armor
- LAB: Creation of a Cloud HA VPN Connection
RECENT POSTS
- Installing Context-Aware Network Access Control using Cisco ISE Policies
- Designing Network Access Control that is Scalable using Cisco ISE Architecture
- Enterprise Network Access Control and Policy Enforcement using Cisco ISE
- Secure Device Administration and Network Access Using AAA Architecture
- Designing Enterprise-Class Hybrid Cloud Connectivity Using AWS Networking Services
- Exploring Core AWS Networking and Messaging Concepts for Modern Cloud Architectures
- Understanding Key AWS Services for Modern Cloud Architectures
- Building a Strong AWS Foundation with Amazon S3, EC2, and Virtual Private Cloud
- Understanding the ENSDWI Course: Advanced Cisco SD-WAN (Viptela) Concepts
- A Complete Guide to the DCACI-A Course: Mastering Advanced Cisco ACI Concepts


LEAVE A COMMENT
Please login here to comment.