EMAIL SUPPORT
dclessons@dclessons.comLOCATION
USAdding Spine & Rack
Apstra makes it very easy for you to not only grow your blueprint but also to keep your designs up to date. Regarding adding new devices to your blueprints, this module will cover adding spine nodes and racks. Adding a spine or a rack to a blueprint is fairly trivial task using Apstra. The main caveat to adding a rack is whether the spine nodes have enough leaf ports (Leaf port group) to support the one or two leaf nodes in the new rack. To add a rack, you select a rack from the global catalog of rack types (like you did when you initially created the template) or you can select from the embedded rack types for the blueprint.
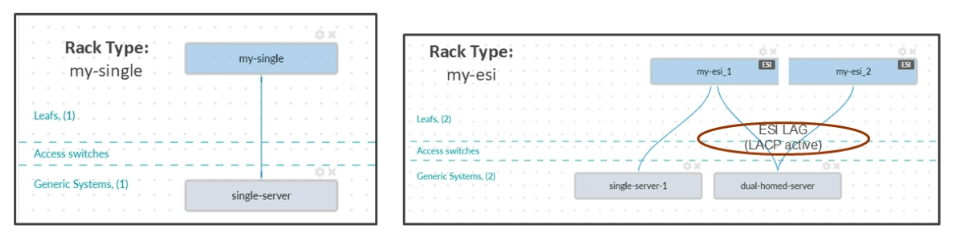
Example — Rack Types
We will begin going through a set of examples to show you how to add a spine node and a rack to your blueprint. This below figure shows the rack types from the global catalog that are being used to create the topology we will be using.
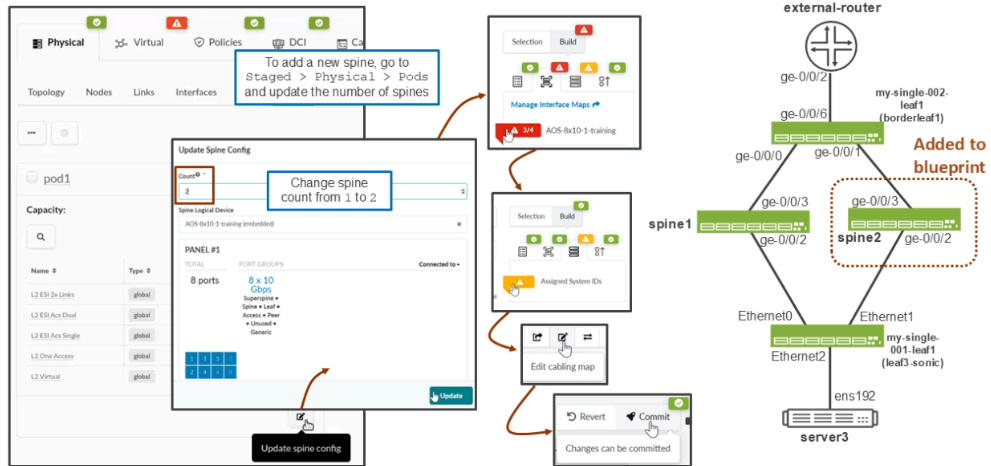
Adding a Spine
Adding a spine node to the blueprint is a trivial task in Apstra UI. After physically cabling the spine node into its position in the fabric and getting it into the OOS-Ready state (acknowledged), in the blueprint, you navigate to Staged > Physical > Pods and click Update spine config .
Then, update the total number of spines to reflect the existing spine and the spine that you wish to add. Here, set the number of spines to 2. Next, assign an interface map and system ID to the spine node, ensure the cabling map is correct, and commit the changes. Apstra will auto-configure the spine node for both the overlay and underlay networks as necessary.
Adding Rack
Click Add Racks to add a rack to your blueprint. In the drop-down list, select the rack type that you will use for this new rack to match in layout. Finally, select the number of copies of that rack type that you want to deploy.
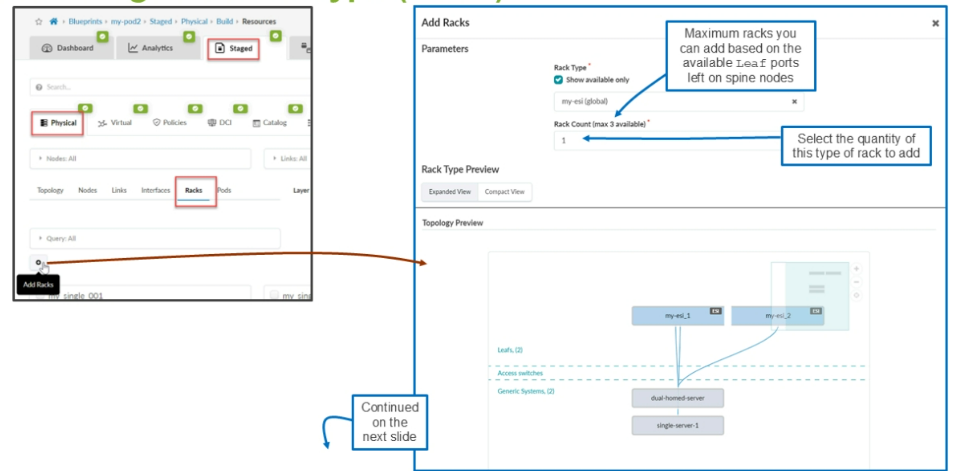
The figure shows the details of the selected rack type, including leaf-to-spine connectivity, logical devices, number of generic systems, and leaf-to-generic connectivity.

Comment
TABLE OF CONTENTS
- Navigating Apstra UI
- Configure : Logical Devices, Device Profiles, and Interface Maps
- Managing Devices
- Creating Resources and Tags
- Configuring Racks
- Configuring Templates
- Building and Deploying a Blueprint From a Template
- Working With The Active Blueprint
- Enabling Property Sets & Configlets
- Configuring Connectivity Templates
- Configuring Multitenancy
RECENT POSTS
- Understanding Cisco ISE Authentication and Authorization Policies
- Installing Context-Aware Network Access Control using Cisco ISE Policies
- Designing Network Access Control that is Scalable using Cisco ISE Architecture
- Enterprise Network Access Control and Policy Enforcement using Cisco ISE
- Secure Device Administration and Network Access Using AAA Architecture
- Designing Enterprise-Class Hybrid Cloud Connectivity Using AWS Networking Services
- Exploring Core AWS Networking and Messaging Concepts for Modern Cloud Architectures
- Understanding Key AWS Services for Modern Cloud Architectures
- Building a Strong AWS Foundation with Amazon S3, EC2, and Virtual Private Cloud
- Understanding the ENSDWI Course: Advanced Cisco SD-WAN (Viptela) Concepts


LEAVE A COMMENT
Please login here to comment.