EMAIL SUPPORT
dclessons@dclessons.comLOCATION
USLAB: Create a Custom VPC & Test Reachability between EC2 via Internet GW and NAT GW.
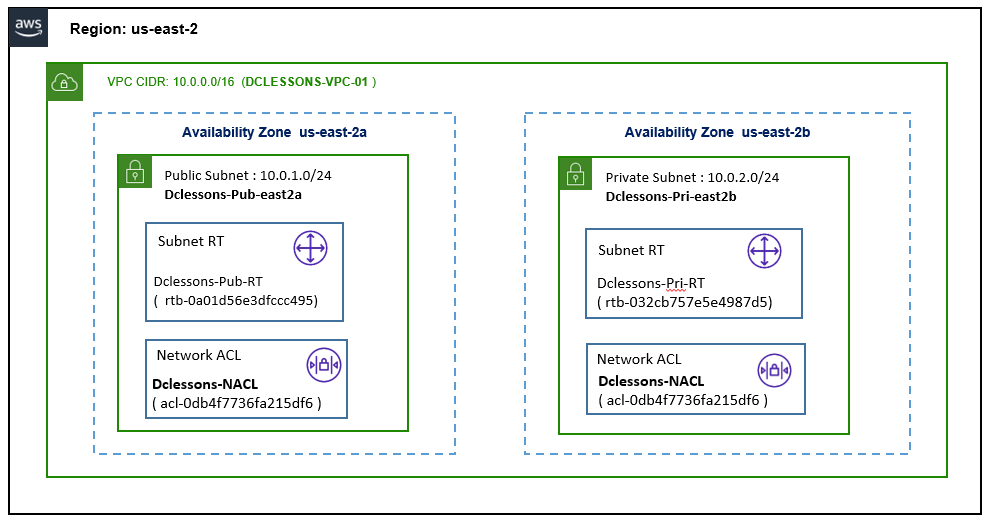
Topology:
Refer Below Topology to configure Custom VPC.
Task:
- Create a Custom VPC DCLESONS-VPC-01 with CIDR 10.0.0.0/16
- Create public Subnet Dclessons-pub-east2a with subnet 10.0.1.0/24 on AZ us-east-2a
- Create Private subnet Dclessons-pri-east2a with subnet 10.0.2.0/24 on AZ us-east-2b
- Create Public Subnet Route table: Dclessons-pub-RT and Network ACL: Dclessons-NACL
- Create Private Subnet Route table: Dclessons-pri-RT and Network ACL: Dclessons-NACL
- Create IGW: Dclessons-INT-GW01 and attach to VPC DCLESSONS-VPC-01
- Update Public Route Table Dclessons-pub-RT with Default route with target IGW
- Create New Security Group Dclessons-SG-01 and allow all traffic for inbound and outbound
- Launch EC2 instance Dclessons-pub-EC2 in Public Subnet , Create an EIP and associate to it.
- SSH to Dclessons-Pub-EC2 and check traffic via Reachability Analyzer.
- Create NAT gateway – Dclessons-NAT-GW and allocate EIP and associate to it.
- Update Private Subnet Route table and added default route pointing to NAT GW
- Launch EC2 instance in Private Subnet and SSH it from Dclessons-pub-EC2 for testing.
Solution:
Create VPC:
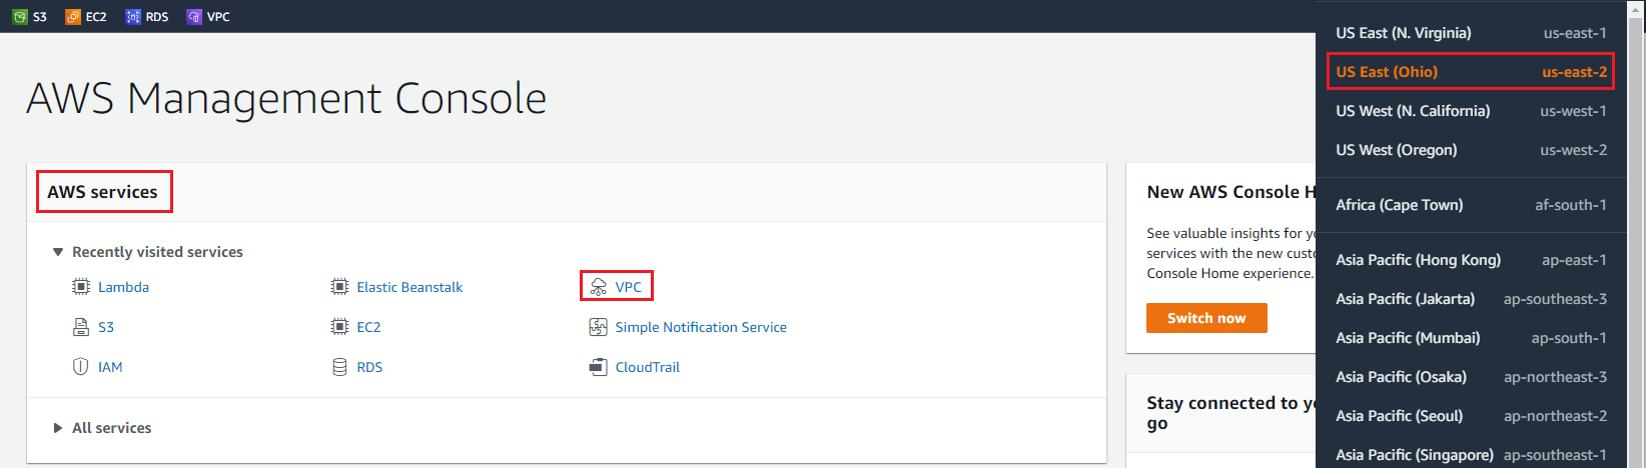
Here to create a Custom VPC, we need to login to AWS management Console and under AWS Services | Select VPC and Select the region US East (Ohio), where you want to create your VPC
In the Left Side | Select your VPC and on right side workboard, you will see 1 VPC has been already created, named as Default VPC in all Region.
You can also observe under subnets section, Route Table, Internet gateway, Network ACLs, Security Groups, there are default Route table, Default Internet gateway, Default NACL, Default SG supporting to your Default VPC are already there.
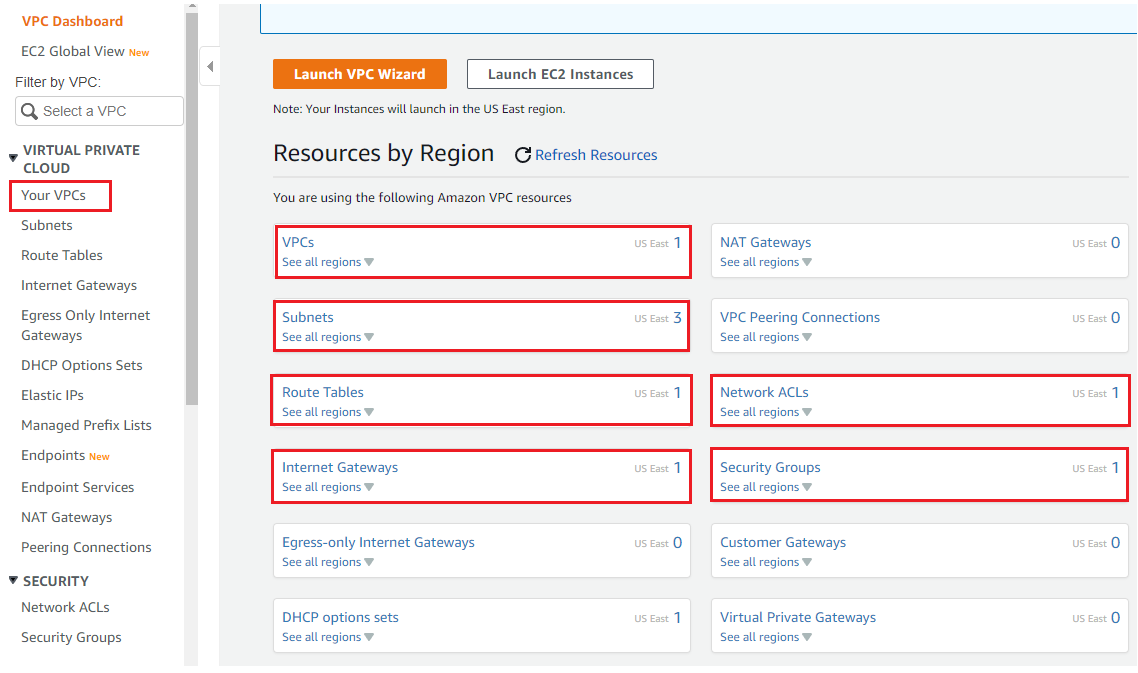
On Right hand side of your VPC work plane, Click on Create VPC.

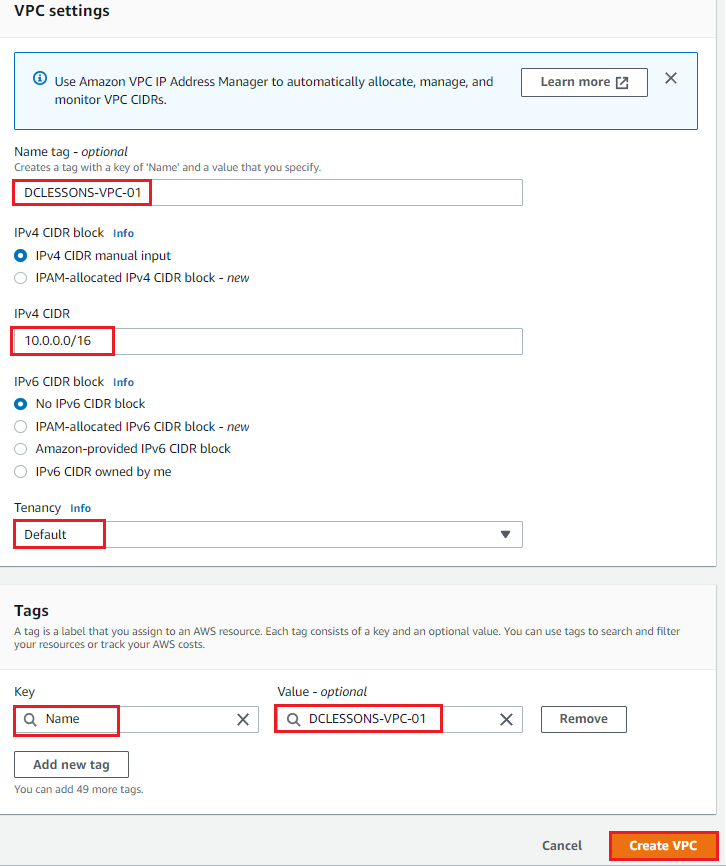
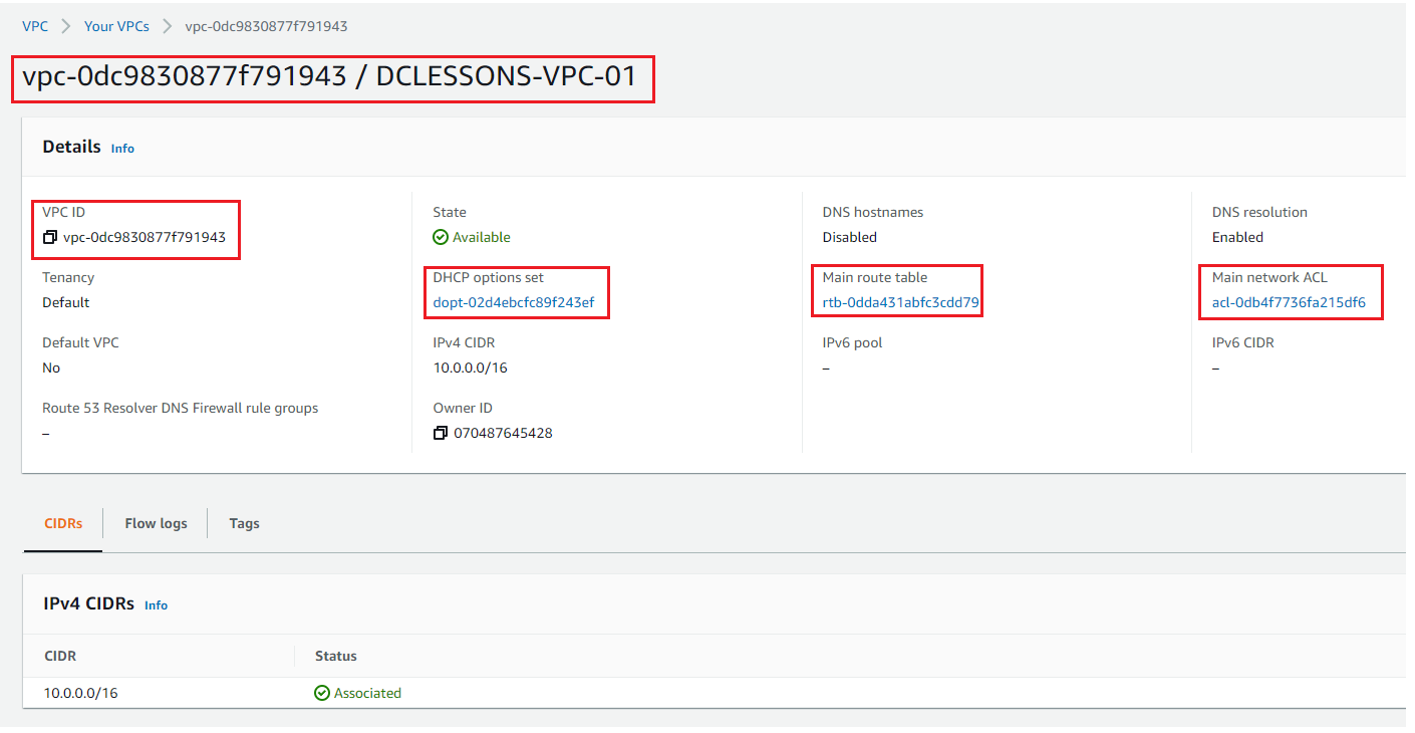
Under VPC Setting, Provide VPC name: DCLESSONS-VPC-01 | IPV4 CIDR: 10.0.0.0/16 | Tenancy: Default | Tags: Name: Value: DCLESSONS-VPC-01 | Create VPC.
Once VPC is created, you can see its details: DCLESSONS-VPC-01 (vpc-0dc9830877f791943). Here you can see that DHCP option set is also defined. This DHCP Option sets defines the Domain name and DNS server, in this you can also define the NTP server.
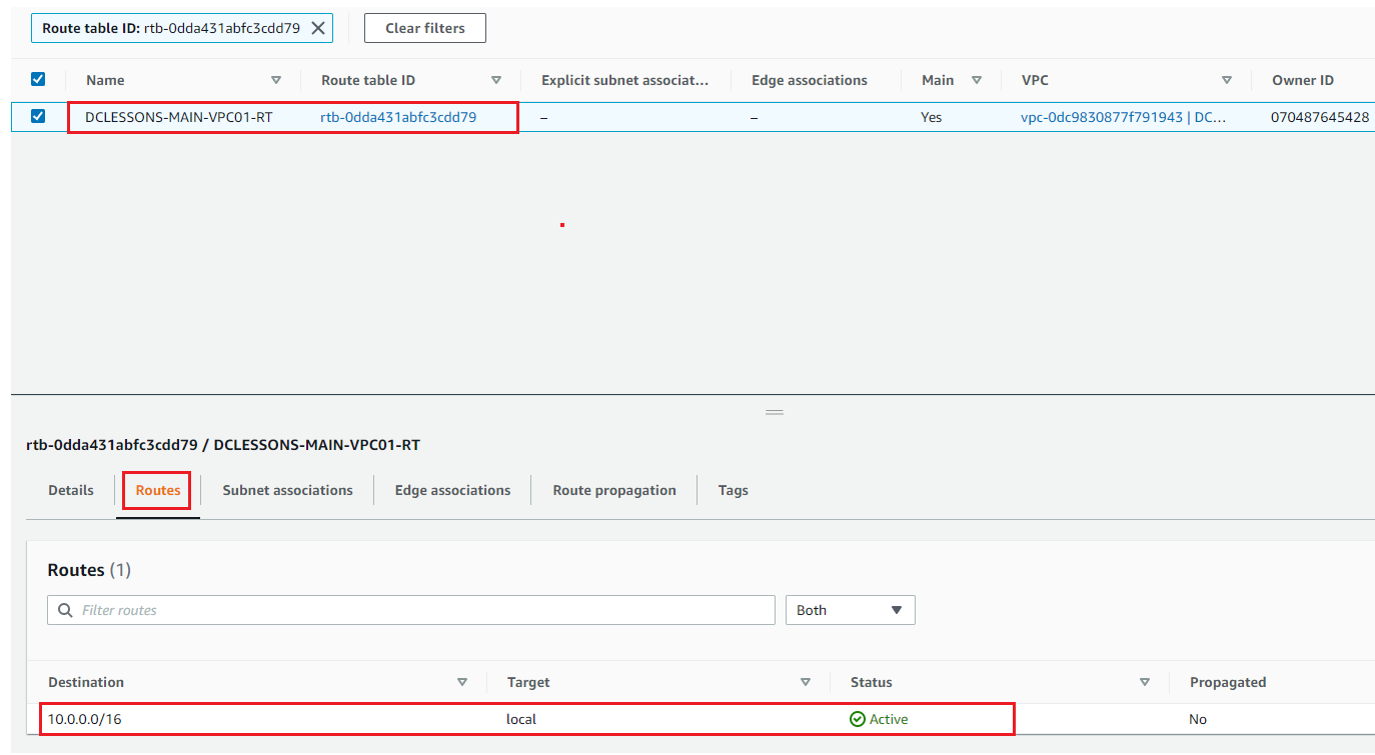
In the Route table Section, You can see one RT, which is MAIN RT , which we have renamed it to DCLESSONS-MAIN-VPC01-RT. In the details section, you can see that there is no Explicit Subnet Association done with this RT.

In same RT, Click on Route Section, where you can see that 10.0.0.0/16 CIDR is already associated with Target: local and status is Active. This Route is mainly used for Inter-VPC Communication, and this RT will make sure that all EC2 instance within VPC have IP reachability between each other.
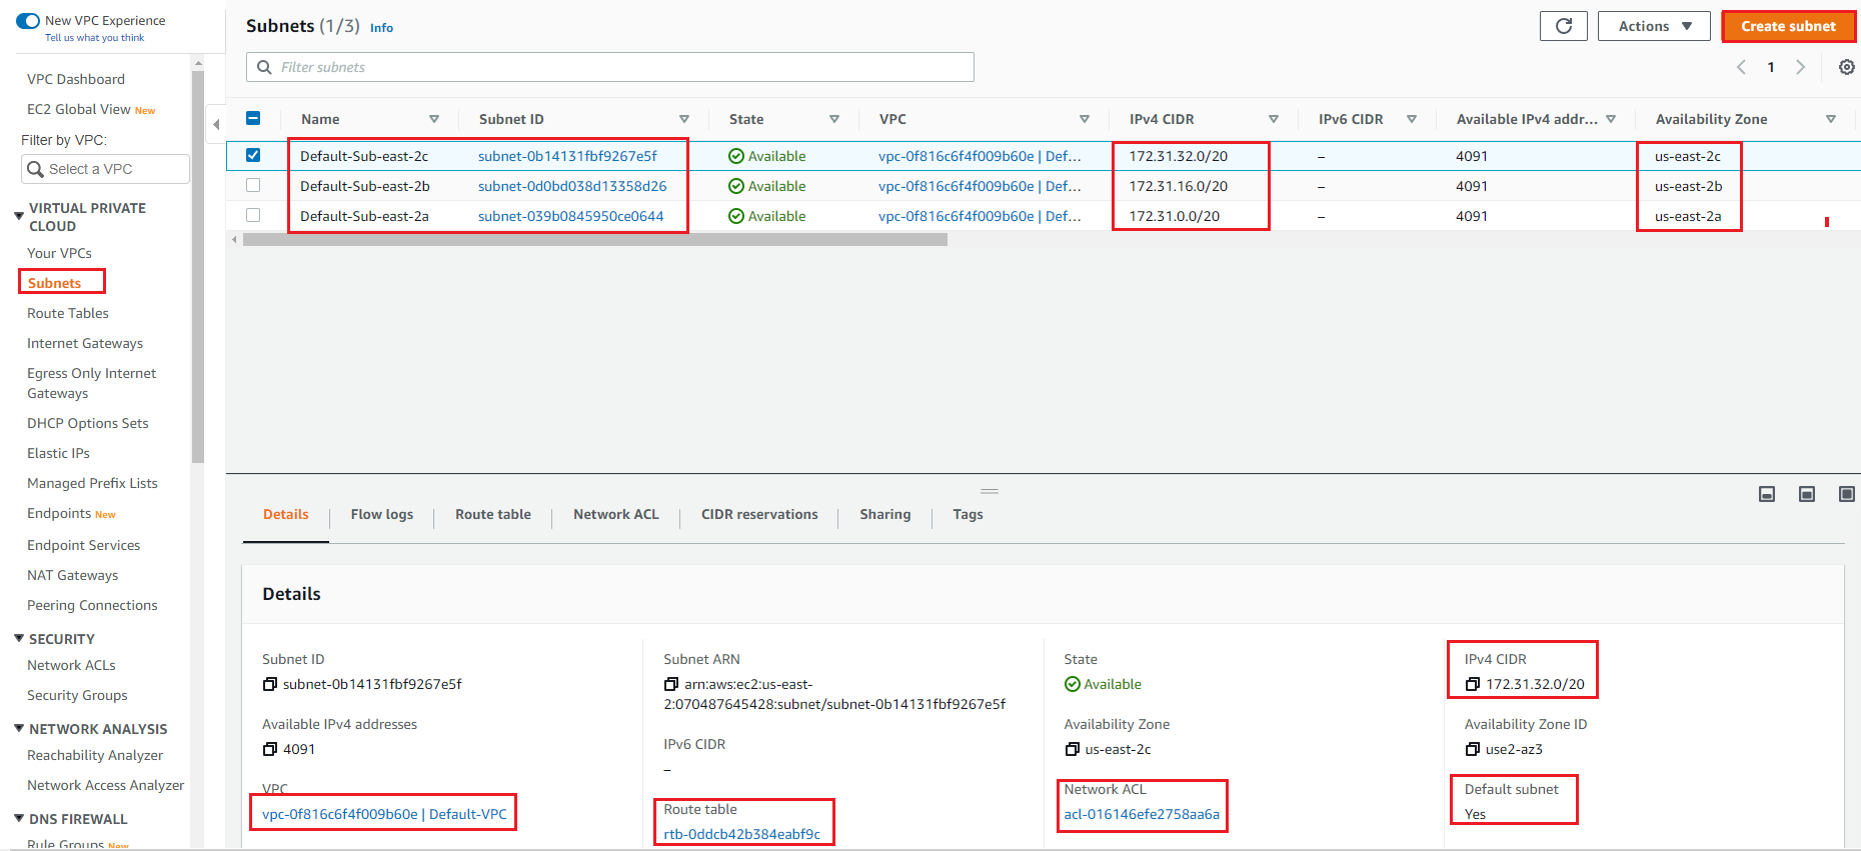
In below figure, you can also see that, there are 3 Default Subnet for Default VPC in that region, one subnet in each Availability Zone. This default Subnet also have default RT and default NACL associated to it.
Create Subnets:
Here we have to create two subnets, One Public Subnet for Internet access and One Private Subnet which will have EC2 instance and will access Internet via NAT Gateway.
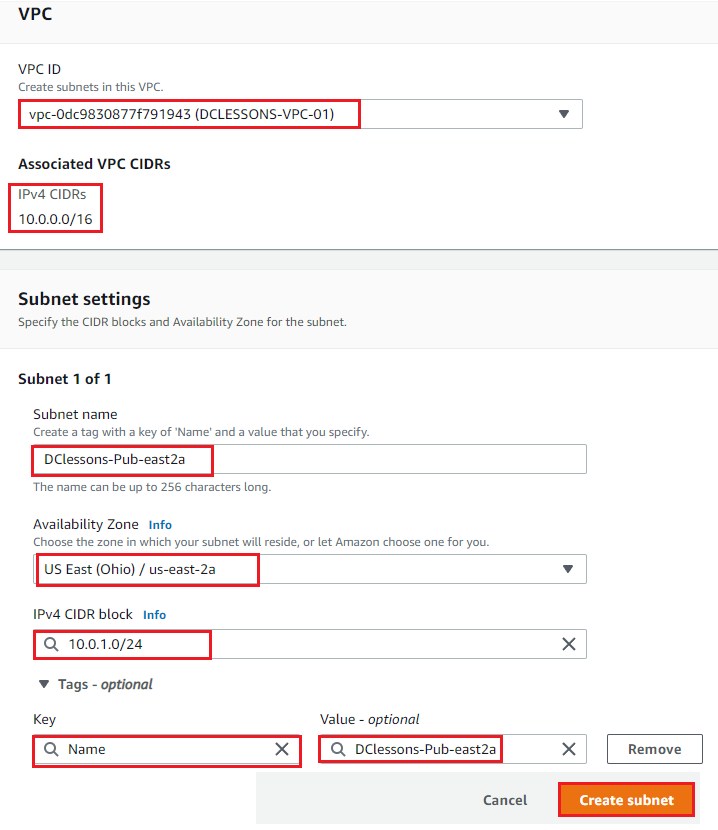
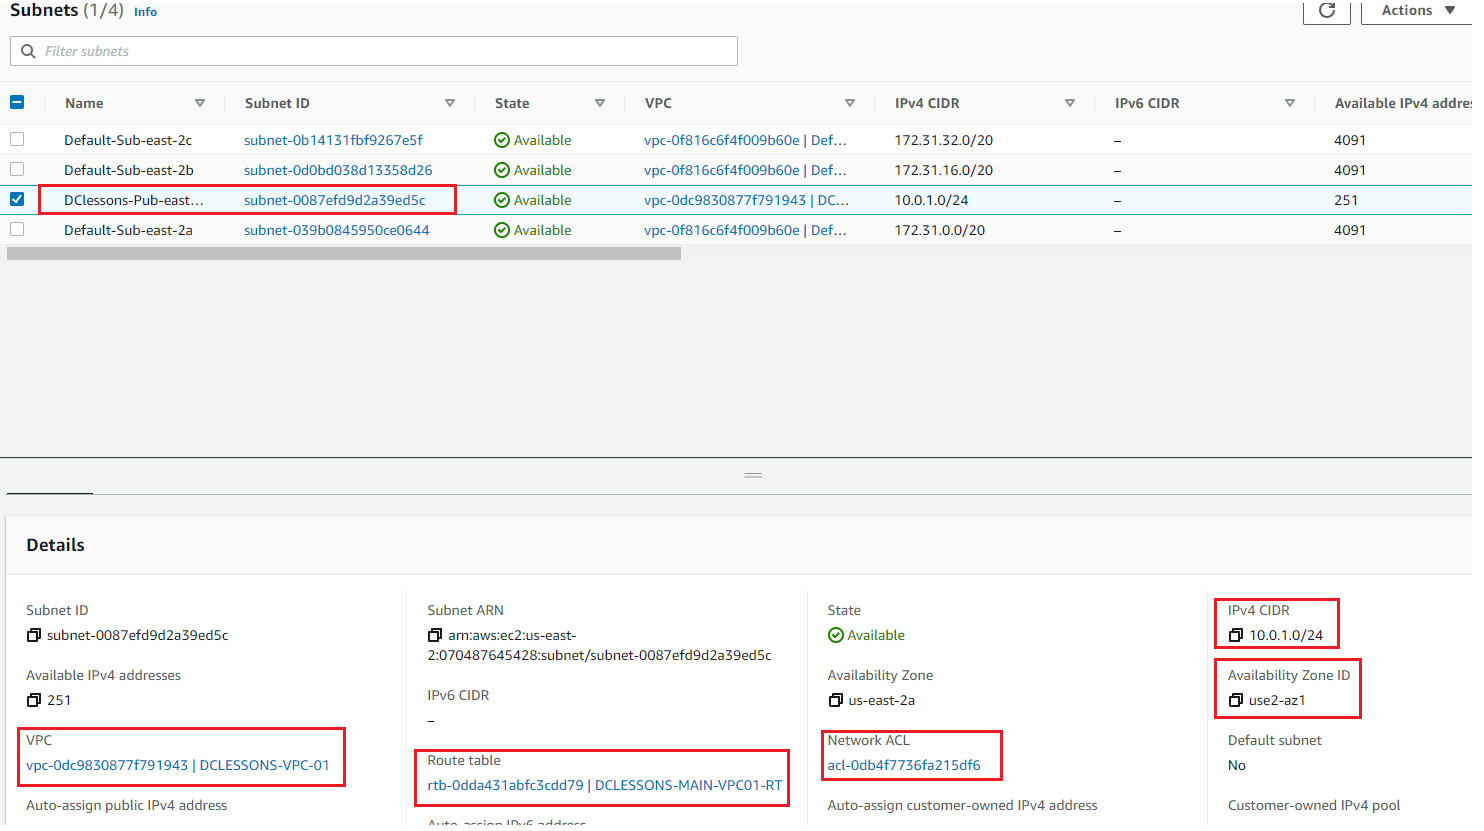
Go to Subnet Section on Left hand side of your VPC Work plane. Under Subnet setting | Name: Select VPC ID: DCLESSONS-VPC-01 | Subnet Name: Dclessons-pub-east2a | AZ: east-2a | IPV4 CIDR block : 10.0.1.0/24 | tag : name: Value : Dclessons-Pub-east2a | Click Create |
Now you can see that Public Subnet has been created and is associated it to DCLESSONS-VPC-01 and has been associated to DCLESSONS-MAIN-VPC01-RT and one NACL.
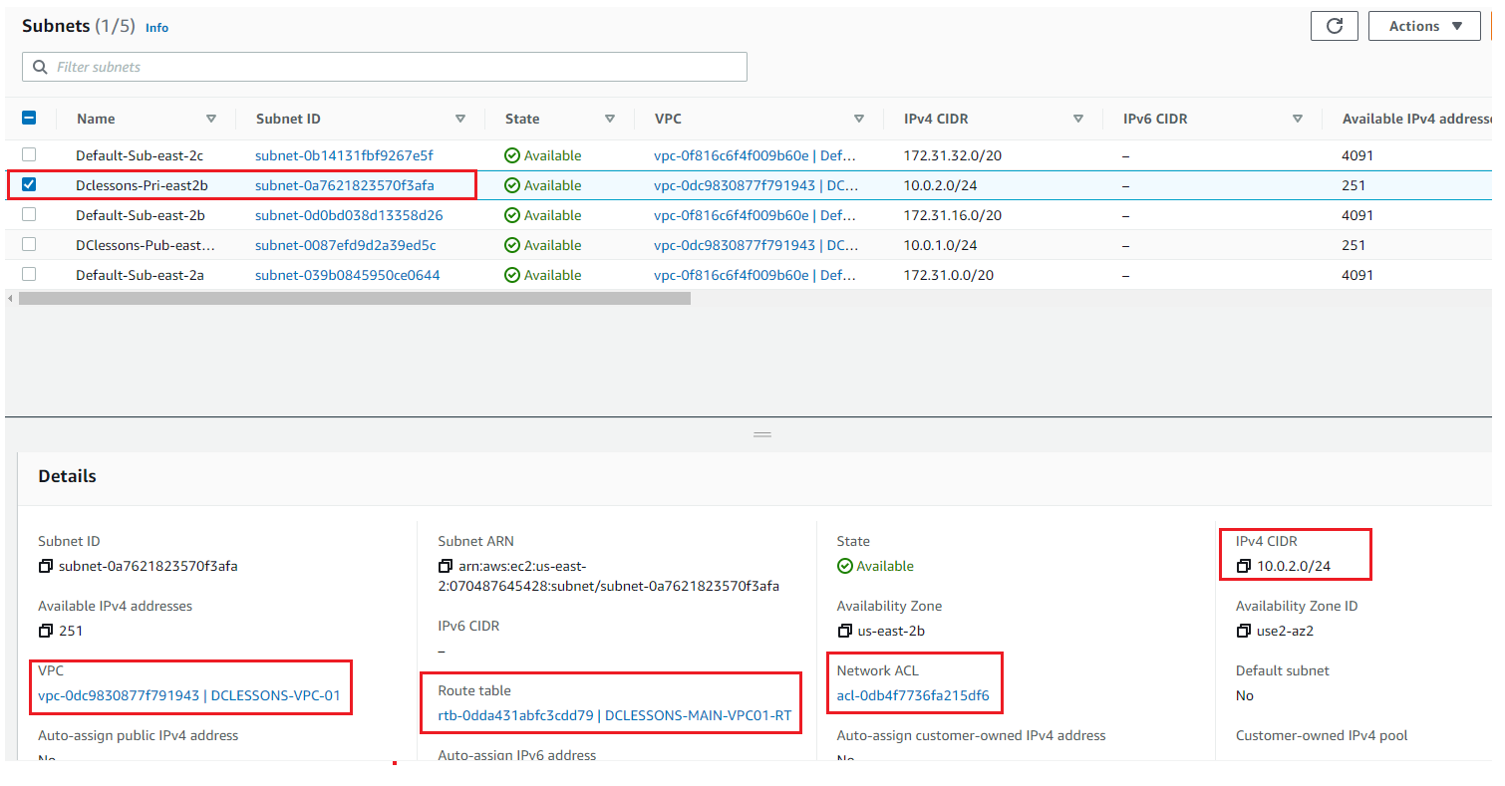
Like Wise Create the private Subnet as per details shown in below Figure
Create Route Tables:
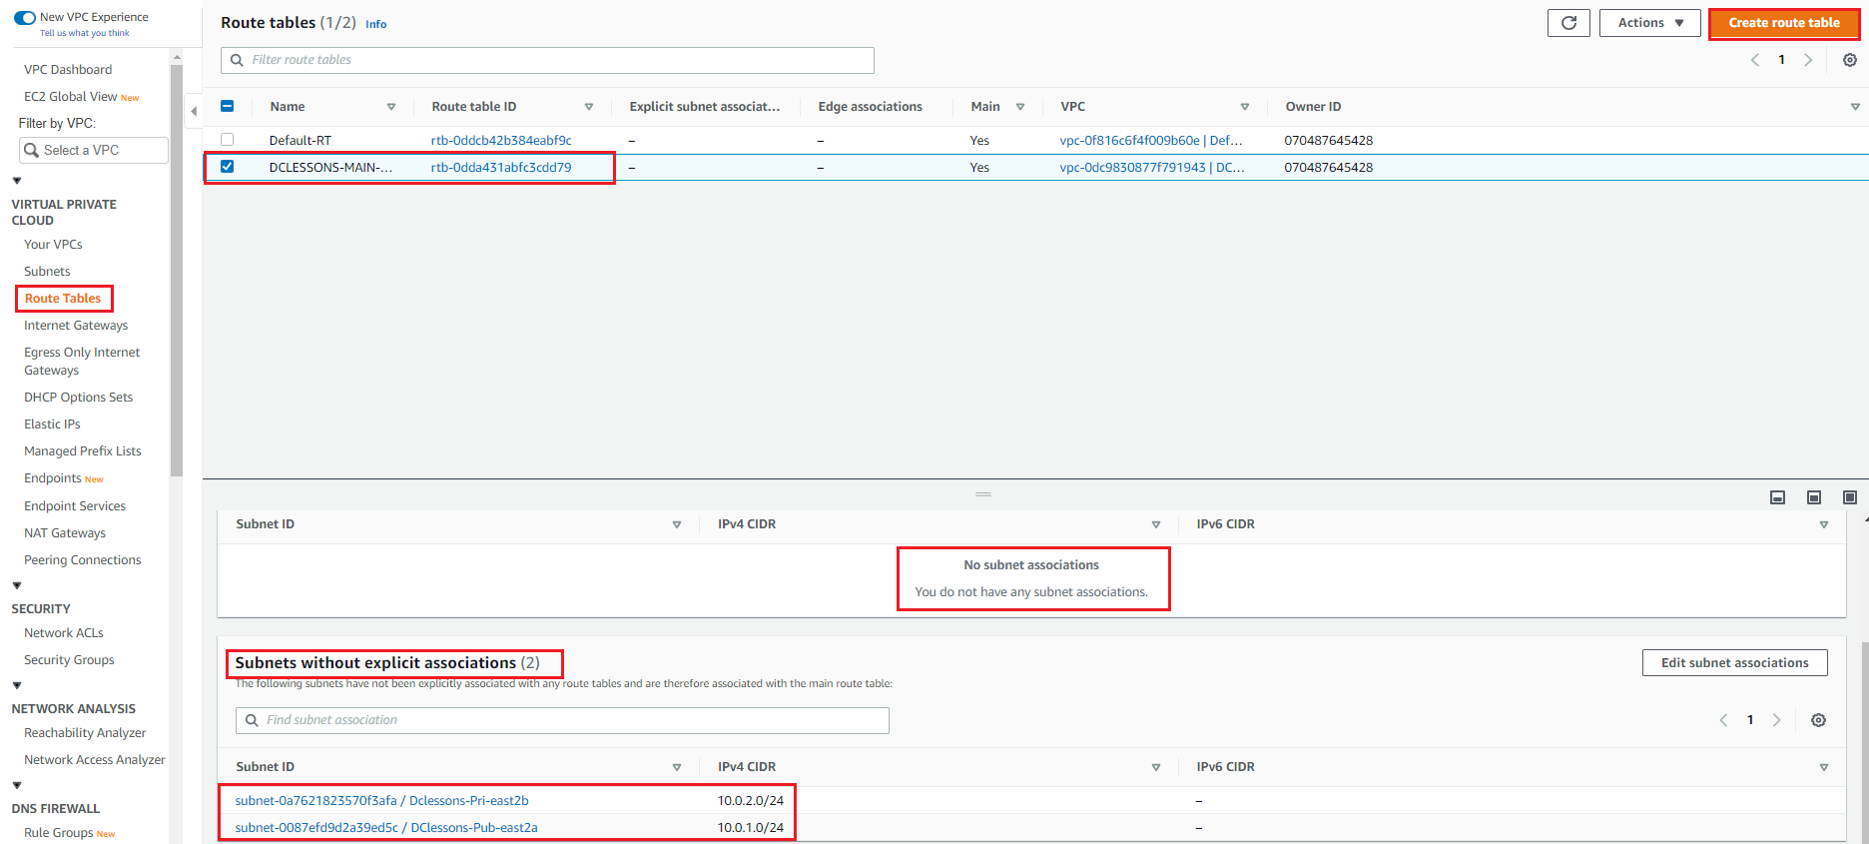
In the left-hand Side of your VPC Work Plane | Select Route table | Click on Create RT. here you can see that there is already one Default RT named DCLESSONS-MAIN-VPC01-RT, and has no Subnet Associated to it. You can see this in below figure
Here we will create two RT one for Public Subnet and one for private Subnet, which we have previously created. Provide below input.
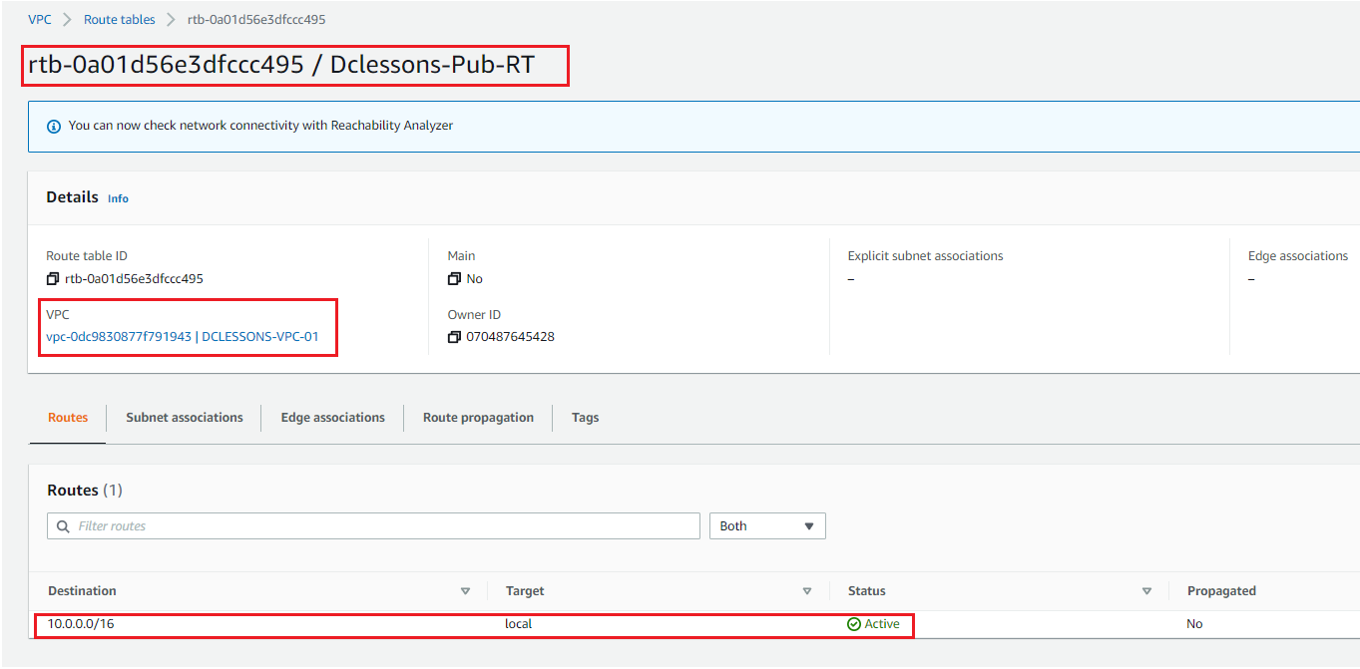
Name: Dclessons-Pub-RT | Associate it to DCLESSONS-VPC-01 | Tag: Name: value: Dclessons-Pub-RT| Create Route Table
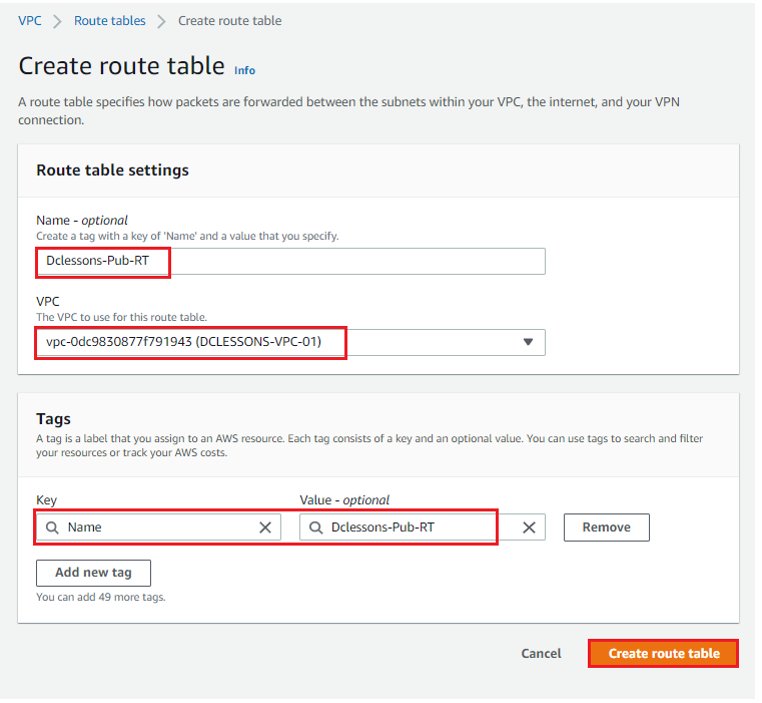
Once Route Table id created, you can see its details : Dclessons-Pub-RT : rtb-0a01d56e3dfccc495. You can see that it has already one Route 10.0.0.0/16 with target: Local.
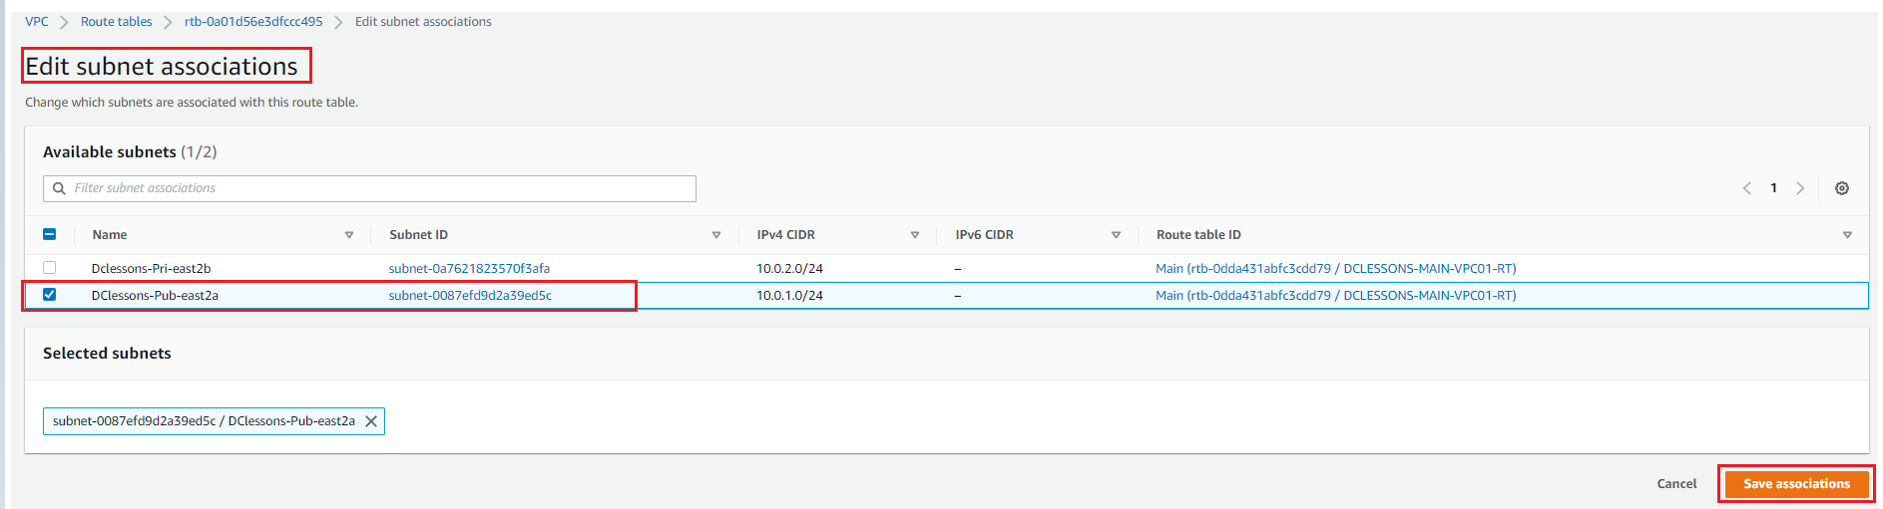
Now Click to Subnet Association | Edit Subnet Association as shown in figure
Select Dclessons-pub-RT and click Save
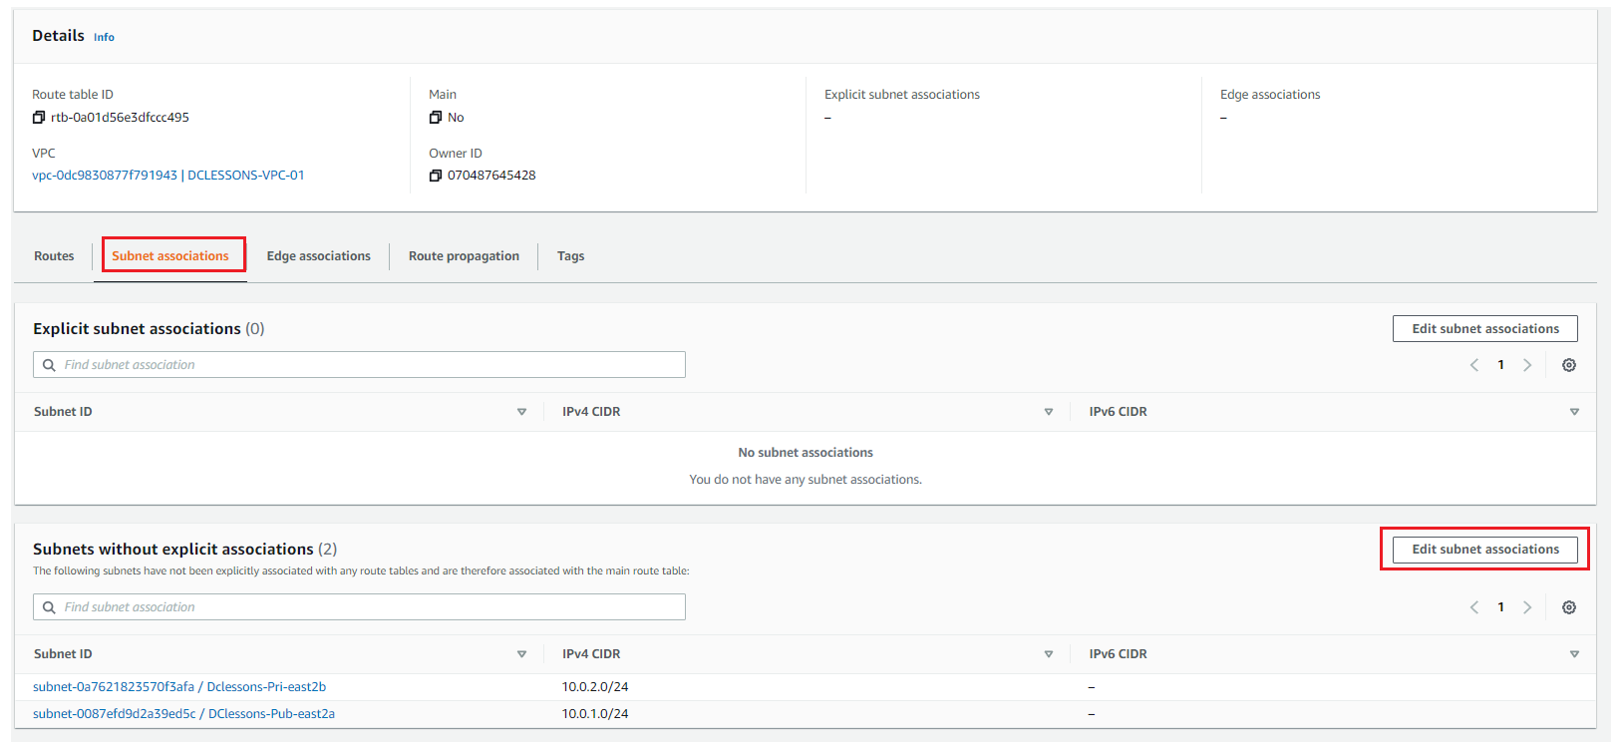
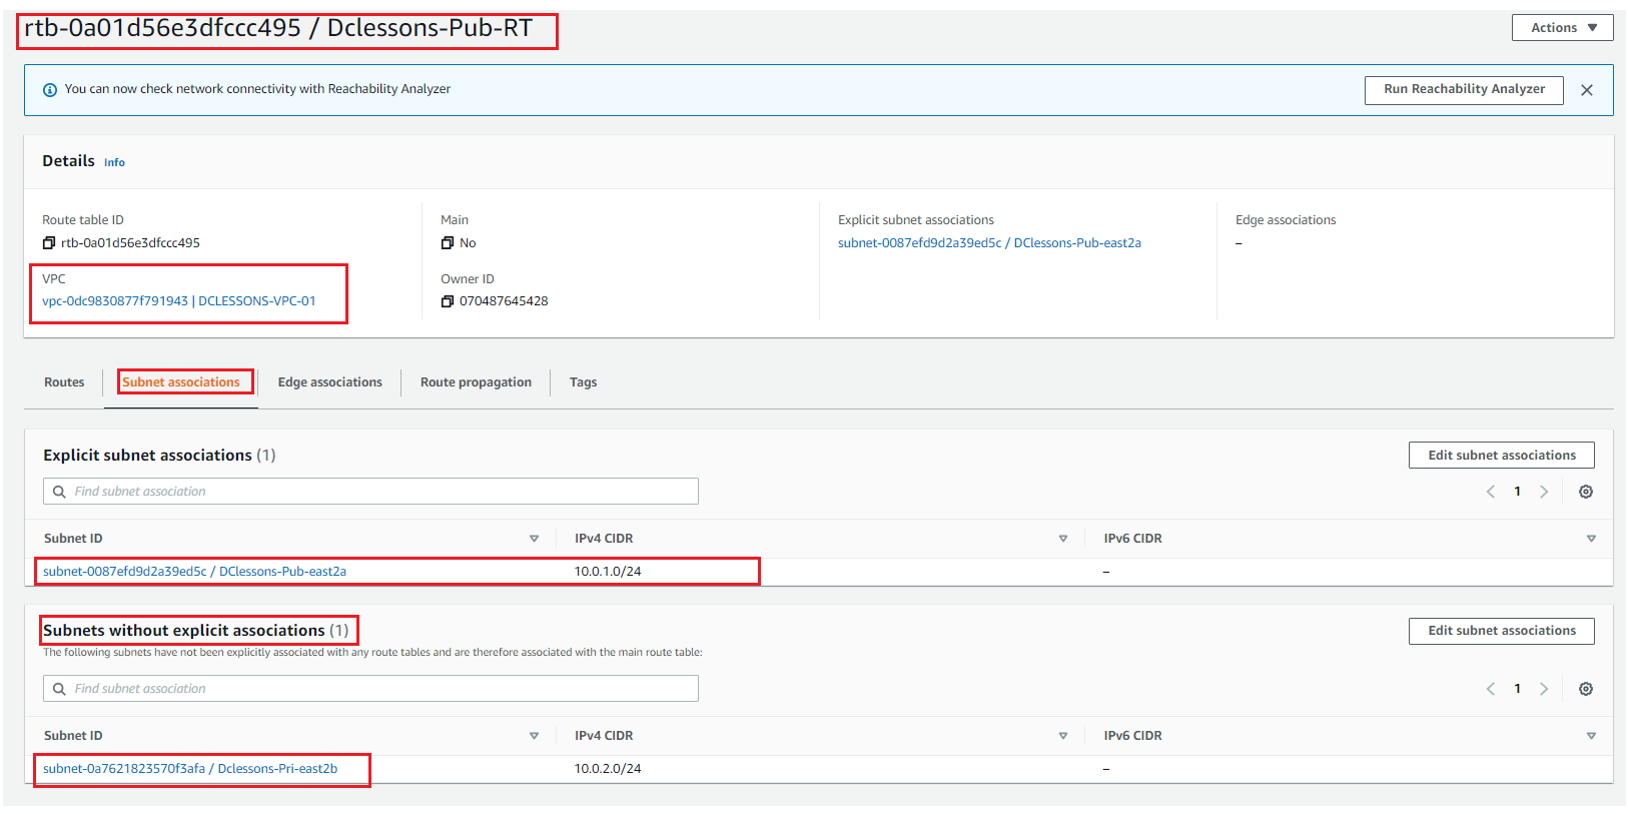
Now you can see that public Subnet: Dclessons-Pub-RT has 10.0.1.0/24 subnet associated to it and One subnet 10.0.2.0/24 subnet has not explicit association.
Likewise, you have to create One Route table for private Subnet and associate it with subnet 10.0.2.0/24, as shown in below figure

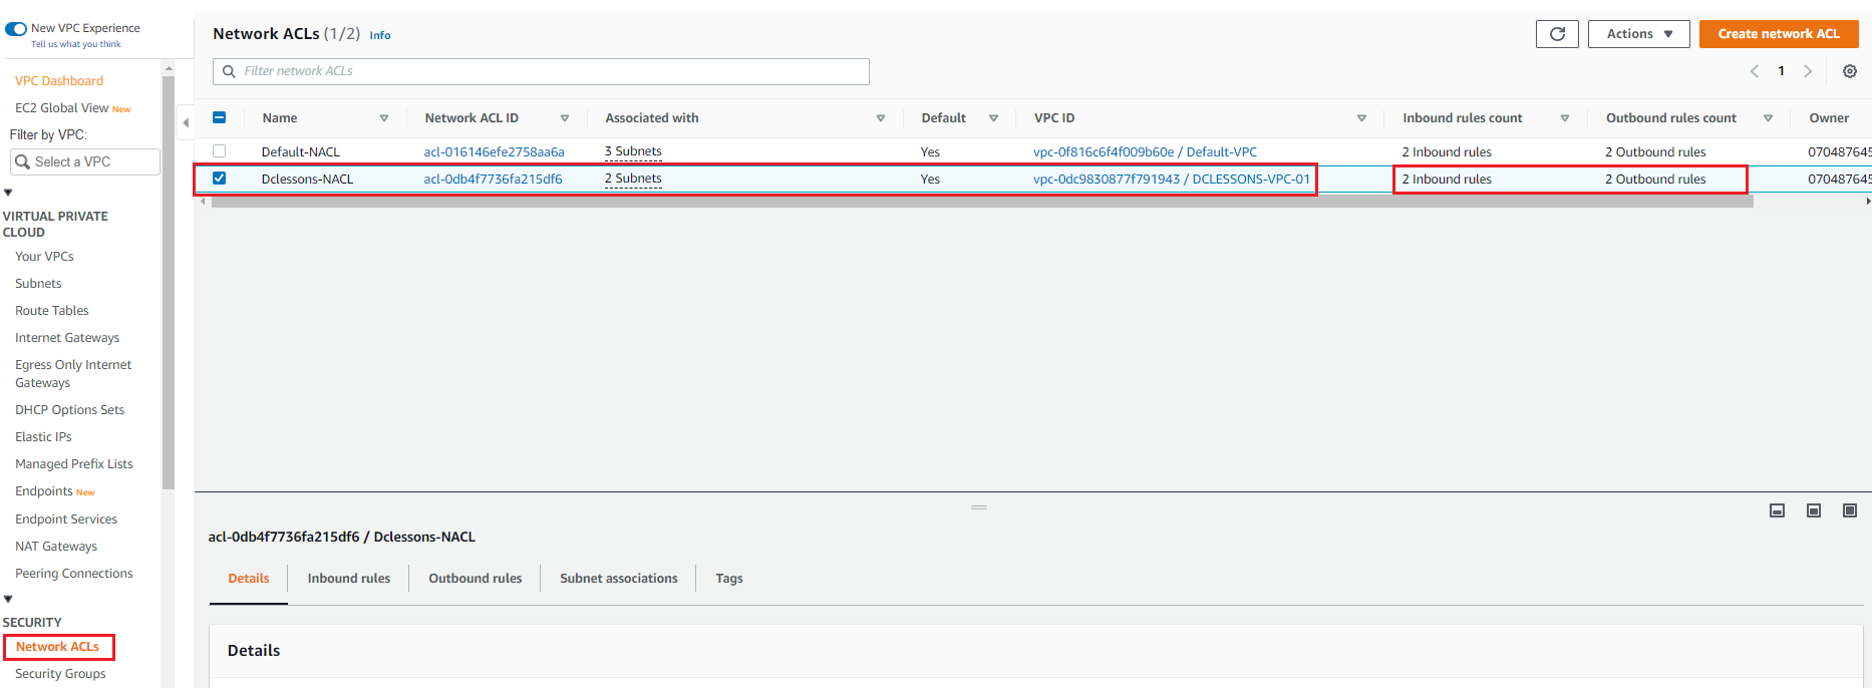
Create NACL:
Go to your VPC Section | Left Side of your Work plane | Click Network ACLs under Security Section
Here you can see that one NACL for your VPC DCLESSONS-VPC-01 has already been created by default. We have renamed it to Dclessons-NACL. Both public and private subnet will be protected by this NACL only.
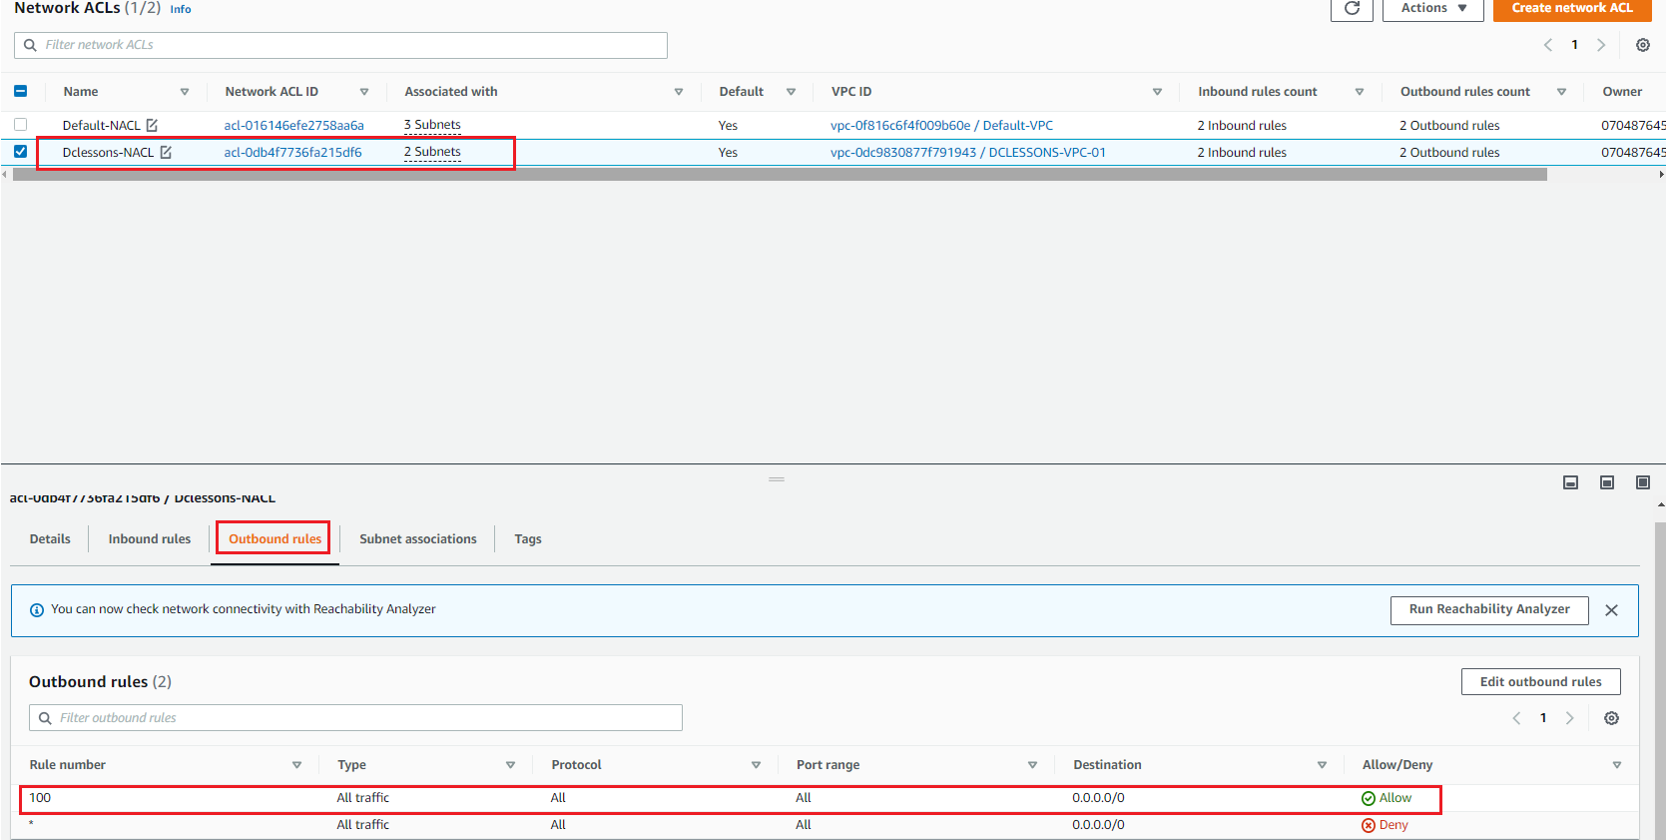
By default, this NACL will allow all traffic to and from the subnet. Go to outbound Rule Section and see all traffic is allowed from this NACL
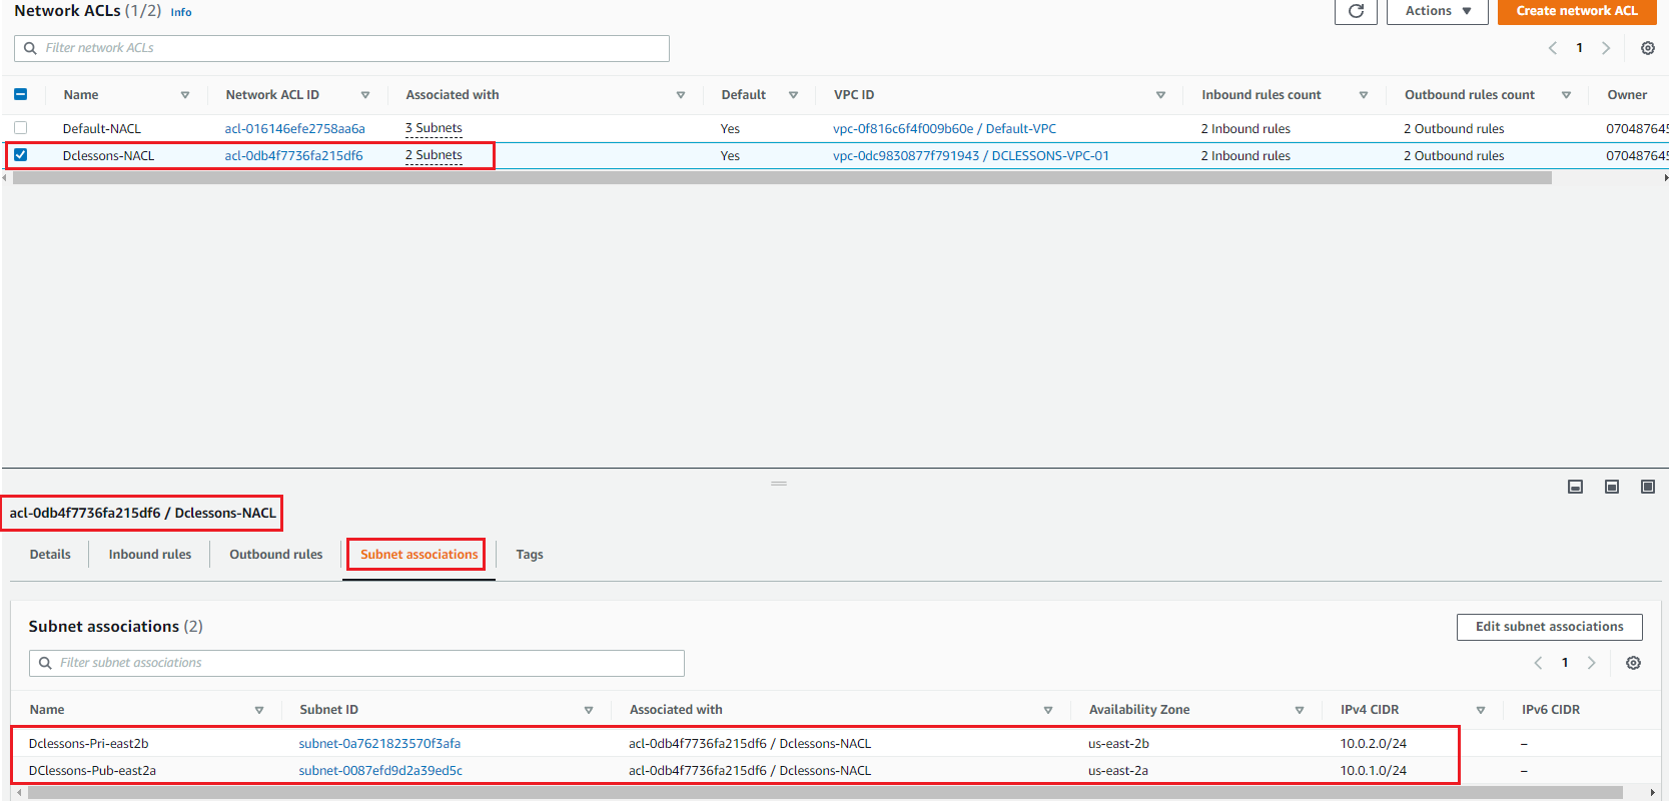
Now Select this NACL: Dclessons-NACL | Subnet Association | here you can see that both Subnet has been associated to this NACL .
Create IGW:
In this section, we need an internet gateway, for internet access for EC2 instances. IGW performs Data-plane encapsulation and decapsulation and perform IP address translation. We also must allocate Elastic public IP address and associate it with EC2 instances. By doing it, we don’t add EIP to EC2 instance itself , instead we create One to One NAT entry in to VPC associated IGW.
Below is the Architecture need to be followed while setting up an internet connection for public subnet of AWS DCLESSONS-VPC-01.

Comment
TABLE OF CONTENTS
- LAB: Create a Custom VPC & test reachability between EC2 via Internet GW and NAT GW.
- LAB: Configure EC2 as VPN Server for Open VPN Connection
- LAB: Configure AWS Site to Site VPN Connection
- LAB: Configure Network Loadbalancer
- LAB : Configure Transit Gateway with Segmentation
- LAB :Configure Transit Gateway Peering between Two VPC
- LAB: Configure VPC Peering between Two VPC
- LAB : Configure VPC Endpoint to access S3
- LAB: Configure End to End VPC Endpoint Service
- LAB : Create VPC Flow Logs and Generate Traffic
- LAB : Configure WAF to block Web traffic
RECENT POSTS
- Installing Context-Aware Network Access Control using Cisco ISE Policies
- Designing Network Access Control that is Scalable using Cisco ISE Architecture
- Enterprise Network Access Control and Policy Enforcement using Cisco ISE
- Secure Device Administration and Network Access Using AAA Architecture
- Designing Enterprise-Class Hybrid Cloud Connectivity Using AWS Networking Services
- Exploring Core AWS Networking and Messaging Concepts for Modern Cloud Architectures
- Understanding Key AWS Services for Modern Cloud Architectures
- Building a Strong AWS Foundation with Amazon S3, EC2, and Virtual Private Cloud
- Understanding the ENSDWI Course: Advanced Cisco SD-WAN (Viptela) Concepts
- A Complete Guide to the DCACI-A Course: Mastering Advanced Cisco ACI Concepts


LEAVE A COMMENT
Please login here to comment.