EMAIL SUPPORT
dclessons@dclessons.comLOCATION
USNSX Edge Service Gateway Firewall Configuration
Task:
- Create Rule name DCLessons FW Rule with source 192.168.110.10 and destination Web_Tier_Logical_Switch with action Reject
- Test the FW rule
- Again Change the action to Accept and again test the traffic from 192.168.110.10
- Delete the Rule just created.
Solution:
The NSX Edge Firewall monitors North-South traffic to provide perimeter security capabilities. Whereas NSX Distributed Firewall, where policy is applied at the virtual NIC of every VM.
When rules are created in the NSX Firewall user interface that are applicable to an NSX Edge Gateway, they are displayed on the Edge in read-only mode. When rules exist in multiple locations, they are displayed and enforced in the following order:
- User-defined rules from the Firewall user interface (Read only).
- Auto-configured rules (automatically created rules that enable control traffic for Edge services).
- User-defined rules on NSX Edge Firewall user interface.
- Default rule.
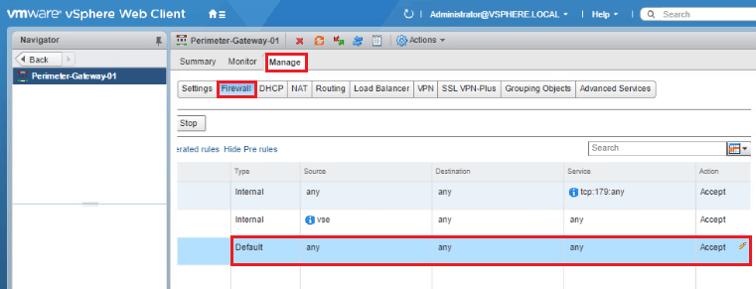
Solution: Follow the following steps:
- Click Home
- Click Networking & Security.
- Click NSX Edges.
- Double-click Perimeter Gateway-01.

- Click Manage.
- Click Firewall.
- Click to select Default Rule.
- Click the pencil icon under the Action column.
- Select Deny in the Action field.
Don’t revert the changes as we are not going to changes in FW rule configuration.
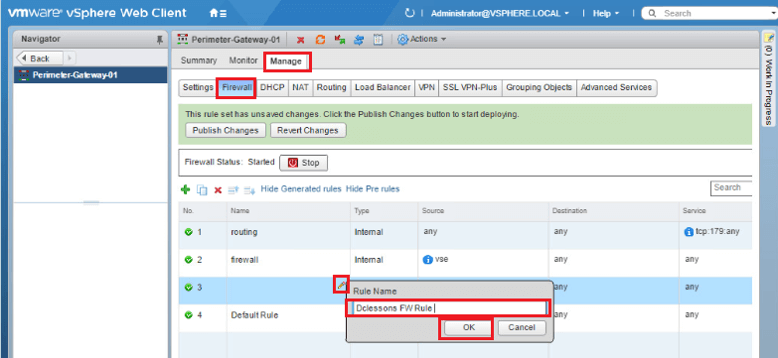
Adding Edge Services Gateway Firewall Rule
We will add a new edge firewall rule to block the Control Center's access to the Customer DB Application.
- Click Green Plus icon to add a new firewall rule.
- Hover mouse over the upper right corner of the Name column and click the pencil icon.
- Enter Main Console FW Rule as the Rule Name.
- Click OK.
Hover mouse in the upper right corner of the Source column and click Pencil icon.
- Click Object Type drop down menu and select IP Sets.
- Click New IP Set... hyperlink.
- Enter Main Console as the Name.
- Enter 192.168.110.10 as the IP address.
- Click OK.

Comment
You are will be the first.
TABLE OF CONTENTS
- LAB NSX Manager Installation
- LAB NSX Logical Switching Configuration
- LAB NSX Logical Router Configuration
- LAB NSX EDGE SERVICES GATEWAY
- Gateway
- LAB NSX Edge Service Gateway as DHCP Relay
- LAB NSX Configuring L2VPN
- LAB NSX DFW Configuration
- LAB NSX Dynamic Security Group Configuration
- LAB NSX Micro-Segmentation
RECENT POSTS
- Installing Context-Aware Network Access Control using Cisco ISE Policies
- Designing Network Access Control that is Scalable using Cisco ISE Architecture
- Enterprise Network Access Control and Policy Enforcement using Cisco ISE
- Secure Device Administration and Network Access Using AAA Architecture
- Designing Enterprise-Class Hybrid Cloud Connectivity Using AWS Networking Services
- Exploring Core AWS Networking and Messaging Concepts for Modern Cloud Architectures
- Understanding Key AWS Services for Modern Cloud Architectures
- Building a Strong AWS Foundation with Amazon S3, EC2, and Virtual Private Cloud
- Understanding the ENSDWI Course: Advanced Cisco SD-WAN (Viptela) Concepts
- A Complete Guide to the DCACI-A Course: Mastering Advanced Cisco ACI Concepts


LEAVE A COMMENT
Please login here to comment.