EMAIL SUPPORT
dclessons@dclessons.comLOCATION
USLAB:Configuring vPC & its Components
Topology:
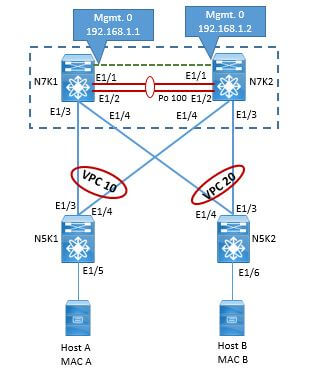
Task:
Configure the vPC system as per topology and as per task given below.
- Configure vPC domain 100 between N7K1 and N7K2
- Configure N7K1 with Role priority 10 and N7K2 with Role Priority 20
- Configure Peer-keepalive link between N7k1 and n7K2 on mgmt0 link.
- Configure LACP port-channel port Eth1/1 and Eth1/2 on both N7K1 and N7K2 and use it as peer-link
- Configure Eth1/3 on vPC 10 and Eth1/4 on vPC 20 on N7K1 and same on N7K2.
- Configure Eth1/3 and Eth1/4 on N5K1 on Port channel 10 and Eth1/3 and Eth1/4 on N5K2 on Port channel 20.
- Configure Layer 2 VLAN VLAN 10, VLAN 20, and VLAN 30 on All Four Switch
- Configure N7K1 as STP Root Bridge.
- Configure Eth1/5 on VLAN 10 on Both N5K1 and N5K2. Assign HOST 1 with IP 10.10.10.4 and Host with IP 10.10.10.5
- Verify the Connectivity vPC and Connectivity between Host 1 and Host 2.
Solution:
TASK 1: Configure vPC domain 100 between N7K1 and N7K2, Configure N7K1 with Role priority 10 and N7K2 with Role Priority 20 and Configure Peer-keepalive link between N7k1 and n7K2 on mgmt0 link. Configure LACP port-channel port Eth1/1 and Eth1/2 on both N7K1 and N7K2 and use it as peer-link
NEXUS 7K1 Configuration:
N7K1(config)# feature lacp
N7K1(config)# feature vpc
N7K1(config)# feature interface-vlan
N7K1(config)# vpc domain 100
N7K1(config-vpc-domain)# role priority 10
N7K1(config-vpc-domain)# peer-keepalive destination 192.168.1.2 source 192.168.1.1 vrf management
N7K1(config-vpc-domain)# exit
!
N7K1(config)# int eth1/1-2
N7K1(config-if-range)# switchport
N7K1(config-if-range)# switchport mode trunk
N7K1(config-if-range)# channel-group 100 mode active
N7K1(config-if-range)# no shut
N7K1(config-if-range)# exit
N7K1(config)# int po100
N7K1(config-if)# switchport
N7K1(config-if)# switchport mode trunk
N7K1(config-if)# vpc peer-link
N7K1(config-if)# no shut
N7K1(config-if)#exit
!
NEXUS 7K2 Configuration:
N7K2(config)# feature lacp
N7K2(config)# feature vpc
N7K2(config)# feature interface-vlan
N7K2(config)# vpc domain 100
N7K2(config-vpc-domain)# role priority 20
N7K2(config-vpc-domain)# peer-keepalive destination 192.168.1.1 source 192.168.1.2 vrf management
N7K2(config-vpc-domain)# exit
!
N7K2(config)# int eth1/1-2
N7K2(config-if-range)# switchport
N7K2(config-if-range)# switchport mode trunk
N7K2(config-if-range)# channel-group 100 mode active
N7K2(config-if-range)# no shut
N7K2(config-if-range)# exit
N7K2(config)# int po100
N7K2(config-if)# switchport
N7K2(config-if)# switchport mode trunk
N7K2(config-if)# vpc peer-link
N7K2(config-if)#exit
N7K2(config-if)# no shut
vPC domain Verification and Peer-link verification:

Comment
TABLE OF CONTENTS
- VPC Terminology & Deployment Scenarios
- VPC Configuration Best Practices
- VPC Consistency Check and failover Scenarios
- VPC Traffic Flows
- VPC in Mixed Chassis Mode
- Attaching Devices to VPC domain
- STP Behaviour in VPC
- VPC and L3 Design Scenarios
- Fex With vPC and ISSU
- VPC Enhancements
- Nexus 5500 & vPC
- LAB:Configuring vPC & its Components
- LAB: VPC Consistency Check and failover Scenarios
- LAB: Back to Back VPC
- OTV Terminology & Concepts
- OTV Control plane over Multicast & Unicast Infrastructure
- OTV Data Traffic
- OTV Advance Functions
- OTV Multi-Homing
- OTV FHRP Isolation & Stability Conditions
- OTV Single Edge Device – Multicast Mode Configuration
- OTV in Unicast Mode Configration Guidelines
- LAB OTV Configuration
RECENT POSTS
- Installing Context-Aware Network Access Control using Cisco ISE Policies
- Designing Network Access Control that is Scalable using Cisco ISE Architecture
- Enterprise Network Access Control and Policy Enforcement using Cisco ISE
- Secure Device Administration and Network Access Using AAA Architecture
- Designing Enterprise-Class Hybrid Cloud Connectivity Using AWS Networking Services
- Exploring Core AWS Networking and Messaging Concepts for Modern Cloud Architectures
- Understanding Key AWS Services for Modern Cloud Architectures
- Building a Strong AWS Foundation with Amazon S3, EC2, and Virtual Private Cloud
- Understanding the ENSDWI Course: Advanced Cisco SD-WAN (Viptela) Concepts
- A Complete Guide to the DCACI-A Course: Mastering Advanced Cisco ACI Concepts


LEAVE A COMMENT
Please login here to comment.