EMAIL SUPPORT
dclessons@dclessons.comLOCATION
USApstra Device Management Workflow
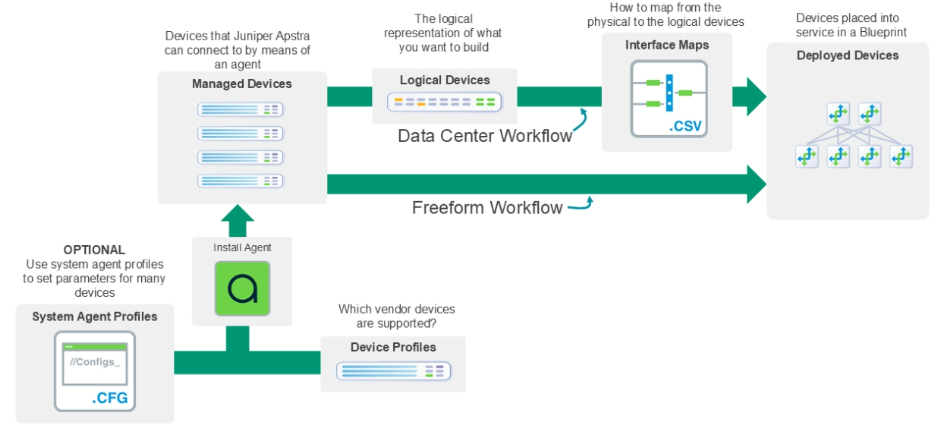
The workflow in Juniper Apstra to get a physical device in your network from the state of being in an unknown state to being actively managed by Apstra. If you remember, every device that is managed by Apstra will have a system agent (sometimes called device agent) that manages that device on behalf of Apstra. Prior to being able to install an agent for a particular device (a QFX10002 switch, for example), Apstra must be able to find a device profile for that device. A device profile helps Apstra determine whether the device being added to the system is a supported device. During the early stages of the agent installation process, Apstra logs in to the device and determines the device manufacturer, model, and the software version.
It uses that information to determine whether the device is a supported device. Apstra searches to see if there is a matching device profile in the list of device profiles. If not, the system agent installation fails. You must go through some simple steps in the UI to create each system agent. For each agent, you must configure some details about the device like username and password. If you have numerous devices that have the same username and password (or other common requirements), you can create an agent profile. Then, when you create the agents, you can apply the agent profile to the agent so that you do not have to reenter the common information each time.
Device Profile
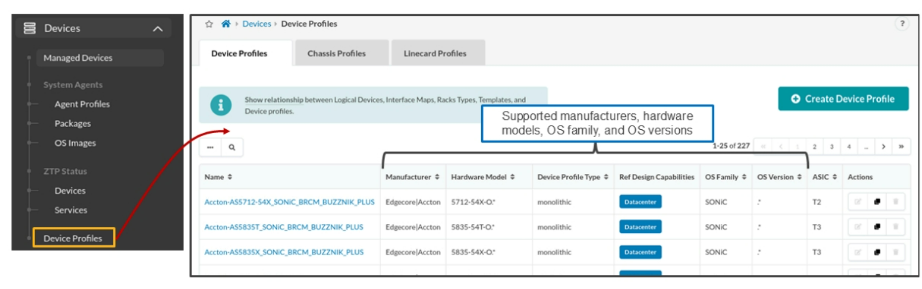
Device profiles serve several purposes, but regarding agent installation, it is used to determine if a device is a supported device. Notice that there are many device profiles available. Each device profile represents a supported manufacturer's device or set of devices. Each device profile contains a manufacturer, model, OS family, and OS version. These fields act as regular expressions and are used to match upon the initial details learned by Apstra during the early stages of agent installation. Using information learned from the device, Apstra tries to find a matching device profile in this list. If it cannot find a matching device profile, the agent installation fails. If Apstra finds a matching device, the agent installation continues associating the newly managed device with that matching device profile from then on.
 To support agent installation and agent-to-Apstra communication, the Apstra server must be able to communicate with the devices over their management interfaces. The management interface is the only interface on a device that Apstra never configures, but it might configure every other interface of a device (change IP addressing, for example). In the example, the Apstra server, ZTP server, and the devices (management interfaces) share a common subnet. We will use the Apstra ZTP server that you find on the Juniper Apstra software download site to act as the Dynamic Host Configuration Protocol (DHCP), Trivial File Transfer Protocol (TFTP), and HTTP server. You can choose to use your own ZTP server, but as you will notice, there are a few things that make using the provided ZTP server easiest to use.
After enabling the devices with a minimal configuration, we will install their Apstra device agents.
Minimum Configuration
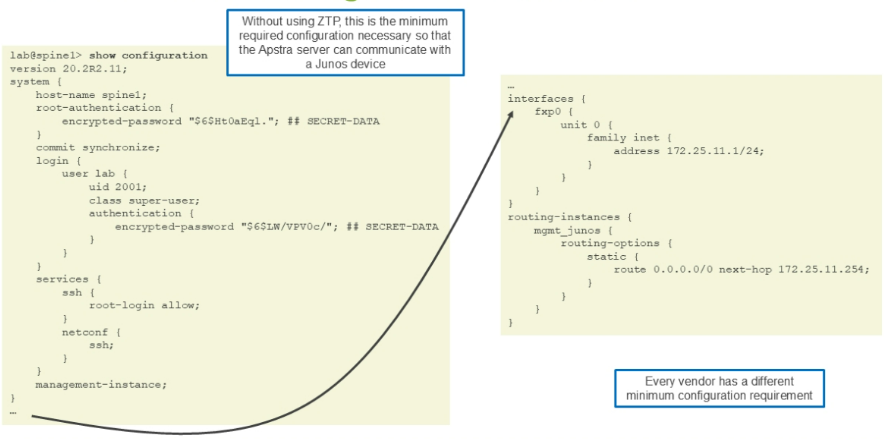
If you do not use ZTP, you must manually configure your devices with a minimum configuration. The Apstra documentation describes the minimum configuration for each vendor. The below figure shows the minimum configuration for a Junos device. You must preconfigure a Junos device with a superuser, Network Configuration Protocol (NETCONF) SSH, management IP address, and a default route if necessary.
Device Configurations
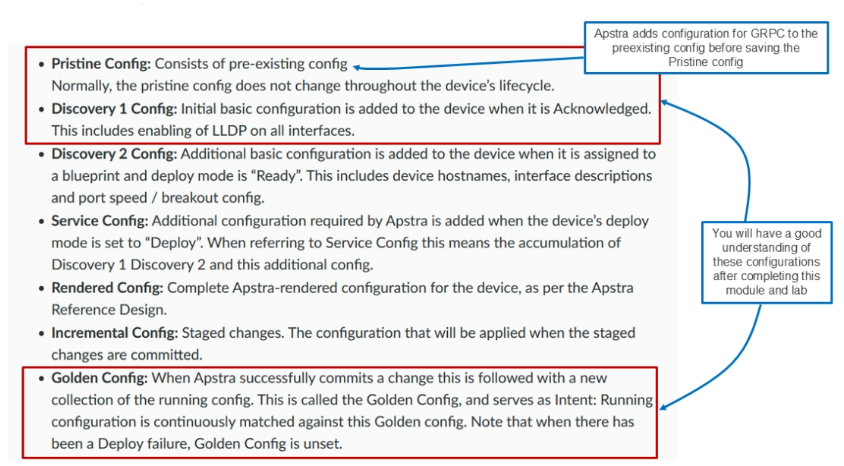
As you get to know Apstra, you quickly realize that there are names given to various device configurations during a device's lifecycle. The below figure lists all of them. In this module, you will get familiar with the highlighted configurations. The easiest configuration to understand is the pristine configuration. A pristine configuration is the configuration that exists on a device just prior and just after agent installation (before acknowledgment).
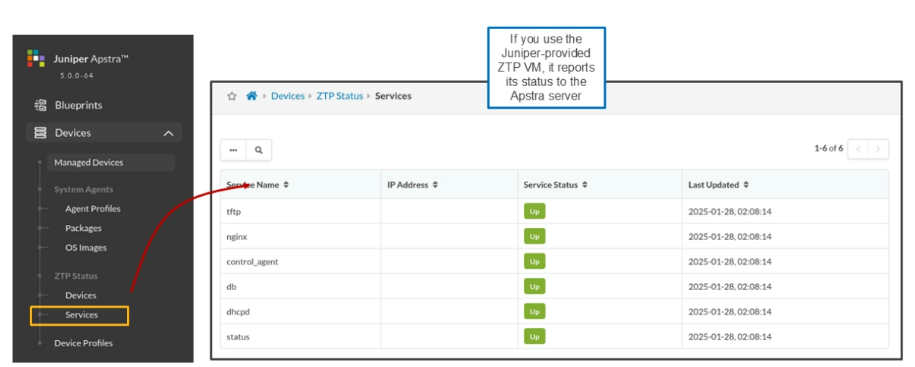
ZTP Server Status
The below figure shows one benefit of using the Juniper-provided Apstra ZTP server virtual machine (VM). There are many benefits, as you will see. By navigating to Devices > ZTP Status > Services, you can see what the Apstra ZTP server VM is reporting to the Apstra server. As you can see, all the ZTP-related services are running on the ZTP VM, including TFTP, NGINX (HTTP), and DHCP. Although you can see that the services are running, you still must make sure that you have configured the ZTP VM properly.
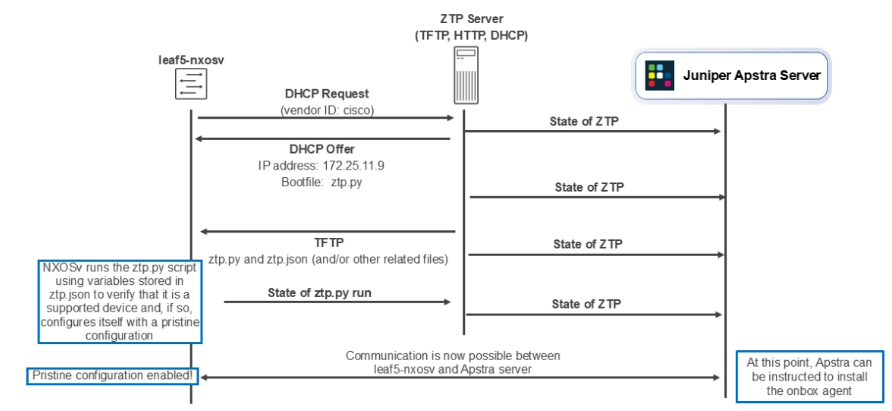
ZTP Process for a Cisco NXOS Device
The below figure shows the start-to-finish process to complete ZTP for a Cisco NXOSv device. Notice that it is in the DCHP request that the ZTP server learns a device's vendor ID. It is the vendor ID, cisco, that enables the ZTP server to send a DHCP offer that contains an IP address of the TFTP server and a bootfile (each vendor's bootfile or provisioning URL will be potentially different). Based on the received information, the NXOSv downloads both the ztp.py script and ztp.json file. The NXOSv device then runs the ztp.py script (using the variables defined in the ztp.json file). The ztp.py script performs a check to ensure that the device is a supported device (Apstra does not use the device profile at this point since the device is not currently communicating with Apstra) and that a valid OS version is running.
If so, the ztp.py script configures the NXOSv with a basic configuration to communicate over its management interface with the Apstra server. This basic configuration eventually becomes the pristine configuration for this device once Apstra installs the agent. Here you see another benefit of using the Juniper-provided ZTP server VM. As ZTP progresses, the VM continually provides status to the Apstra server. This is not something that a self-made ZTP server usually does.
Apstra ZTP Server Overview
Apstra ZTP is a zero-touch-provisioning server for data center infrastructure systems. From an Apstra perspective, it's a process that automatically takes a device from initial boot to a point where it's managed by Apstra. Apstra ZTP takes care of any underlying NOS requirements.
The ZTP process includes the following activities:
Generic DHCP server (if using DHCP)
- The device requests an IP address by means of DHCP.
- The device receives the assigned IP address and a pointer to the OS installation image.
Device initialization
- Download the ZTP script using TFTP.
- Execute the downloaded script to prepare it to be managed. Including verifying that the device is running a supported OS; if it is not, it upgrades or downgrades the version, as needed.
- Set the device admin/root password.
- Create a device user for the device system agent.
Device system agent installation
- The ZTP script makes an API call to install a device system on the device for onbox agents, or on the Apstra server for offbox agents.
Apstra ZTP runs as an Ubuntu 22.04.3 LTS server running MySQL, DHCP, HTTP, and TFTP servers. You'll need to configure the DHCP.conf file and the ztp.json files during ZTP setup.
You can use the Apstra ZTP GUI, and, as of Apstra version 5.0.0, you can also use a ZTP REST API to configure these files, among other tasks. Apstra ZTP provides a method for automating switch initialization and customization.

Comment
TABLE OF CONTENTS
- Navigating Apstra UI
- Configure : Logical Devices, Device Profiles, and Interface Maps
- Managing Devices
- Creating Resources and Tags
- Configuring Racks
- Configuring Templates
- Building and Deploying a Blueprint From a Template
- Working With The Active Blueprint
- Enabling Property Sets & Configlets
- Configuring Connectivity Templates
- Configuring Multitenancy
RECENT POSTS
- Enterprise Network Access Control and Policy Enforcement using Cisco ISE
- Secure Device Administration and Network Access Using AAA Architecture
- Designing Enterprise-Class Hybrid Cloud Connectivity Using AWS Networking Services
- Exploring Core AWS Networking and Messaging Concepts for Modern Cloud Architectures
- Understanding Key AWS Services for Modern Cloud Architectures
- Building a Strong AWS Foundation with Amazon S3, EC2, and Virtual Private Cloud
- Understanding the ENSDWI Course: Advanced Cisco SD-WAN (Viptela) Concepts
- A Complete Guide to the DCACI-A Course: Mastering Advanced Cisco ACI Concepts
- How Our Online Python Certification Will Prepare You for a Career in Network Automation
- What You'll Learn in Juniper Mist Labs: A Deep Dive into AI-Driven Wireless Networking


LEAVE A COMMENT
Please login here to comment.