EMAIL SUPPORT
dclessons@dclessons.comLOCATION
USLAB Amazon EC2 Linux Instances
Let's get started with Amazon Elastic Compute Cloud (Amazon EC2) by launching, connecting to, and using a Linux instance. An instance is a virtual server in the AWS cloud. With Amazon EC2, you can set up and configure the operating system and applications that run on your instance.
Task:
- Step 1: Launch an Instance
- Step 2: Connect to Your Instance
- Step 3: Clean Up Your Instance
Step 1: Launch an Instance
- Open the Amazon EC2 console at https://console.aws.amazon.com/ec2/.
- From the console dashboard, choose Launch Instance.

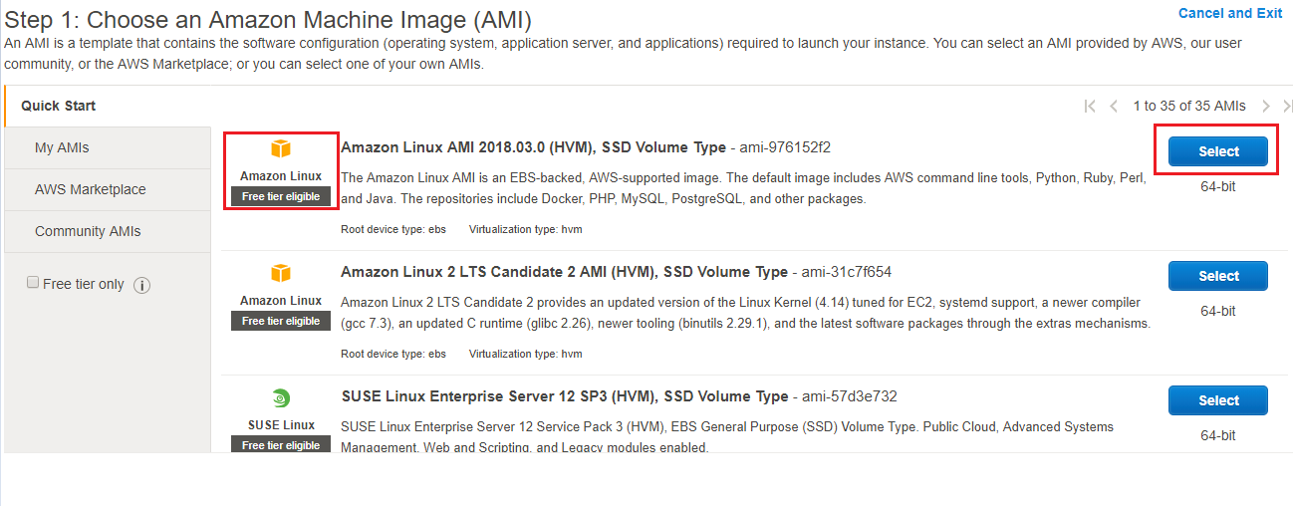
- The Choose an Amazon Machine Image (AMI)page displays a list of basic configurations, called Amazon Machine Images (AMIs) that serve as templates for your instance. Select the HVM edition of the Amazon Linux AMI or the AMI for Amazon Linux 2.Notice that these AMIs are marked "Free tier eligible."
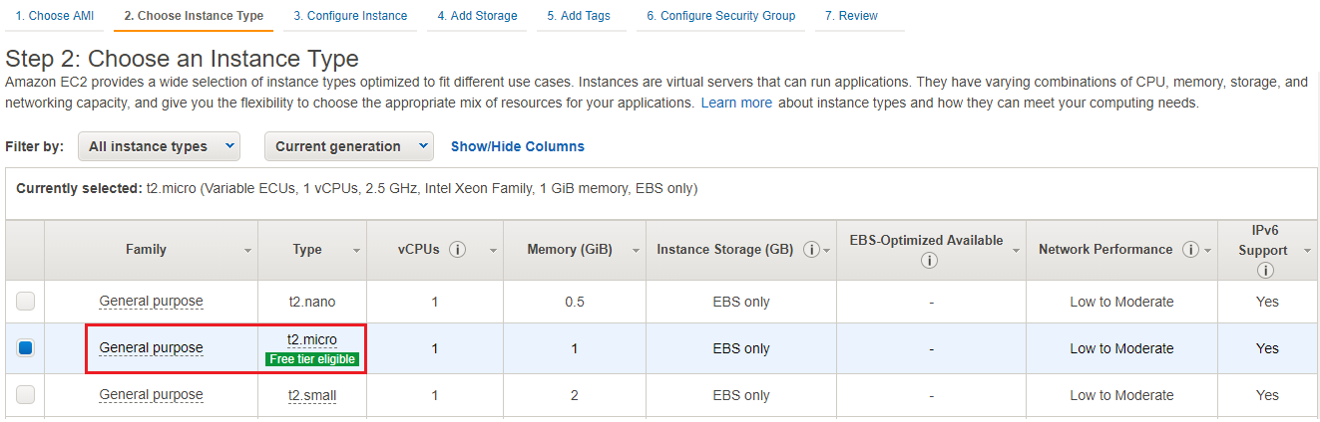
- On the Choose an Instance Type page, you can select the hardware configuration of your instance. Select the micro type, which is selected by default. Notice that this instance type is eligible for the free tier.
- Choose Review and Launch to let the wizard complete the other configuration settings for you.
- On the Review Instance Launch page, under Security Groups, you'll see that the wizard created and selected a security group for you. You can use this security group, or alternatively you can select the security group that you created when getting set up using the following steps:
- Choose Edit security groups.
- On the Configure Security Group page, ensure that select an existing security group is selected.
- Select your security group from the list of existing security groups, and then choose Review and Launch.
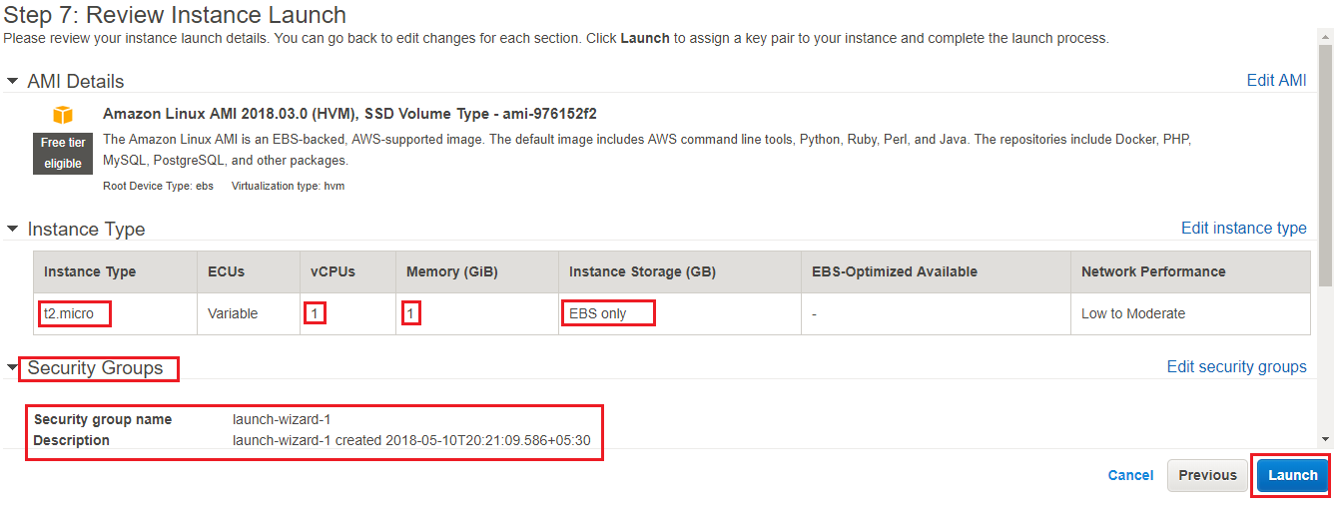
- On the Review Instance Launchpage, choose Launch.
- When prompted for a key pair, select Choose an existing key pair, then select the key pair that you created when getting set up.
Alternatively, you can create a new key pair. Select Create a new key pair, enter a name for the key pair, and then choose Download Key Pair. This is the only chance for you to save the private key file, so be sure to download it. Save the private key file in a safe place. You'll need to provide the name of your key pair when you launch an instance and the corresponding private key each time you connect to the instance.

Comment
You are will be the first.
TABLE OF CONTENTS
- Amazon S3- Basic Features
- Amazon S3 Advance Feature
- Amazon Glacier
- LAB Amazon Simple Storage Service
- LAB Setting up a Static Website
- LAB Enabling Versioning
- LAB Lifecycle Policy for S3 Bucket
- LAB: Create S3 Bucket & Upload Image & View Over browser
- LAB: Install AWS CLI
- LAB: Configure Lembda to upload an object in S3 Bucket
- Creating Custom VPC
- How to Attach Multiple IP to ENI-Instance
- How to Configure Launch Configuration & Auto Scaling
- How to Configure VPC Peering
- How to Configure VPN for VPC
- How to Configure VPC Tunneling
- How to Configure VPC with Private Subnet & Connect to DC
- How to Create Template for CloudFormation
- How to Configure Cloud Formation
- LAB: Configure Auto-Scaling & validation
RECENT POSTS
- Installing Context-Aware Network Access Control using Cisco ISE Policies
- Designing Network Access Control that is Scalable using Cisco ISE Architecture
- Enterprise Network Access Control and Policy Enforcement using Cisco ISE
- Secure Device Administration and Network Access Using AAA Architecture
- Designing Enterprise-Class Hybrid Cloud Connectivity Using AWS Networking Services
- Exploring Core AWS Networking and Messaging Concepts for Modern Cloud Architectures
- Understanding Key AWS Services for Modern Cloud Architectures
- Building a Strong AWS Foundation with Amazon S3, EC2, and Virtual Private Cloud
- Understanding the ENSDWI Course: Advanced Cisco SD-WAN (Viptela) Concepts
- A Complete Guide to the DCACI-A Course: Mastering Advanced Cisco ACI Concepts


LEAVE A COMMENT
Please login here to comment.