EMAIL SUPPORT
dclessons@dclessons.comLOCATION
USLAB: ACI Integration with VMWARE
Topology:
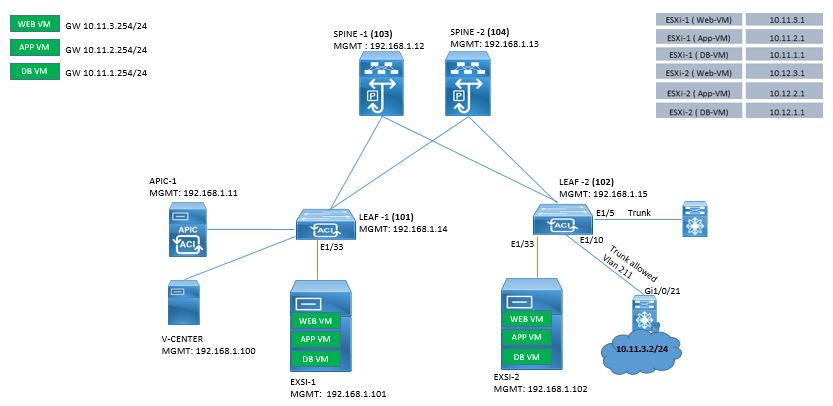
TASK: Follow the below following task to complete the ACI Integration with VMWARE.
TASK1: Registering ACI with VMM Domain
- Configure VMM Domain with name My‐vCenter.
- Create VLAN Pool with name DCLessons_VLAN_Pool and range from 1001 to 1100 and Select “Dynamic Allocation” as the Allocation Mode.
- Configure vCenter Credentials with name administrator, username administrator and password XXXXX
- Create a vCenter server Object by configuring vCenter Controller with name DCLessons, IP Address of the vCenter Server, which is “192.168.1.100, Datacenter name is DCLessons-DC, and associate credential administrator which you created above.
- Verify that your APIC DVS has been created in VMware center and ACI is integrated to VMM Domain.
TASK2: Adding EXSI host to APIC DVS.
- Select the VMNIC2 of both ESXi Server and add to it APIC DVS so that from this NIC traffic from APIC DVS to ACI fabric.
TASK3: Associating EPG to vCenter Domain so that Port-group can be created to APIC DVS.
- Associate DB_EPG to vCenter Domain to create Port-group
- Associate App_EPG to vCenter Domain to create Port-group
- Associate Web_EPG to vCenter Domain to create Port-group
TASK4: Associate VM to EPG Port-Groups created in TASK3.
- Associate Web-Server to Web_EPG Port Group.
- Associate App-Server to App_EPG Port Group.
- Associate DB-Server to DB_EPG Port Group.
TASK5: Create the Attachable Entity Profile and attach it between VMM Domain and Physical Switch Domain.
- Configure AEP profile name AAEP-ESX
- Select domain My-vCenter and leave Association to interface blank.
- Create the Interface Policy Group named DCL_EXSi_INT_POLICY_GROUP and select 10G Link Level Policy, CDP enable Policy, LLDP DISABLE policy and attach it to AAEP-ESX.
- Create Interface profile named DCL_ESXi_INT_PROFILE select interface 1/33 and attach the above Interface Policy Group named DCL_EXSi_INT_POLICY_GROUP
- Create Switch Profile named DCL_ESXI_SW_PROFILE and select Leaf 101 and Leaf 102 and associate above created Interface profile named DCL_ESXi_INT_PROFILE to it.
Solution:
TASK1: Registering ACI with VMM Domain
- Configure VMM Domain with name My‐vCenter.
- Create VLAN Pool with name DCLessons_VLAN_Pool and range from 1001 to 1100 and Select “Dynamic Allocation” as the Allocation Mode.
- Configure vCenter Credentials with name administrator, username administrator and password XXXXX
- Create a vCenter server Object by configuring vCenter Controller with name DCLessons, IP Address of the vCenter Server, which is “192.168.1.100, Datacenter name is DCLessons-DC, and associate credential administrator which you created above.
- Verify that your APIC DVS has been created in VMware center and ACI is integrated to VMM Domain.
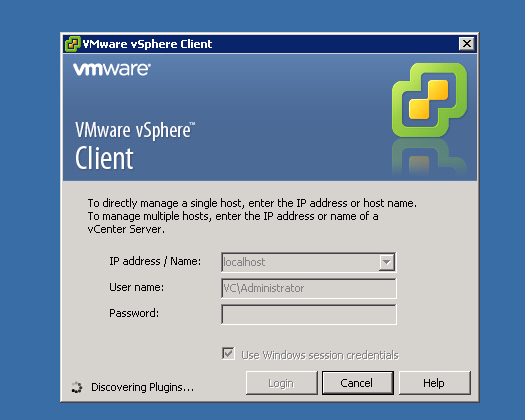
Login to vSphere client which is on the desktop use the defaults credentials, then click on “Login”
Login to APIC GUI please follow the steps and follow the figures below to create the VMM Domain.
- On the top menu, select “VM NETWORKING”
- On the left-hand panel, select the “VMware” folder
- Then on the right-‐hand panel, click on the “+” button
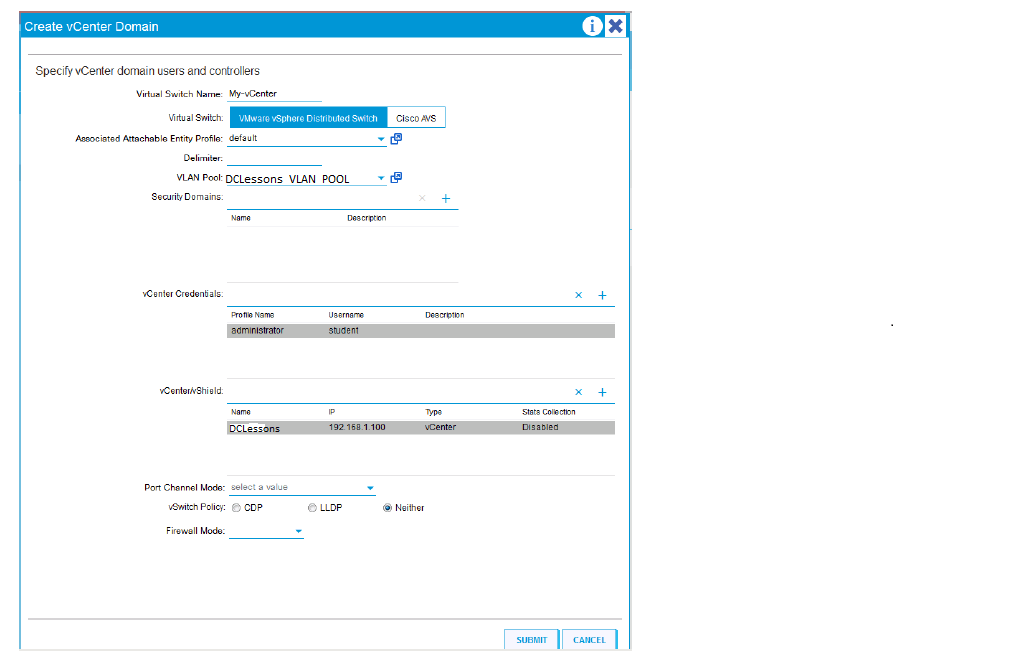
- In the “Name” window box, please type in “My‐vCenter”
- In the “VLAN Pool:” window, click on the drop down arrow
- Select “Create VLAN Pool” and the following window will appear
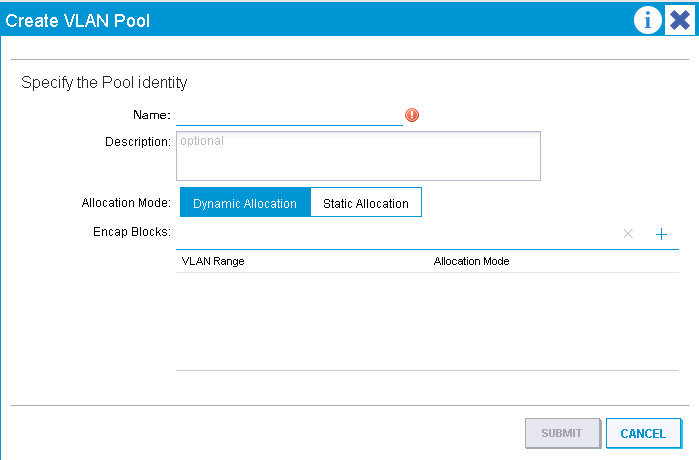
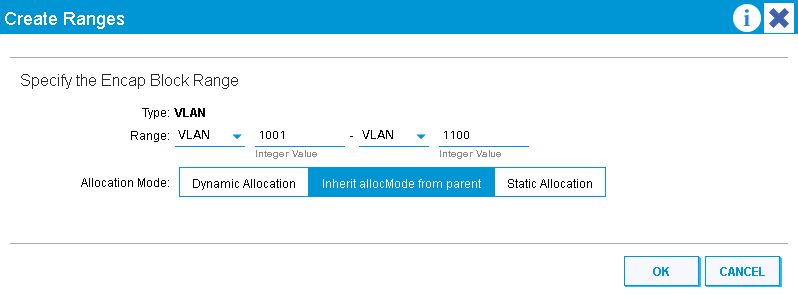
- In the “Name:” type in DCLessons_VLAN_Pool
- In the “Encap Blocks:” click on the “+” to create the VLAN Pool. In this lab, we will use VLAN range of 1001 -‐ 1100.
- Select “Dynamic Allocation” as the Allocation Mode.
- Click “OK”.
- Click on “SUBMIT” to create the VLAN Pool which will take you back to the Create vCenter Domain page
Create vCenter Credentials:
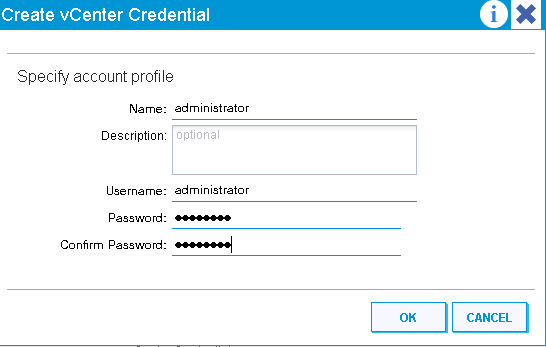
- Next we will create the credentials to login to the vCenter server. To do this, click the “+” next to the “vCenter Credentials:”
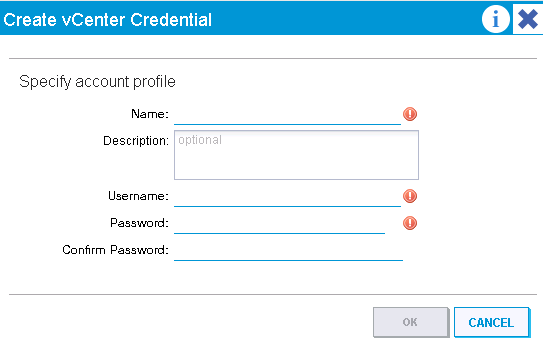
- In the “Name” window, type in a object name for this credential, which in this case we will give it administrator
- In the “Username:” box, type in the username that is authenticated into the VMware vCenter Server, which will be “administrator”
- In the “Password: window, type in the password for the user administrator, which for this lab is “XXXXXX”.
- In the “Confirm Password:” window, retype in the password again.
- Click on “OK” to complete the task
Create vCenter Server Object:
In the next task, we will create the VMware vCenter Server object.
To create the vCenter server object, click on the “+” next to “vCenter/vShield”
- Make sure the “vCenter” button is selected
- In the “Name” window, type in “DCLessons”
- In the “Address”, type in the IP Address of the vCenter Server, which is “192.168.1.100”
- In the “DVS Version”, leave the default “vCenter Default”
- In the “Status Collection”, leave it on “Disabled”
- In the “Datacenter” window, type in “DCLessons-DC”
- In the “Associated Credential:” drop-‐down box, select the credential object that was created in the previous task, which should be administrator
- Click on “OK”
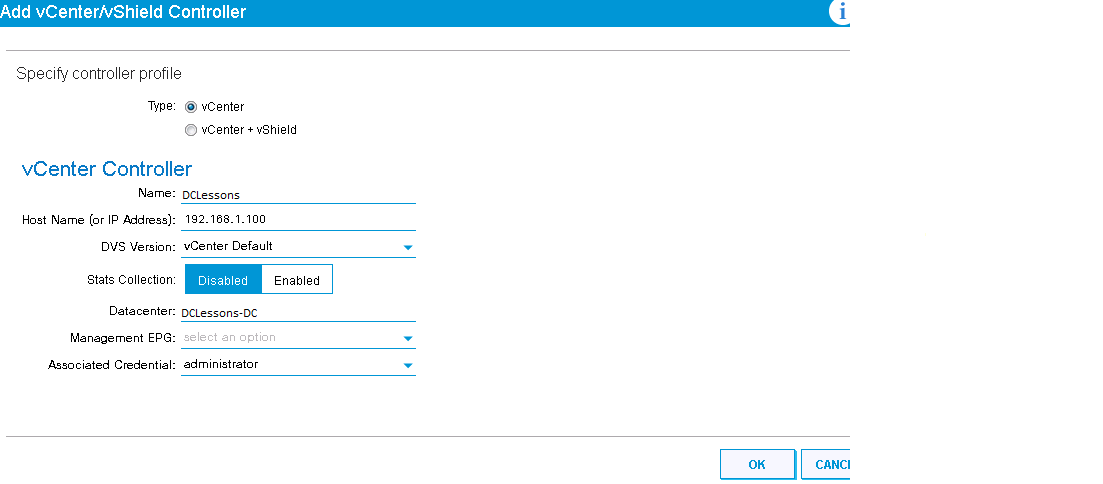
- Click on “SUBMIT” to create the vCenter server object.

Comment
TABLE OF CONTENTS
- ACI Initial Fabric Configuration
- ACI Configure Tenant VRF & Bridge Domain
- ACI Configure Filters and Contracts
- ACI Configure Three-Tier Application Profile
- ACI Configure Baseline Interface Policies
- ACI Integration with VMWARE
- ACI Inter Tenant Connectivity
- ACI Extend Bridge Domain by External Layer 2 Connection
- ACI External Network Connectivity to External Switch via Trunk
- ACI Static Routing for External Layer 3 Connectivity
- ACI OSPF Routing for External Layer 3 Connectivity
- ACI EIGRP Routing for External Layer 3 Connectivity
- ACI EBGP Routing for External Layer 3 Connectivity
- IPN Configuration
- ACI Multipod Overview
- ACI Multi-Pod Building Control Plane
- ACI Multi-Pod Data Traffic Flow
- Multi-Pod Connectivity via External L3
- Host Tracking Subnet Check & Limit IP Learning
- Service Graph Introduction
- BD VRF & EPG Design consideration – Service Chaining
- IP Routing & VRF Design Consideration – Service Chaining
- L3Out for Routing to L4-L7 Devices
- Routed Mode ( Go-To mode ) for L4-L7 Appliance
- Transparent & One ARM mode for L4-L7 Appliance
- Policy Based Redirect in ACI
RECENT POSTS
- Installing Context-Aware Network Access Control using Cisco ISE Policies
- Designing Network Access Control that is Scalable using Cisco ISE Architecture
- Enterprise Network Access Control and Policy Enforcement using Cisco ISE
- Secure Device Administration and Network Access Using AAA Architecture
- Designing Enterprise-Class Hybrid Cloud Connectivity Using AWS Networking Services
- Exploring Core AWS Networking and Messaging Concepts for Modern Cloud Architectures
- Understanding Key AWS Services for Modern Cloud Architectures
- Building a Strong AWS Foundation with Amazon S3, EC2, and Virtual Private Cloud
- Understanding the ENSDWI Course: Advanced Cisco SD-WAN (Viptela) Concepts
- A Complete Guide to the DCACI-A Course: Mastering Advanced Cisco ACI Concepts


LEAVE A COMMENT
Please login here to comment.